

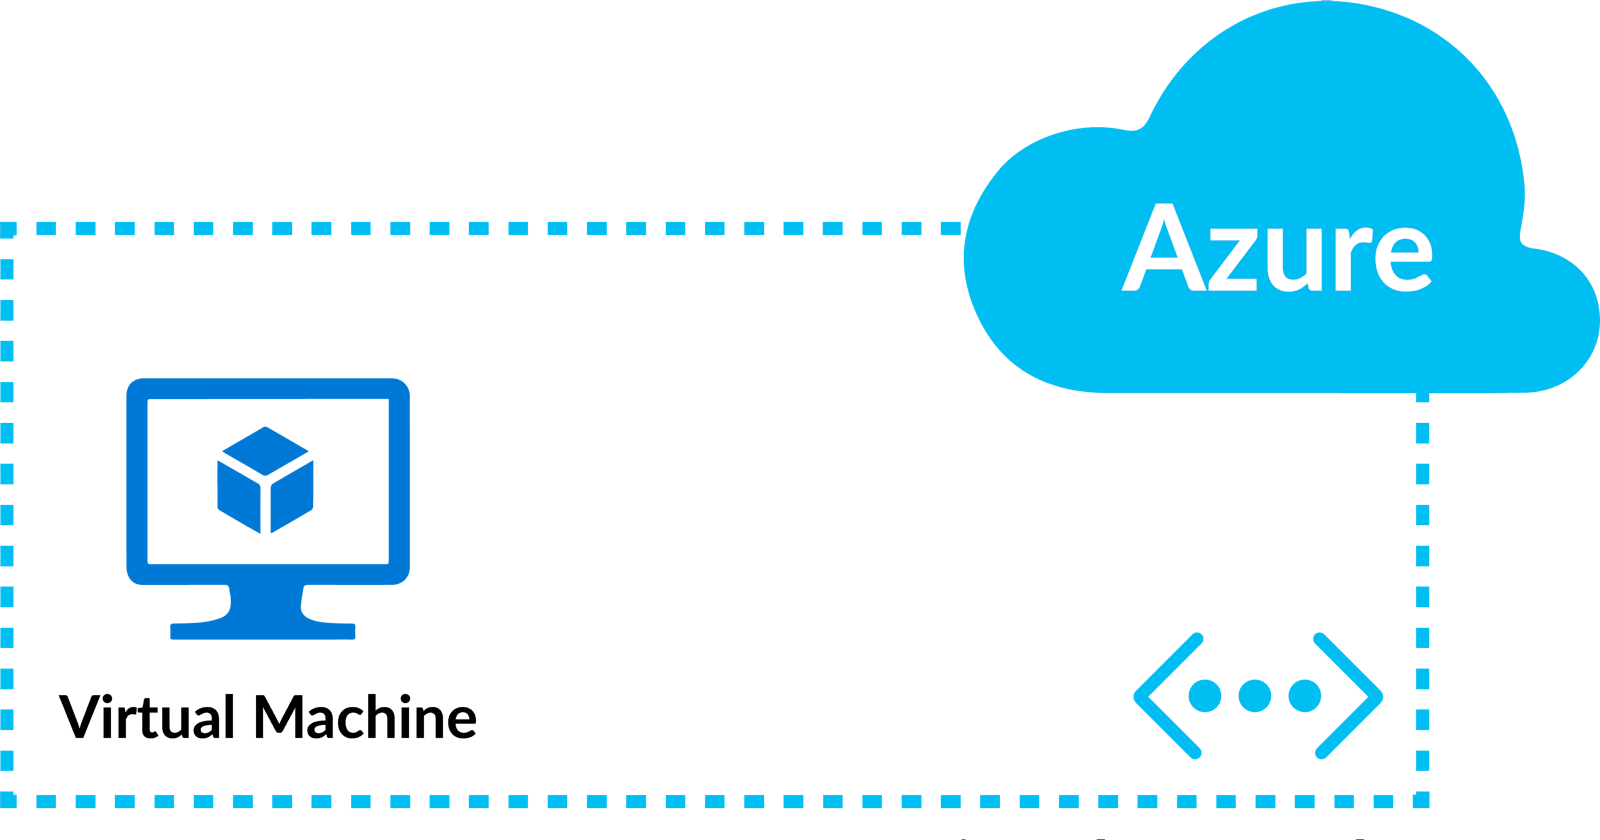


Azure Virtual Network (VNet) enables many types of Azure resources, such as Azure Virtual Machines (VM), to securely communicate with each other, the internet, and on-premises networks. VNet is similar to a traditional network in that you'd operate in your data center but brings with it additional benefits of Azure's infrastructure such as scale, availability, and isolation.
Key scenarios that you can accomplish with a virtual network include - communication of Azure resources with the internet, communication between Azure resources (we will be focusing more on this scenario), communication with on-premises resources, filtering network traffic, routing network traffic, and integration with Azure services.
Now without any further a do let's do some hands-on.
Hands-on1: Create a VNet
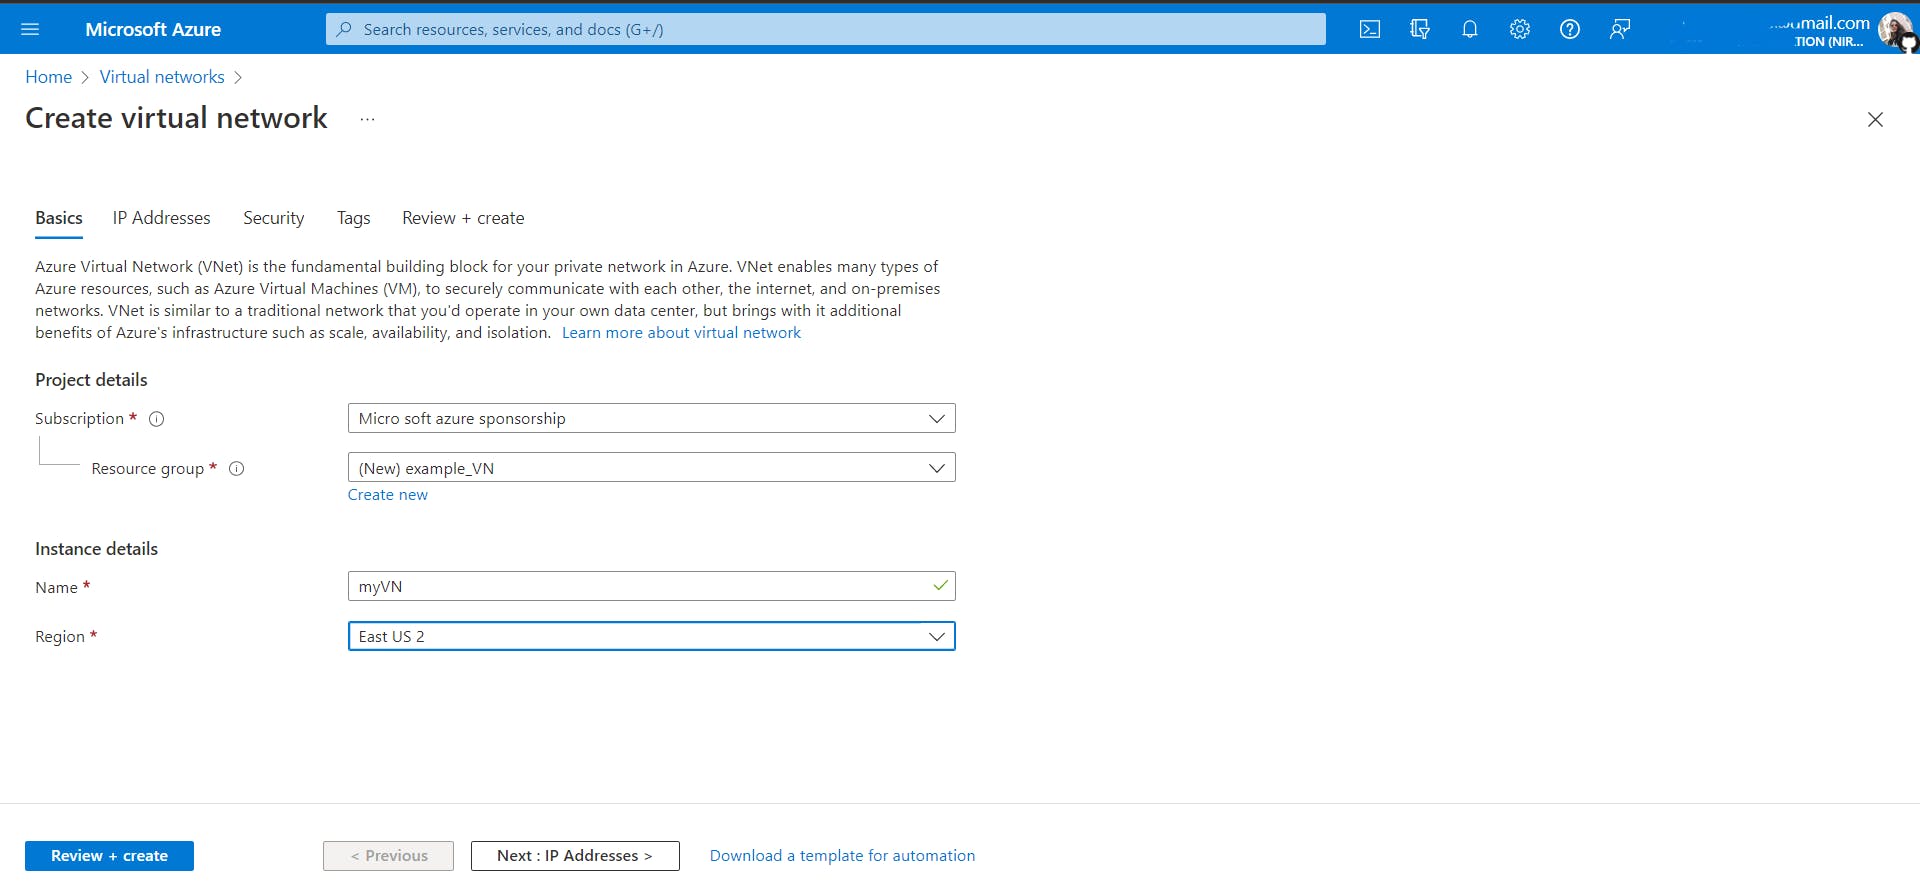
Sign into your Azure portal and search for Virtual Network and click on create. Select your subscription, and create a new resource group for this hands-on. To understand what a subscription and resource group in Azure is, visit this Get started with Microsoft Azure article. Name the VNet and select the region where you want your VNet to be deployed.
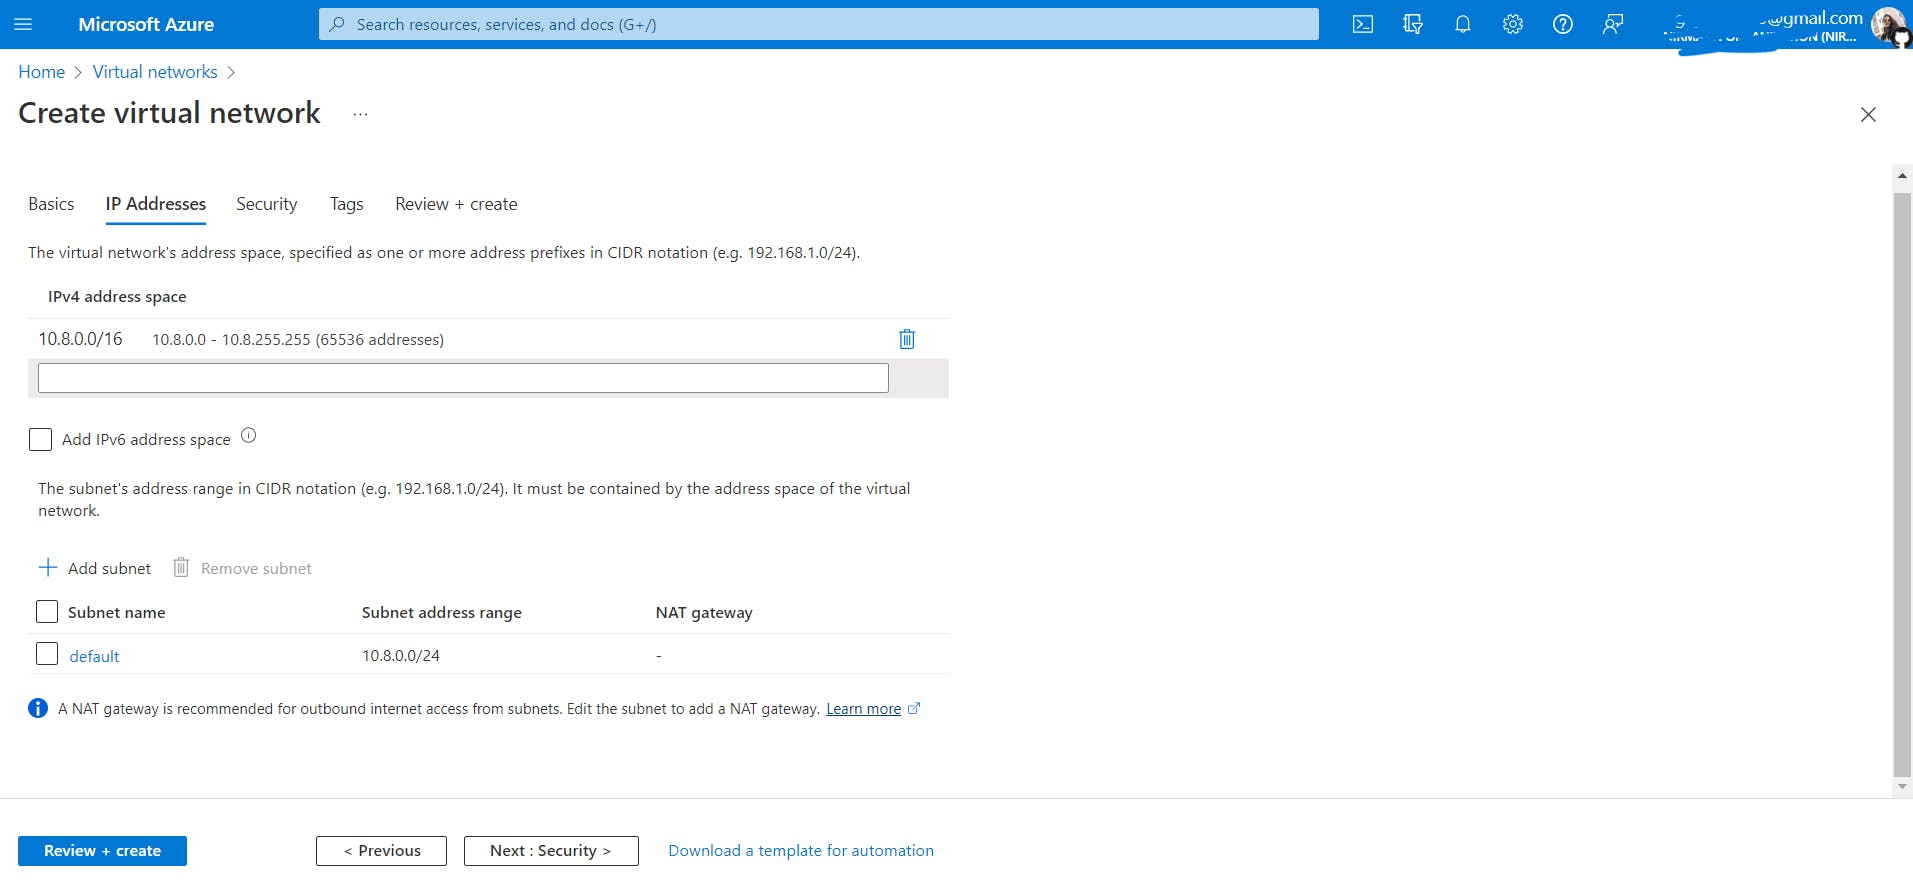
The next tab is about IP address space which will be allocated to the virtual network. By default it suggests an IP address space, you can continue with that or use another address space based on your requirements. We will go with the default one. Now the IP address space is in CIDR notation (classless inter-domain routing).
A little background about CIDR: If you know of Classful addressing in computer networks, we have classes like class A, class B, C, D and E. Each class has a predefined address space. I would like to provide this Networking in the Real world to clear things up.
But there is a problem with Classful Addressing which is that in today's world, we have zillions of devices and more coming eventually someday all the addresses will be consumed and there will be no left for further use, which is why CIDR was introduced. Also in Classful Addressing even if you want to buy a network for let's say 100 computers you have to buy class C IP address space (again you need to understand classful addressing if you want to understand this thoroughly) which provides 256 addresses so basically 156 goes waste in some cases. But of course, you can do variable subnetting and provide the remaining addresses to someone in need as a solution. The initial goal of CIDR was to decrease the rapid exhaustion of IPv4 addresses.
Now coming back here!
10.8.0.0/16: The prefix 16 here means that the first 16 bits will represent the network id and the remaining 26 bits will represent the host id. There is a total of 32 bits as it is an IPv4 address space. Meaning the first two octets (10.8.) will remain as it is because it is network id and the last two octets (0.0) will have all the binary combinations and will become (255.255). That's how there will be 65536 addresses. Simply put if we have 16 bits to generate host ids so basically, 2^16 will be 65536. So you are creating a virtual network with 65536 addresses to allocate.
But what if I don't need this many addresses? I just need 256 addresses because of small business or it may be a startup. In that case, change the prefix as shown.
10.8.0.0/24: Here the first three octets will represent the network id and the remaining 8 bits(last octet) will represent hosts. So 2^8 = 256 addresses.
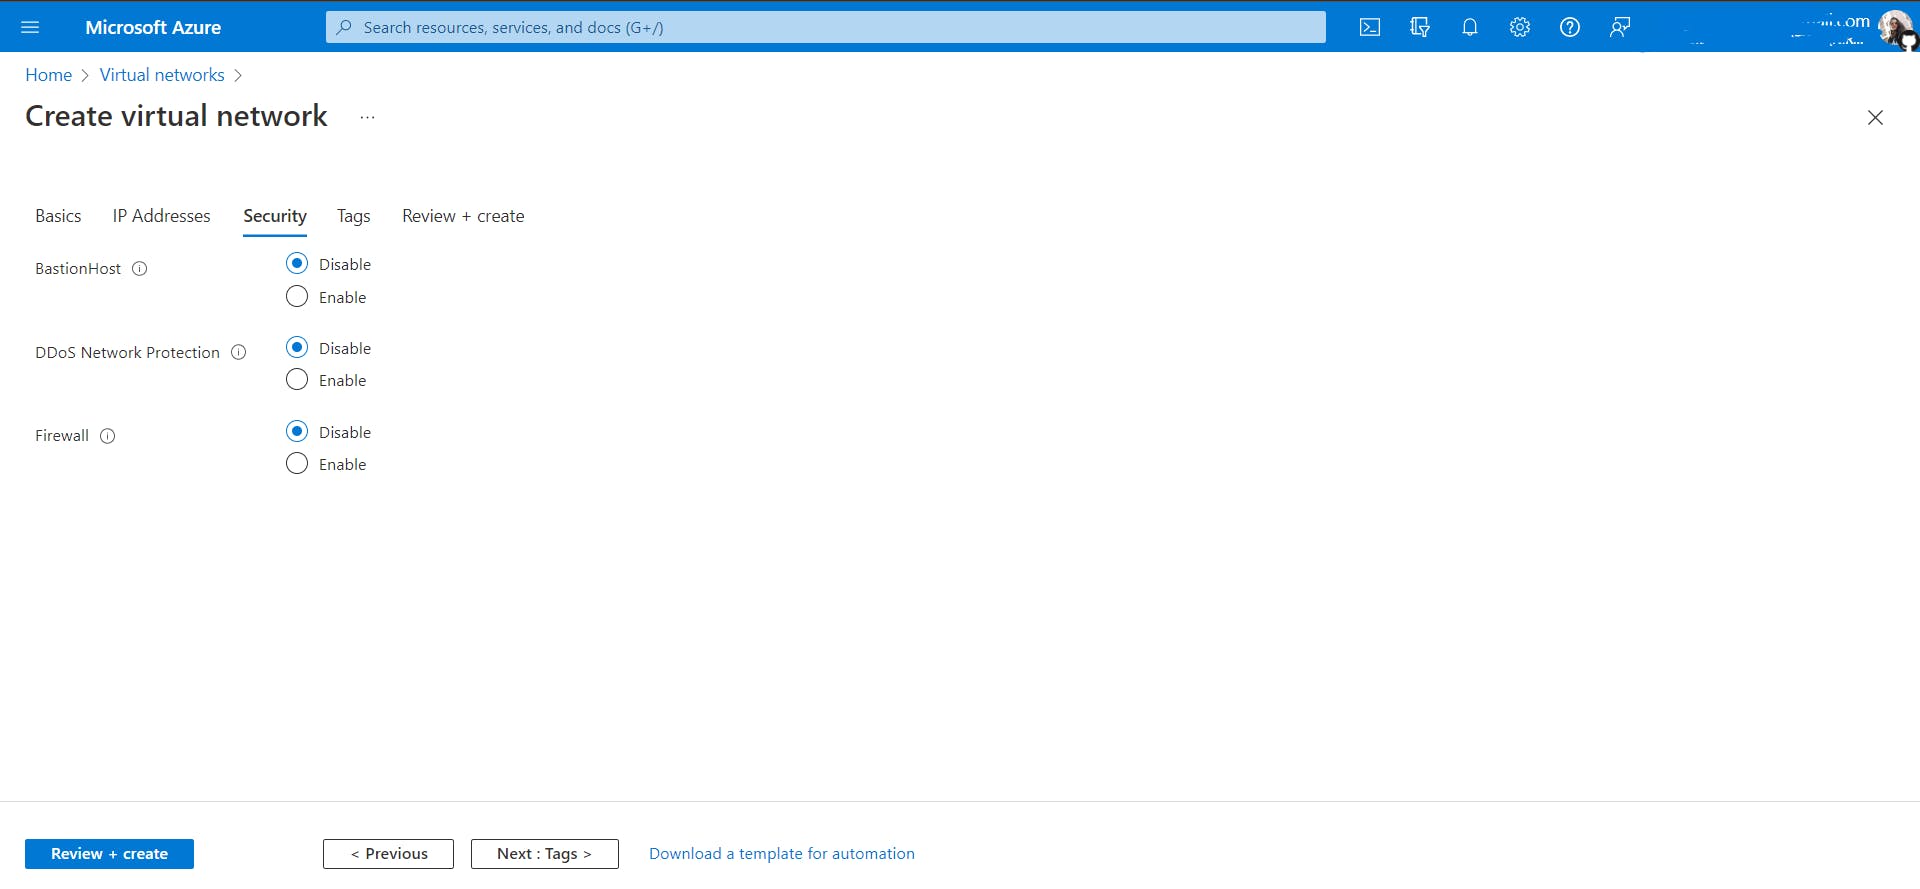
The Next tab is Security.
BastionHost: If a guest user (who can be an employee of some other organization) wants to access a private VM then he can communicate with that VM using bastion host so that the private IP address could not be known. Now read this. The bastion hosts provide secure access to Linux instances located in the private and public subnets of your virtual private cloud (VPC). If you enable bastion host then any hosts/resources in your network will be accessed through it.
DDoS (Distributed Denial of Service): If you want to prevent such an attack enable otherwise don't.
Firewall: It will filter all the incoming and outgoing traffic from and to your Vnet.
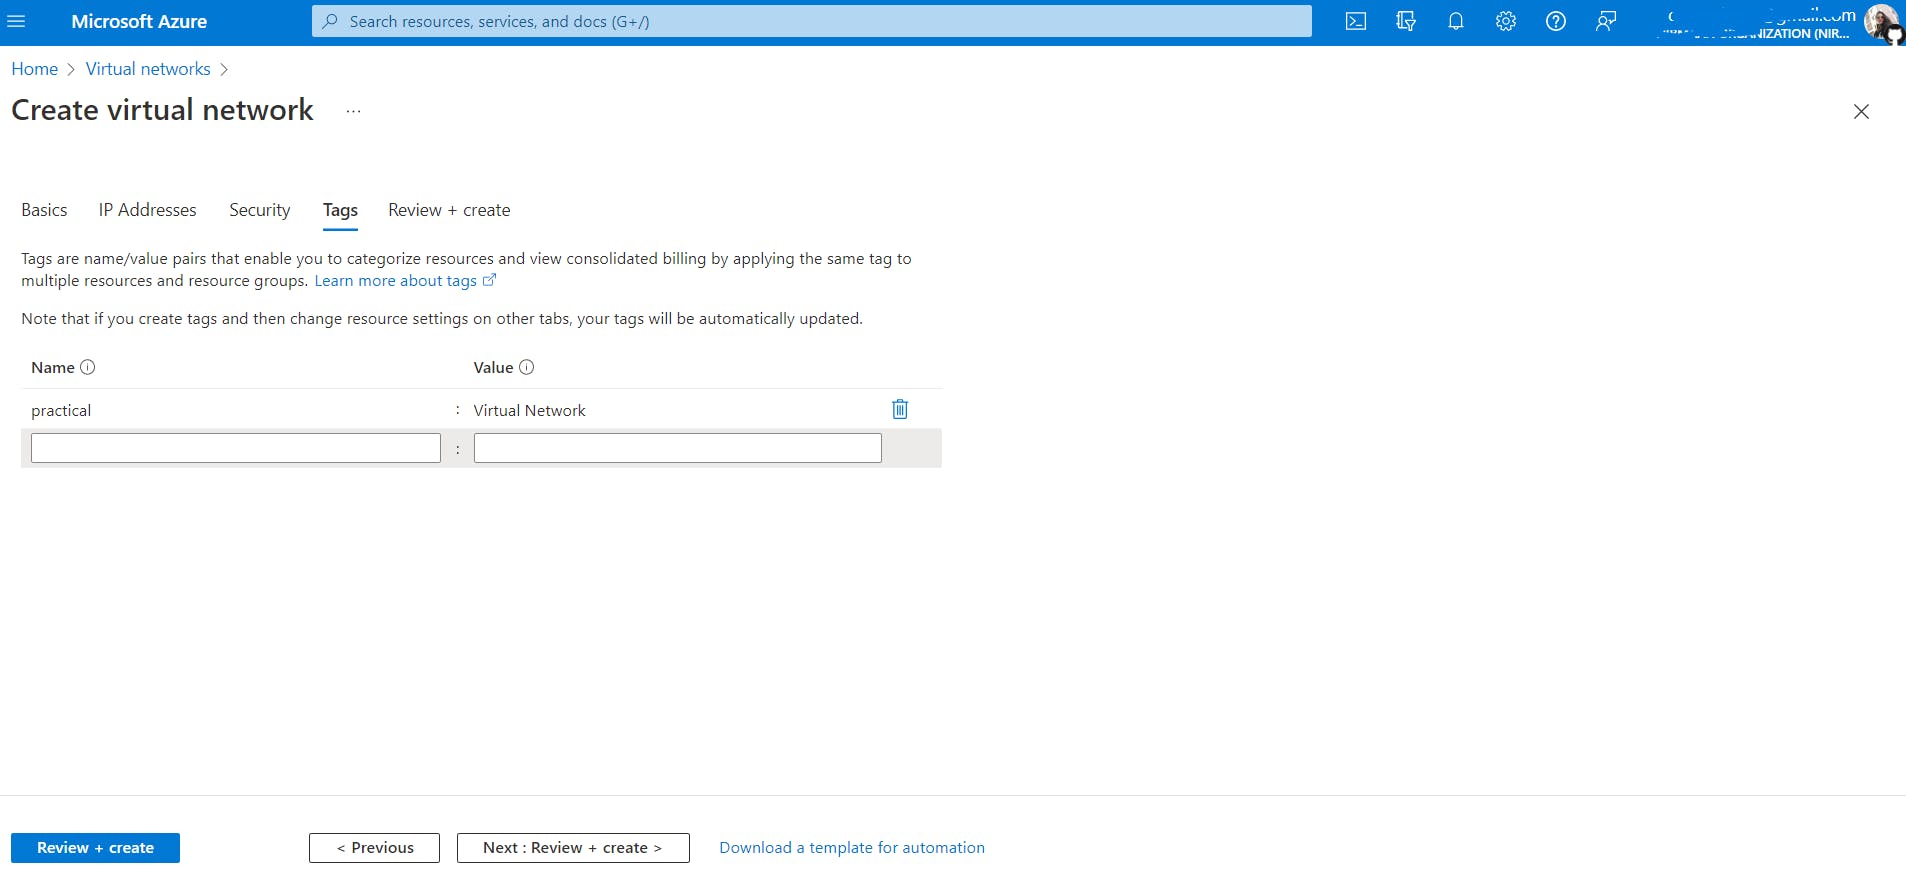
The Next tab is Tags. Think of it as key-value pair to label or to keep track of azure services you create in large projects. You can apply the same tag to multiple resources under one resource group. Suppose I create 15 VMs for the Marketing department then I will tag them as Marketing: VMs, to understand their purpose.
Click on Review + create

In azure, before creating any resource, the Azure Resource Manager checks if the resource is created by an authorized person and that is what it means when it says running final validation.
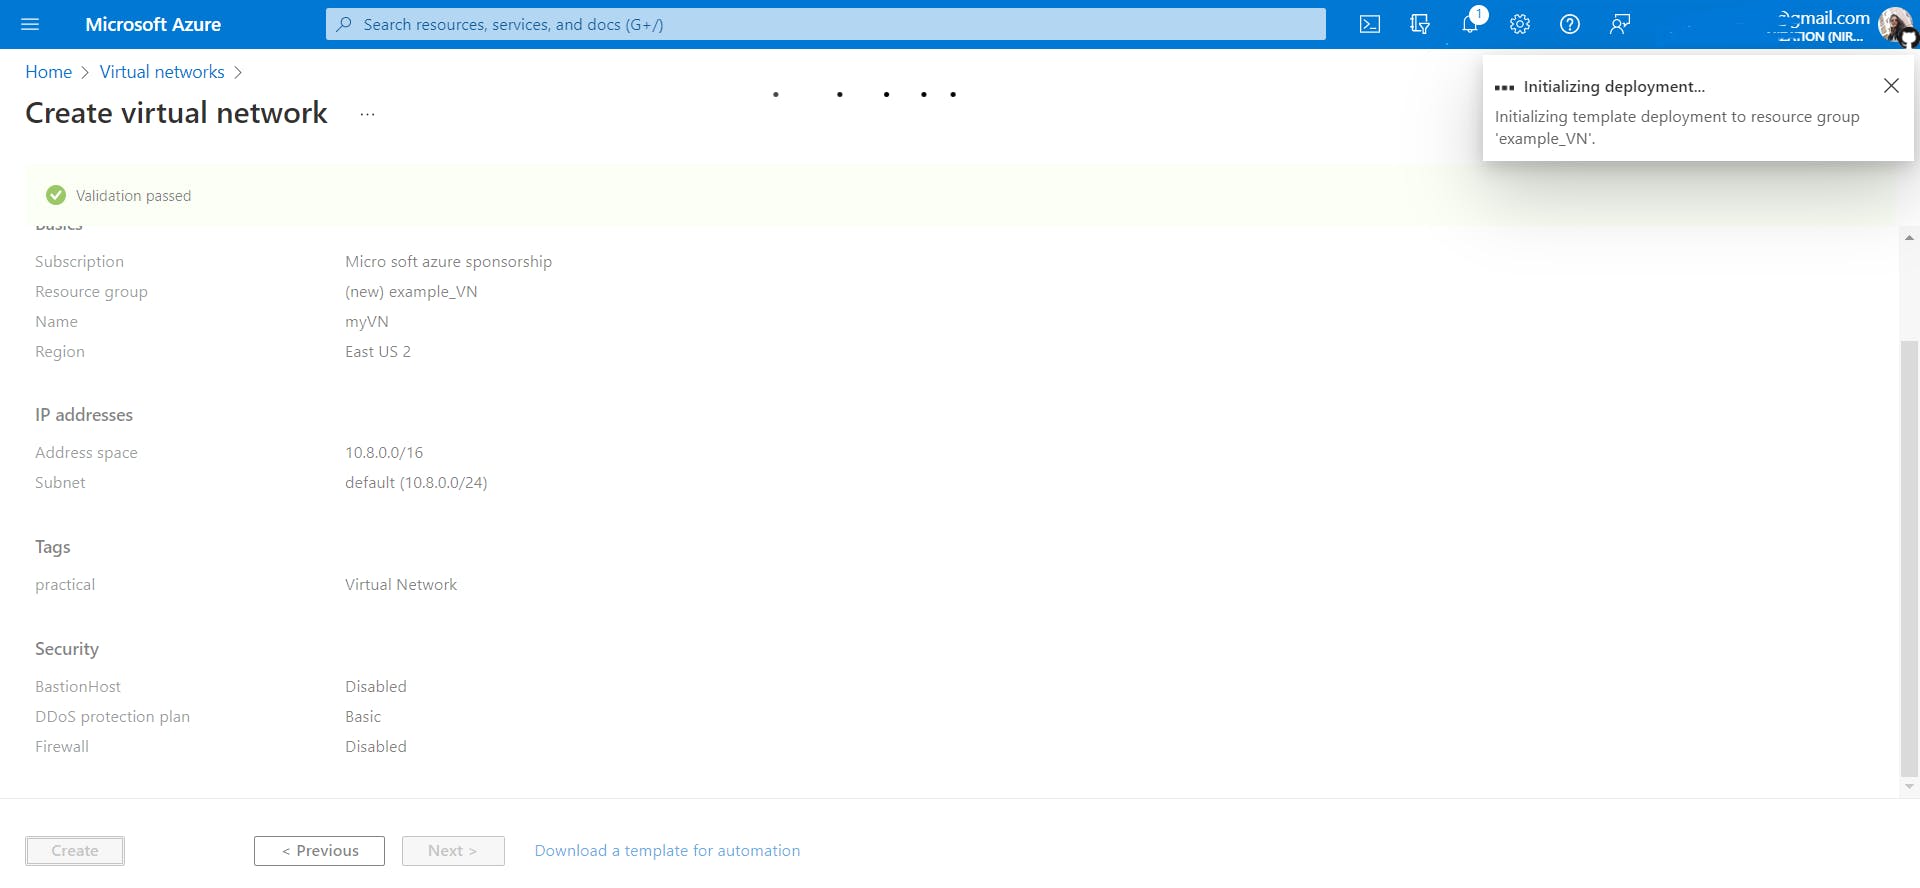
After the validation is passed, Azure will start deploying the resource and after a few minutes the resource in our case, VNet will be created and ready to use.
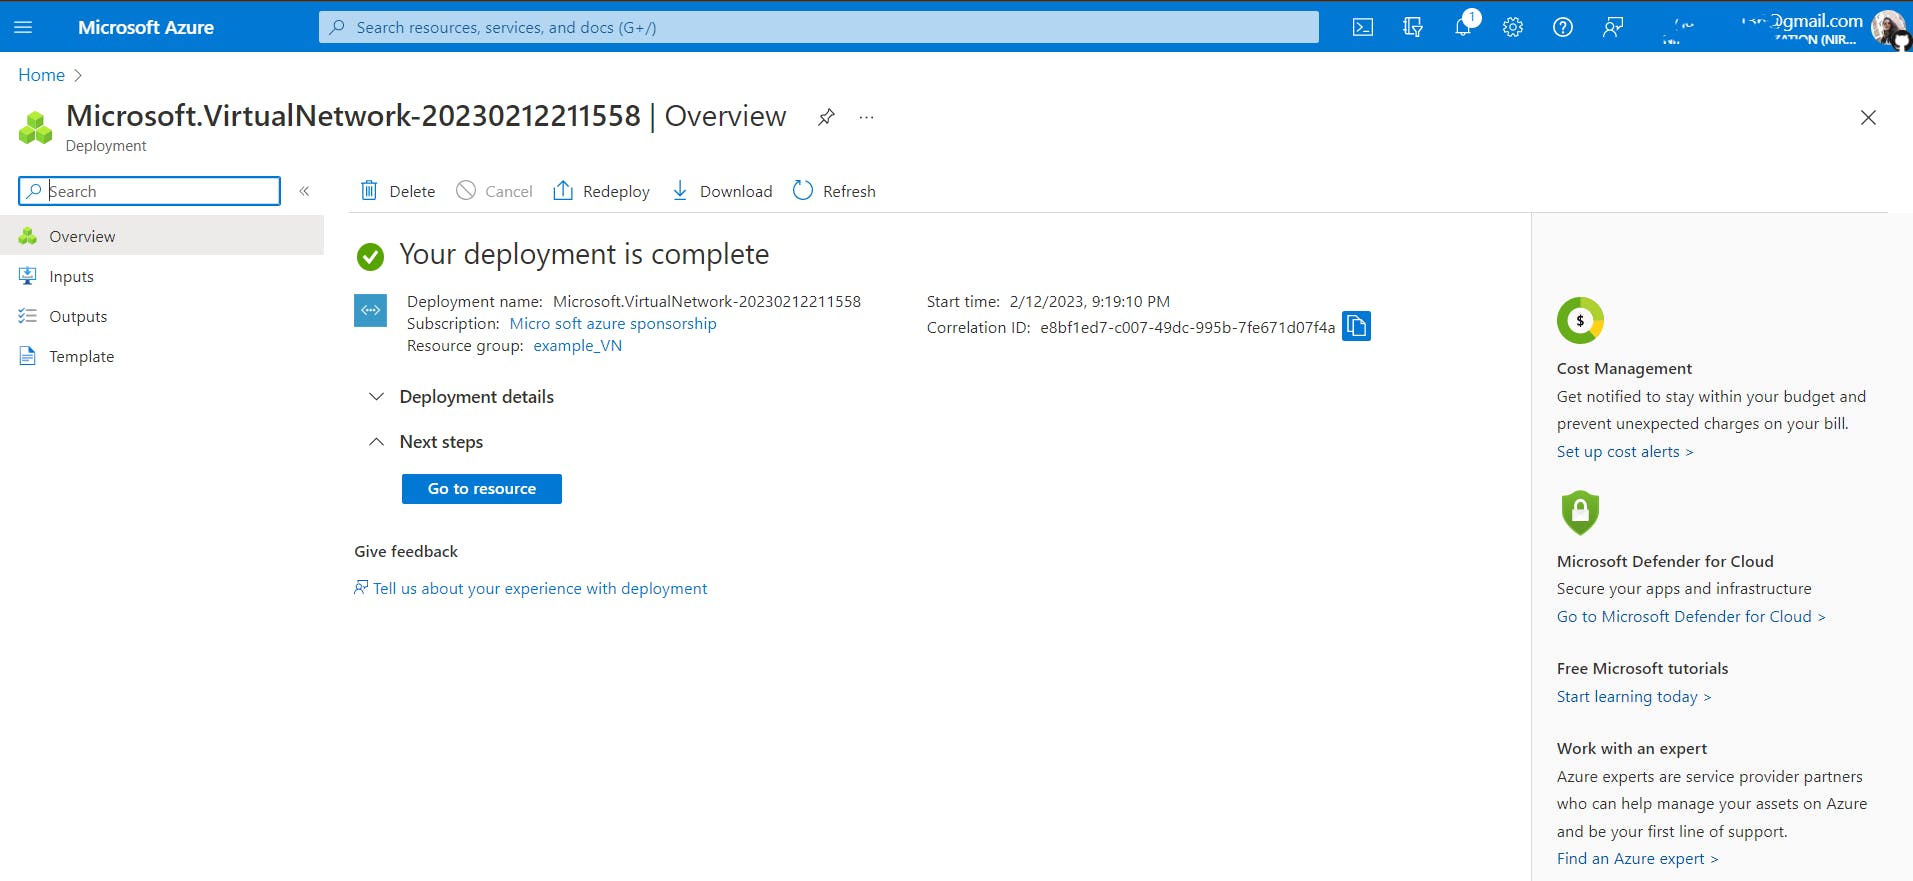
So that's how you create a VNet and then you can create resources in your VNet, we will be creating a VM in the next hands-on.
Also Read: Introduction to Cloud Computing Fundamentals
Creating Subnets inside the VNet
Another important thing is subnets. Before doing this, you need to understand subnetting, what it is, its need and how it works. I would like to explain it quickly though.
Subnetting is the process of dividing a network into a required number of sub-networks. Each subnet can be used for a different purpose. For example, an organization can have multiple departments, we can divide the network the organization uses into subnets. While creating a VNet you can divide the network into a required number of subnetworks.
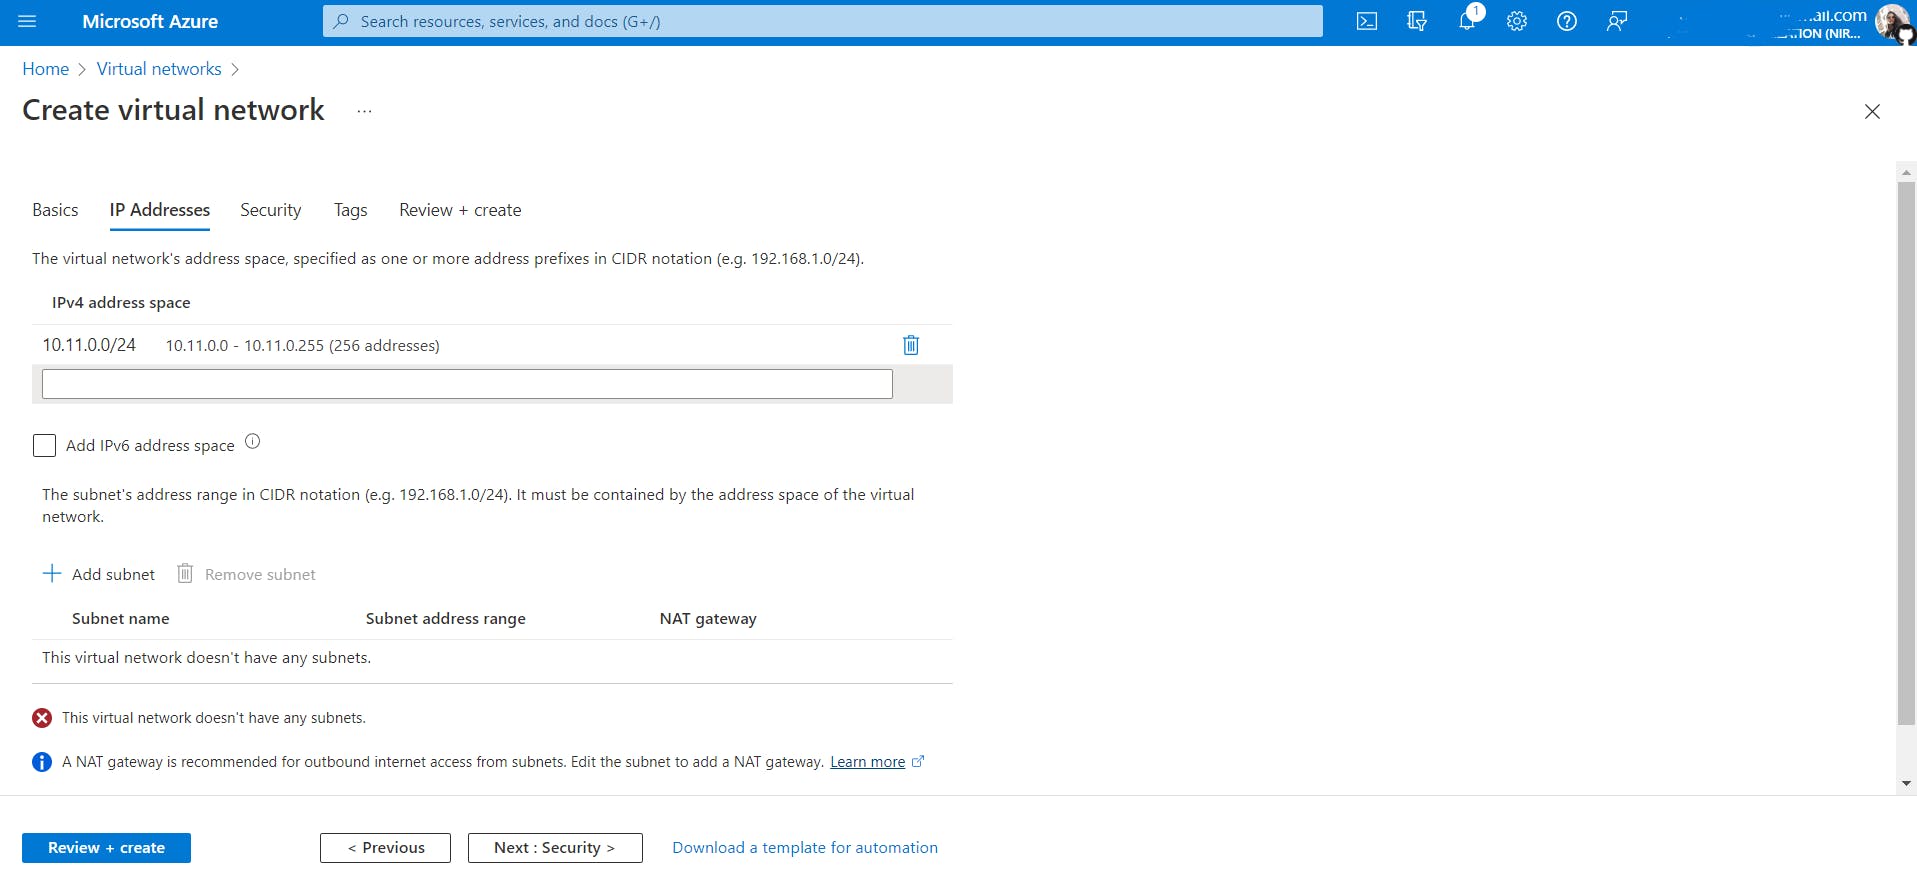
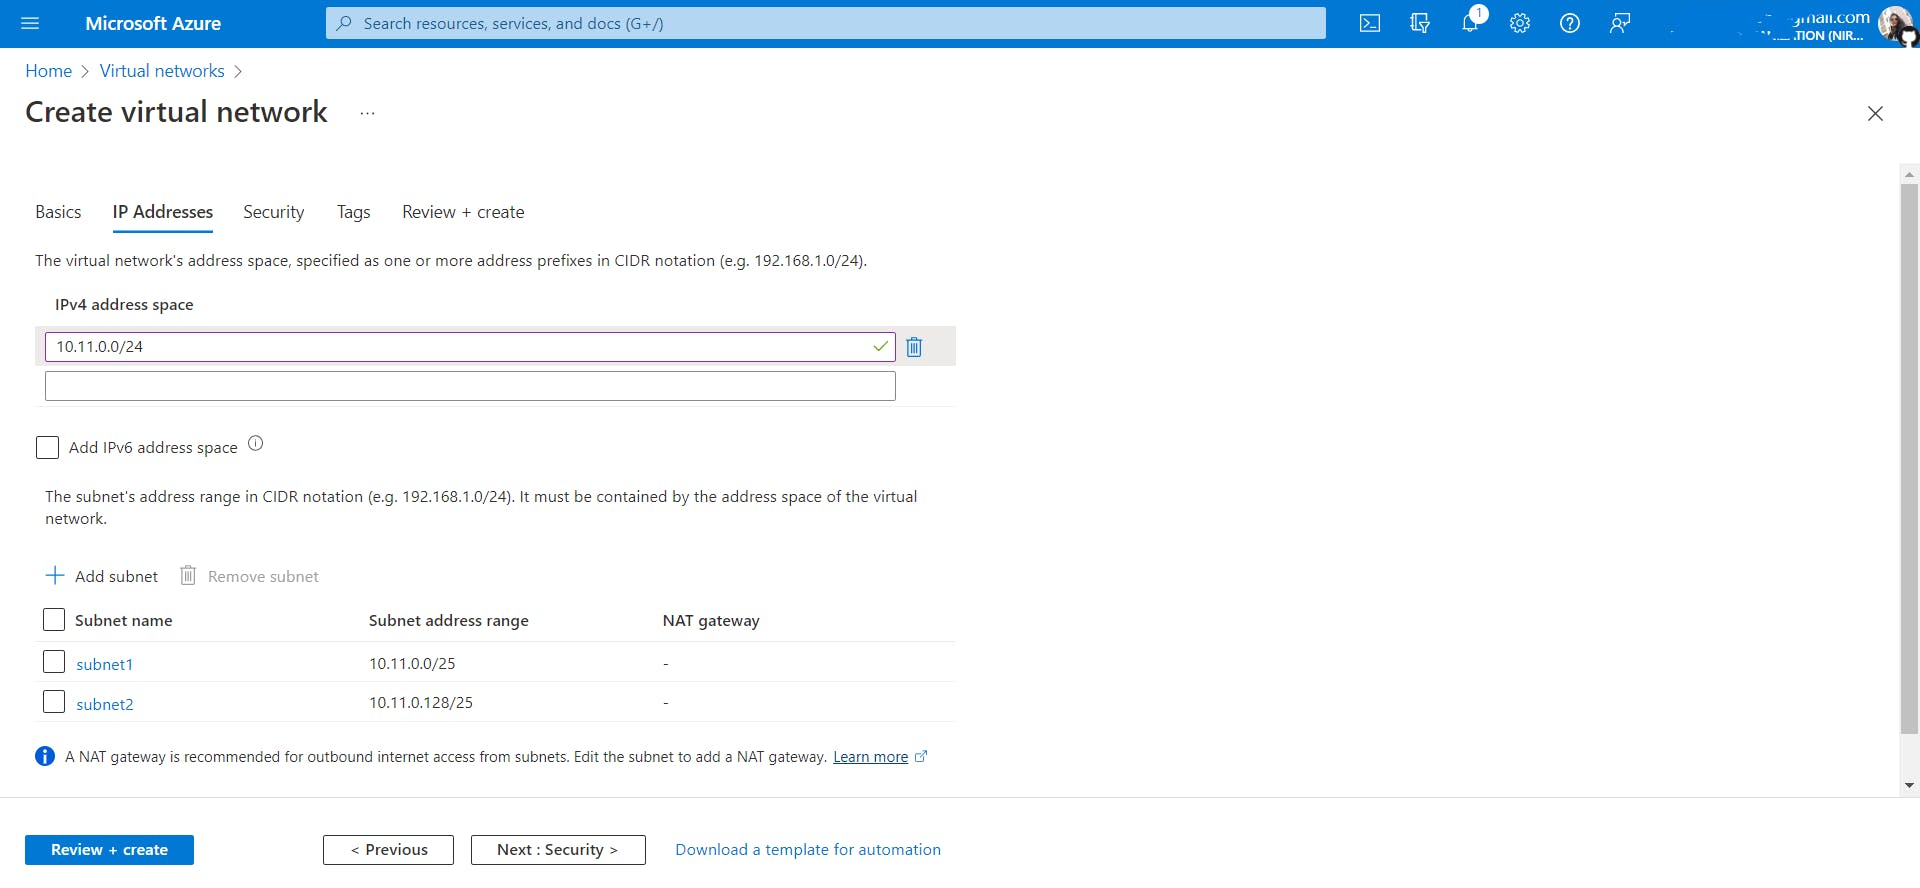
Let's divide this VNet IP address space 10.11.0.0/24 into 2 subnets.
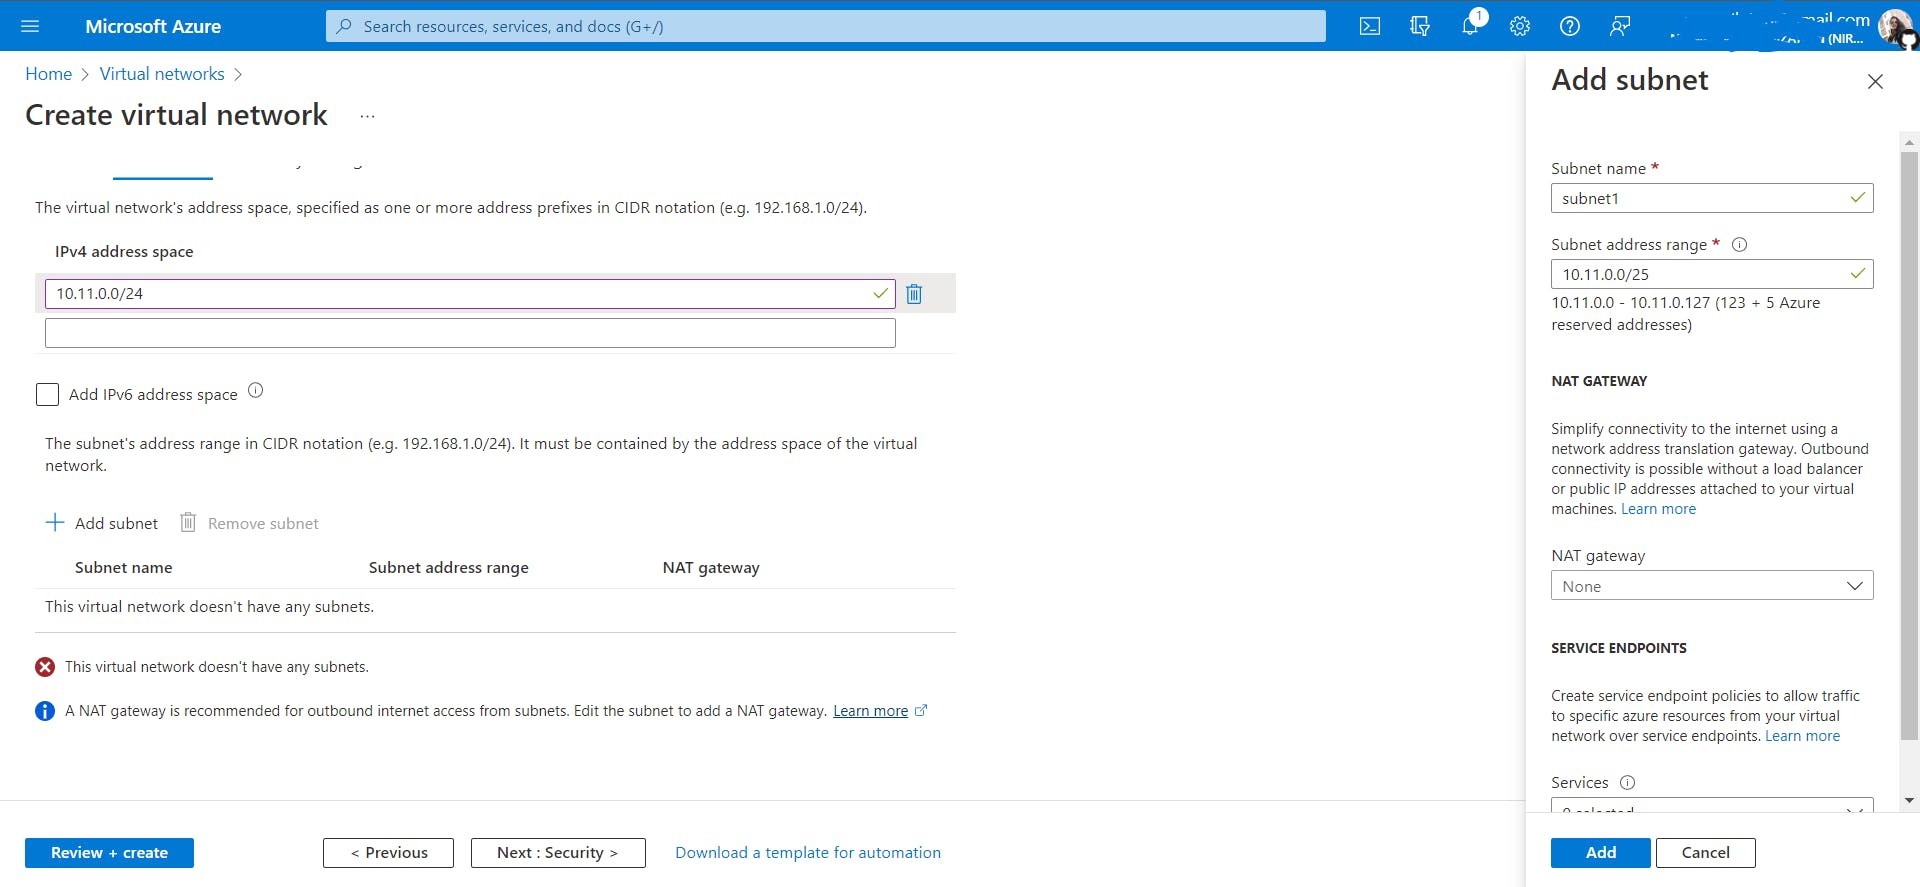
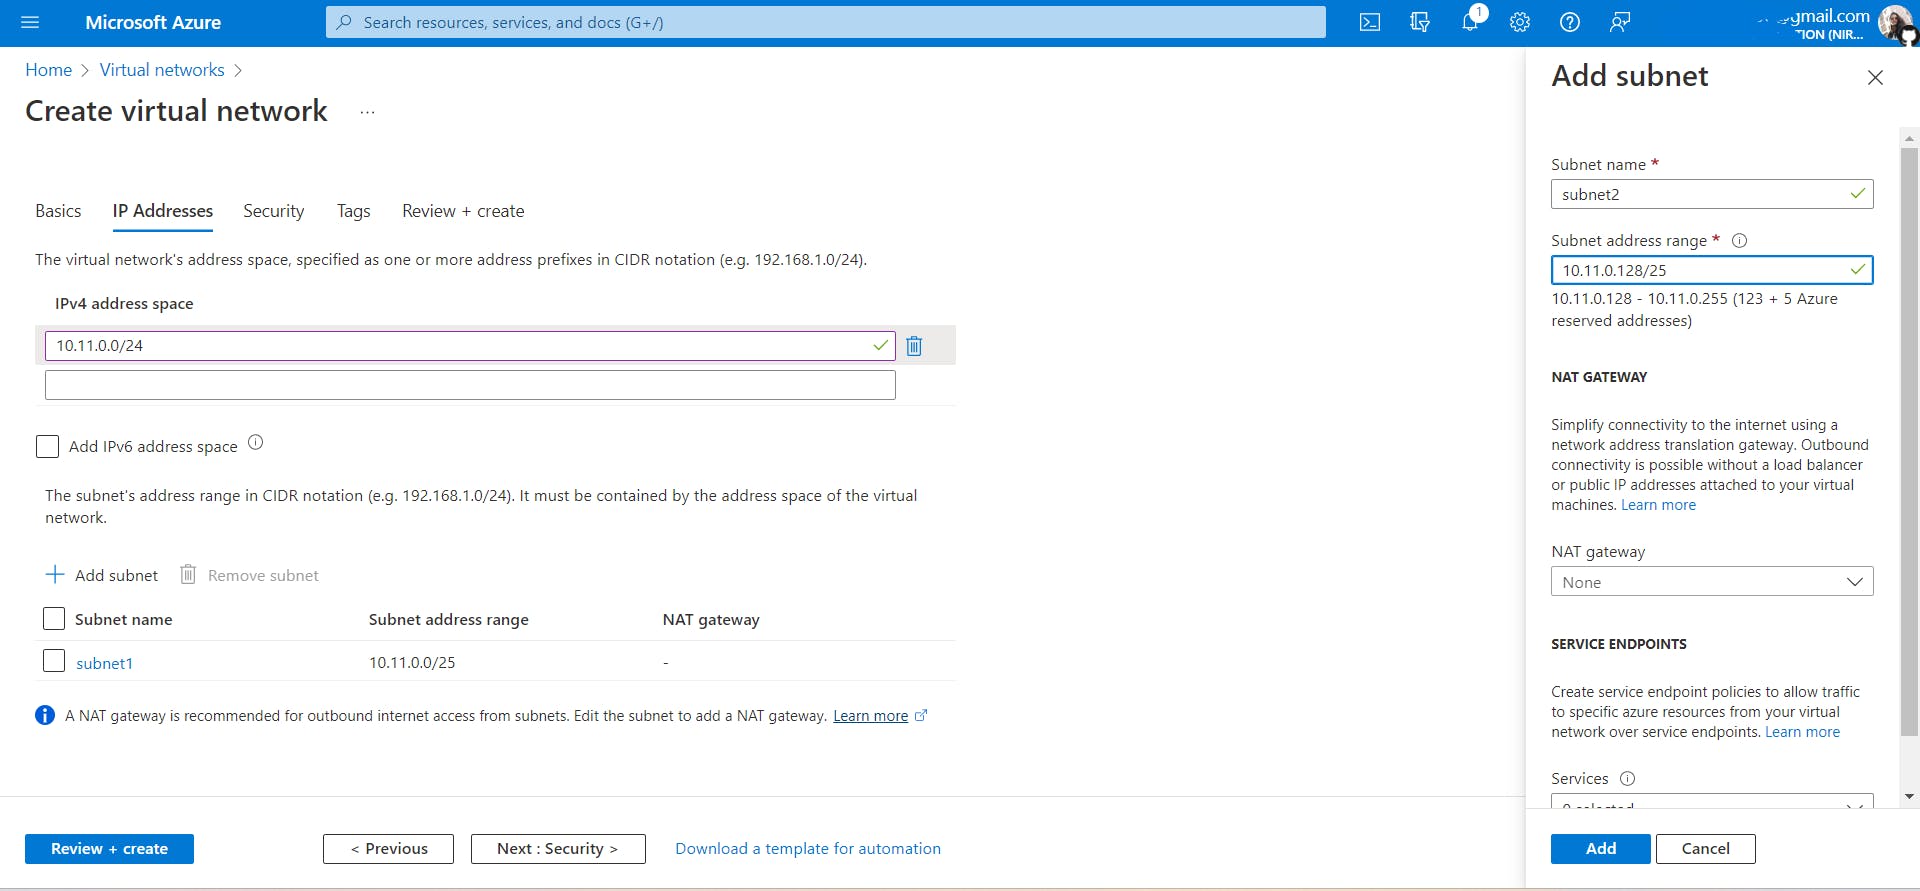
You must be wondering why /25, 128 ???
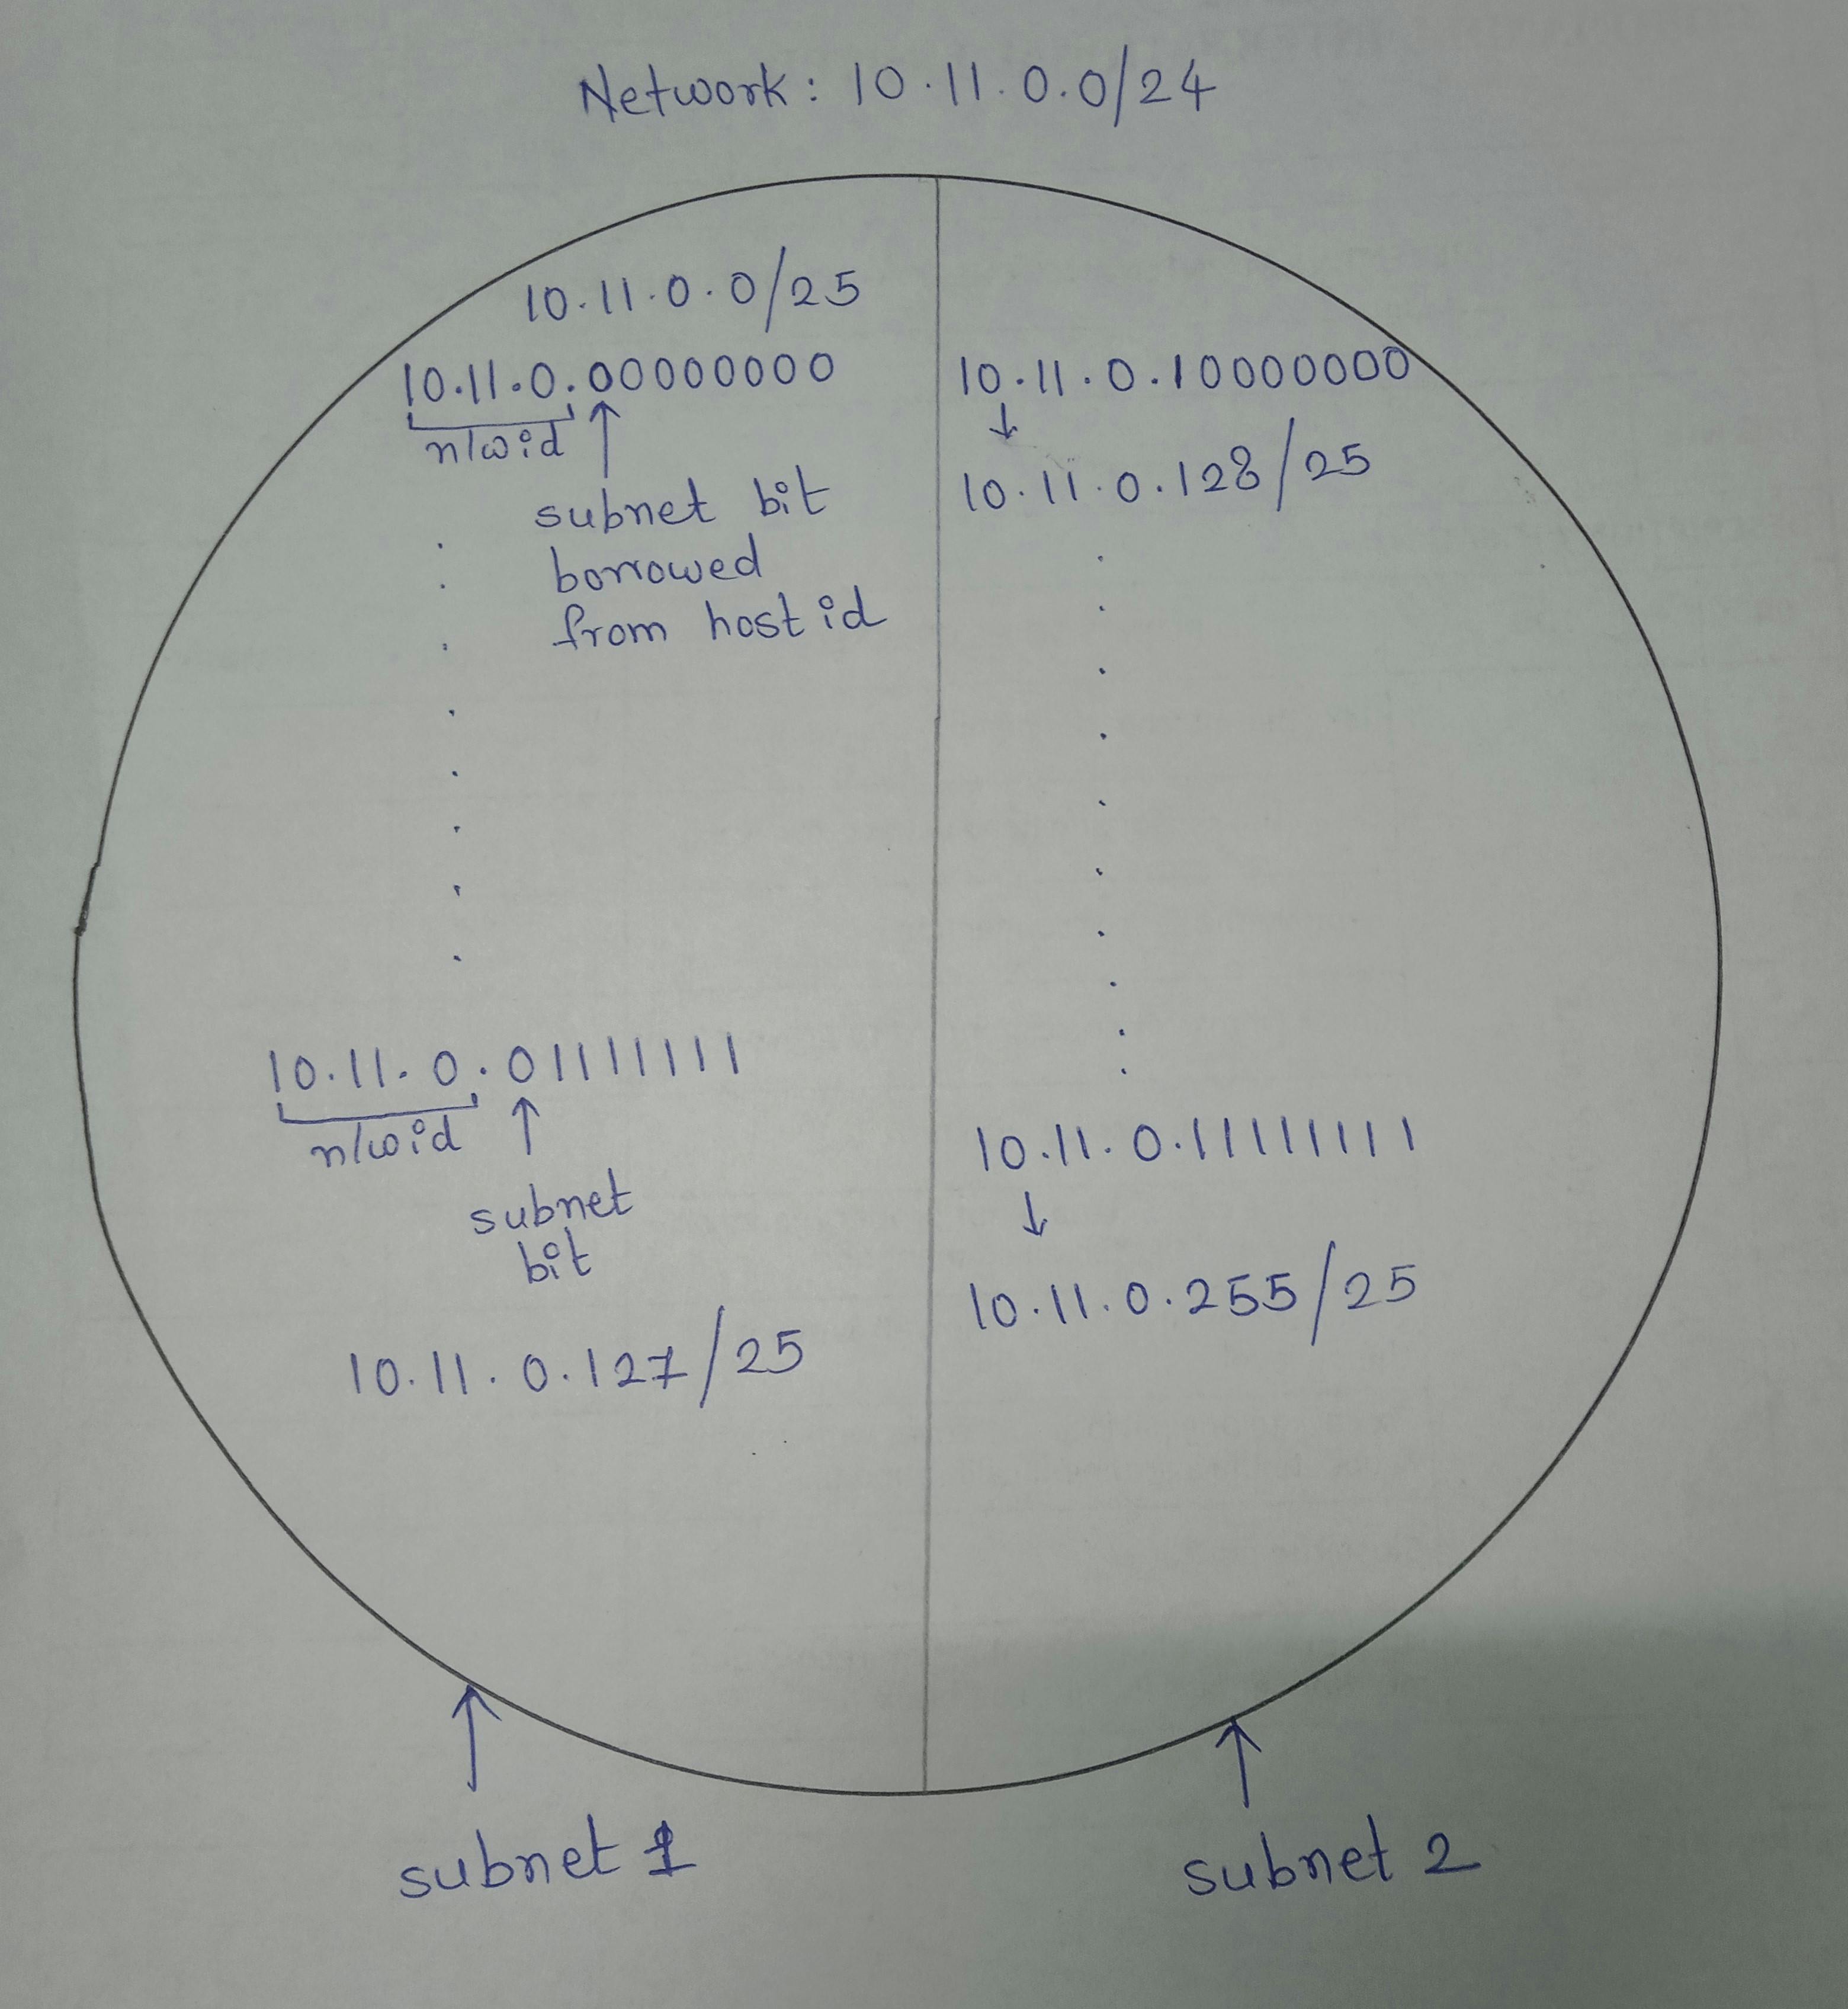
Take a look at the image shown above.
Firstly, while subnetting we always borrow bits from the host id part. Here as I wanted to divide this network into two subnets. I borrowed just one bit which is enough to create two subnets 0 and 1. In addition, If I wanted to create four subnets then I had to borrow two bits from the host id which gives me four combinations 00,01,10,11.
Secondly why /25? Because the first 24 bits represent network id and as we borrowed one bit from host id, network id (24) + subnet id(1) =25. So overall the first 25 bits represent the subnet.
Thirdly, don't touch network id bits, use host id bits to create a subnet.
Finally, the range of subnet1 is 10.11.0.0/25 to 10.11.0/127 and subnet2 is 10.11.0.128/25 to 10.11.0.255/25.
Do try to create a VNet with subnets inside it.
In this hands-on, we have just created an empty virtual network, in the sense, we don't have any resources in this VNet. You can start by creating a VM inside this Vnet. Start by creating a VM. I will try to not elaborate as the focus of this article is on VNet. There will be a dedicated article on Azure VM. As of now you can follow the images and try to understand stuff.
Create VM

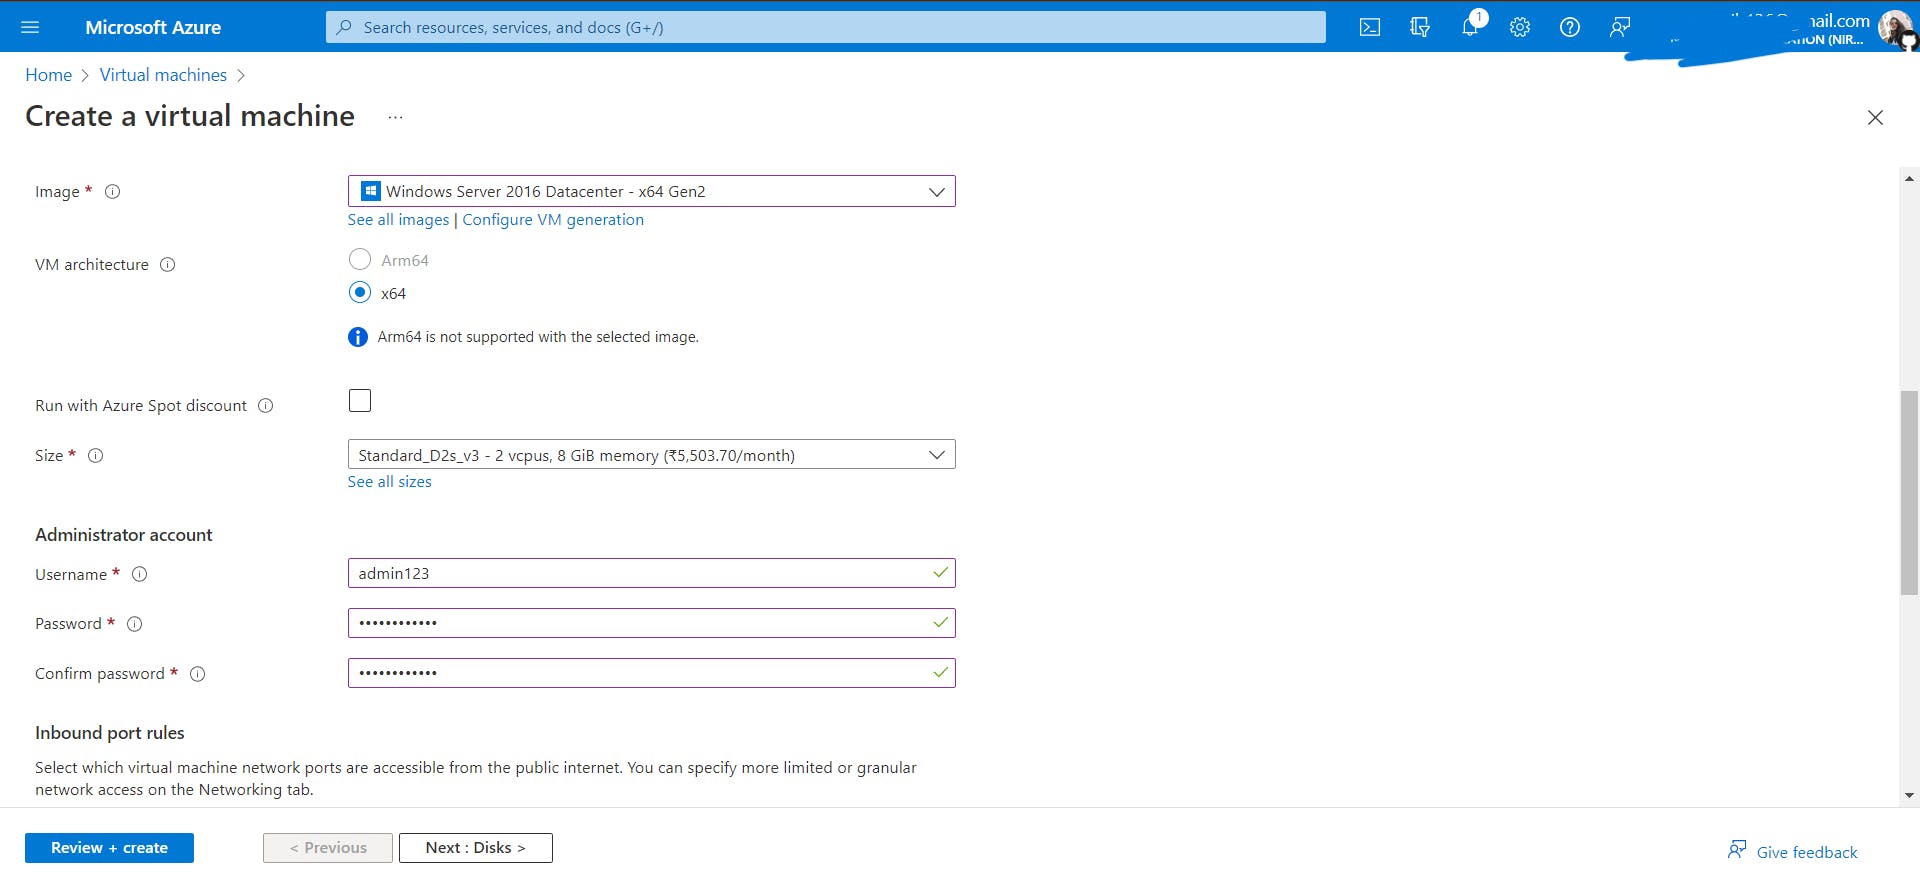
I would suggest using the same credentials (username and password) for all VMs so that you remember them.
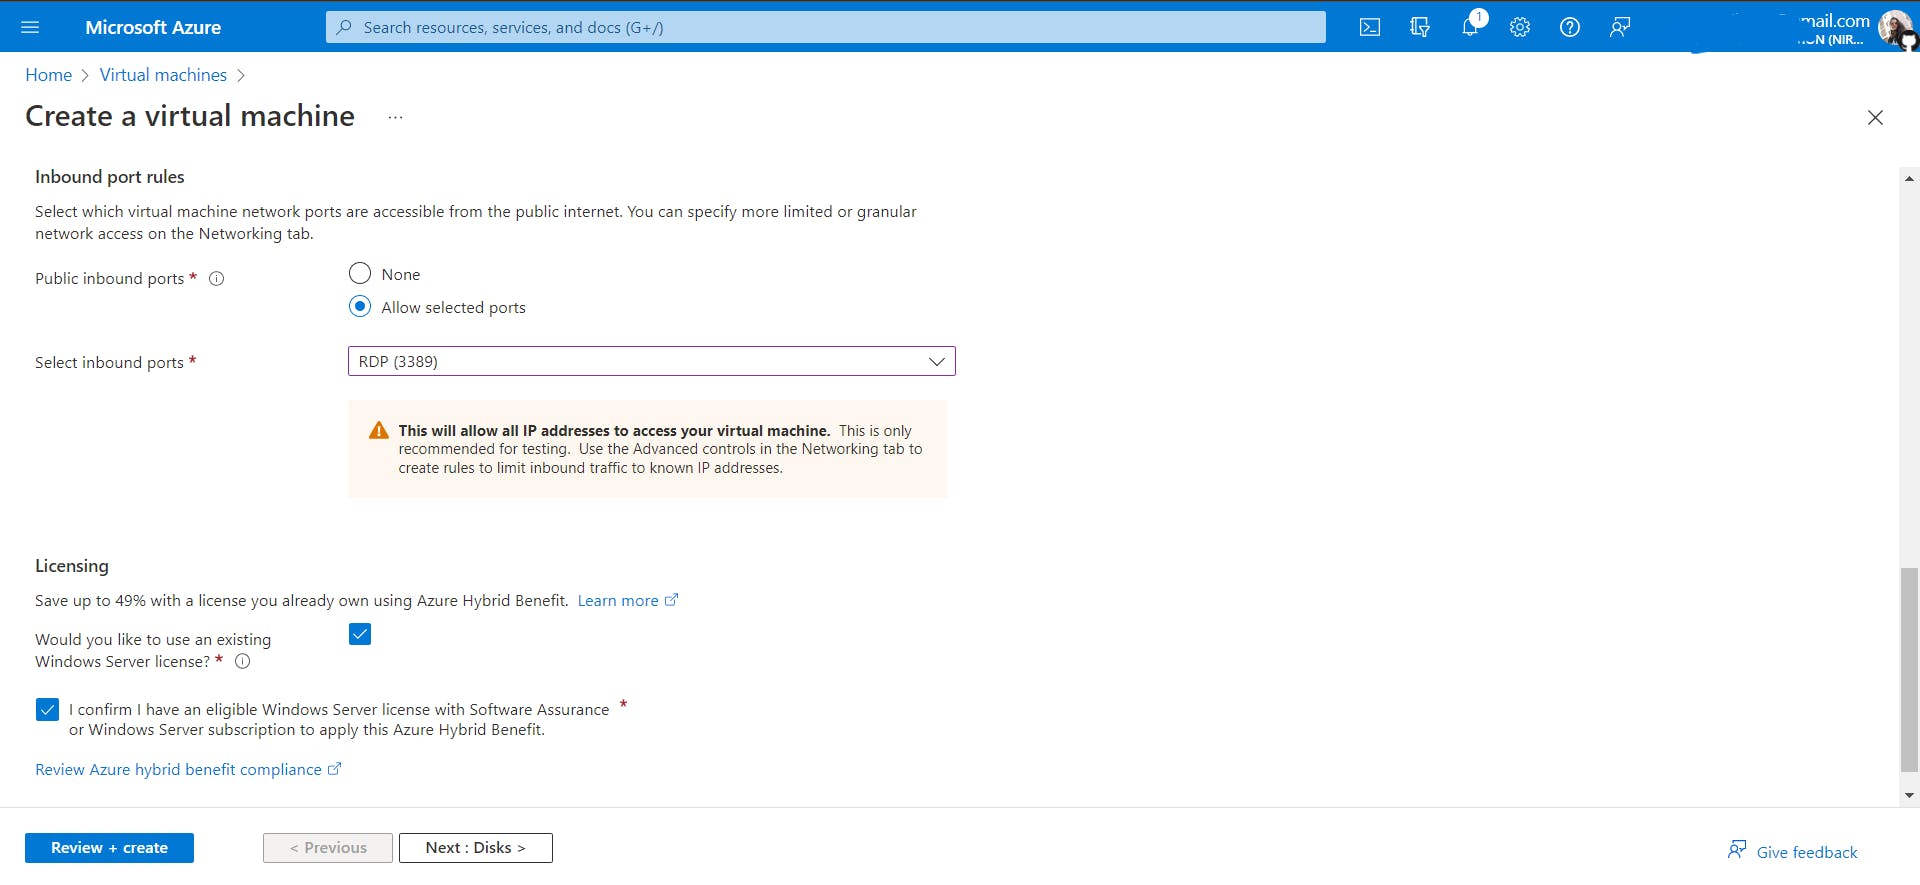
Skip the Disks tab, and keep all configurations default. We don't have to dig in there right now. Go to the Networking tab.
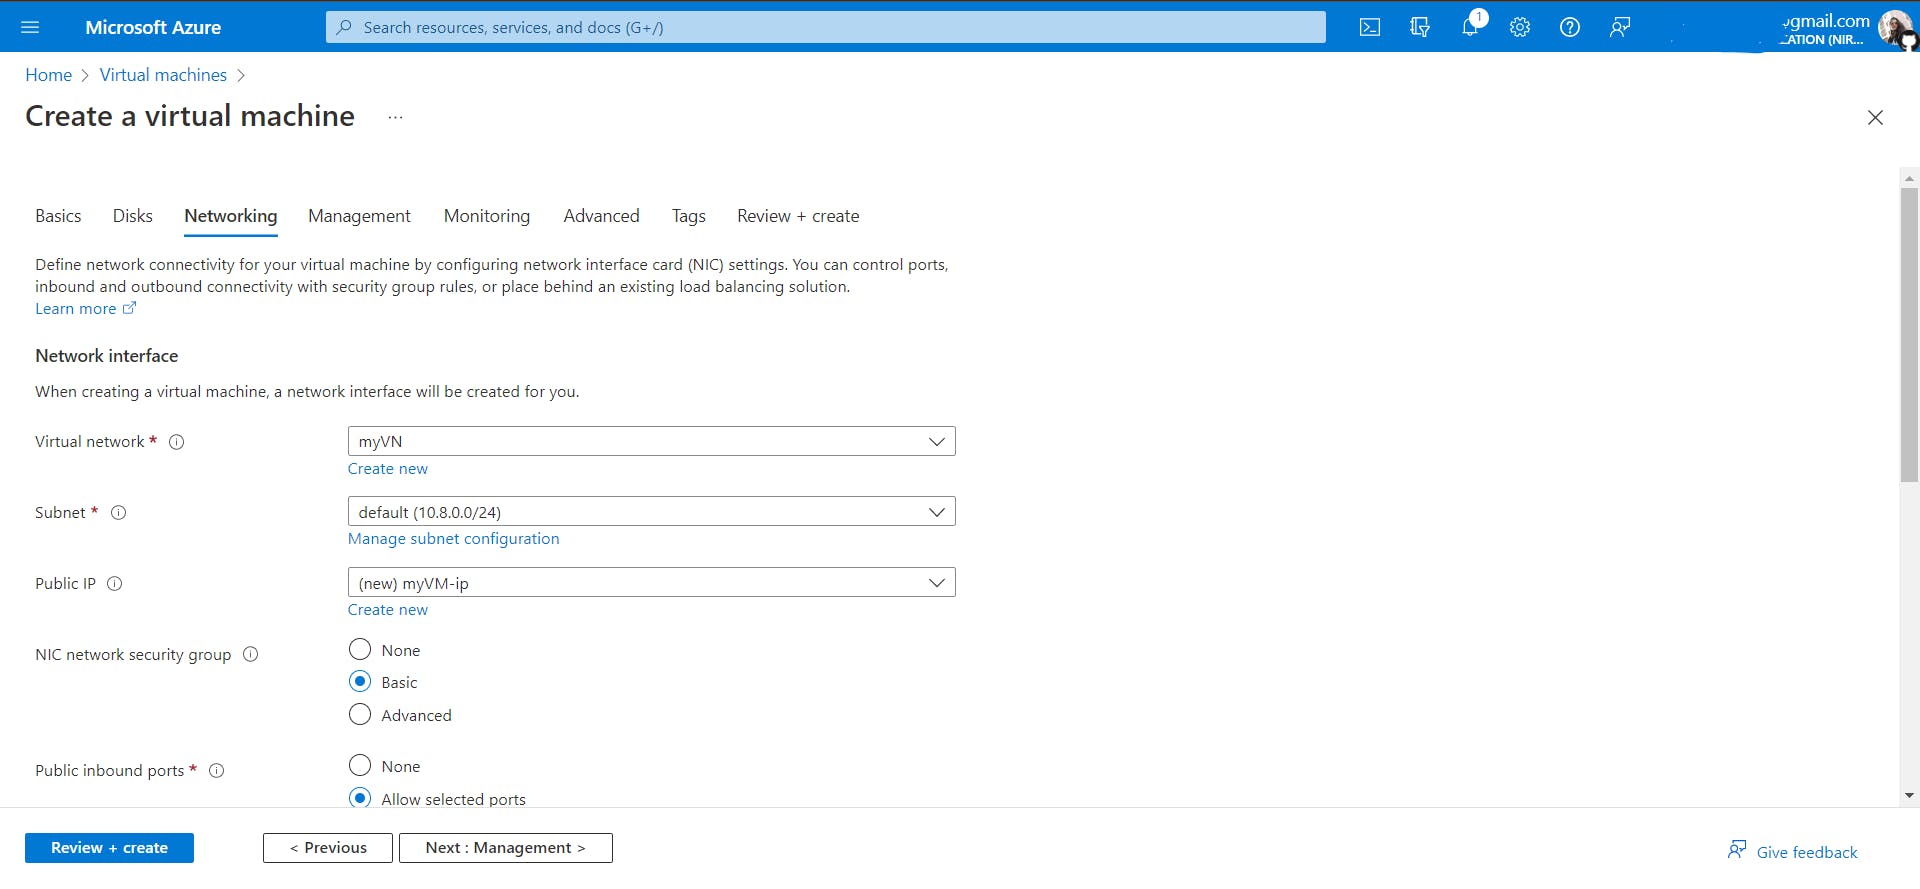
Select the Vnet, where you want your VM to be. In my case it's myVN. Keep the rest of the things and tabs as it is and create this VM. Now you can access this VM by following the steps specified in Hands-on2, so hang on.
Hands-on2: Create a VNet with two VMs inside it and communicate them with each other.
Create a VNet.
Create two VMs.
Go to the Overview tab of both VMs and download the RDP files for both VMs.
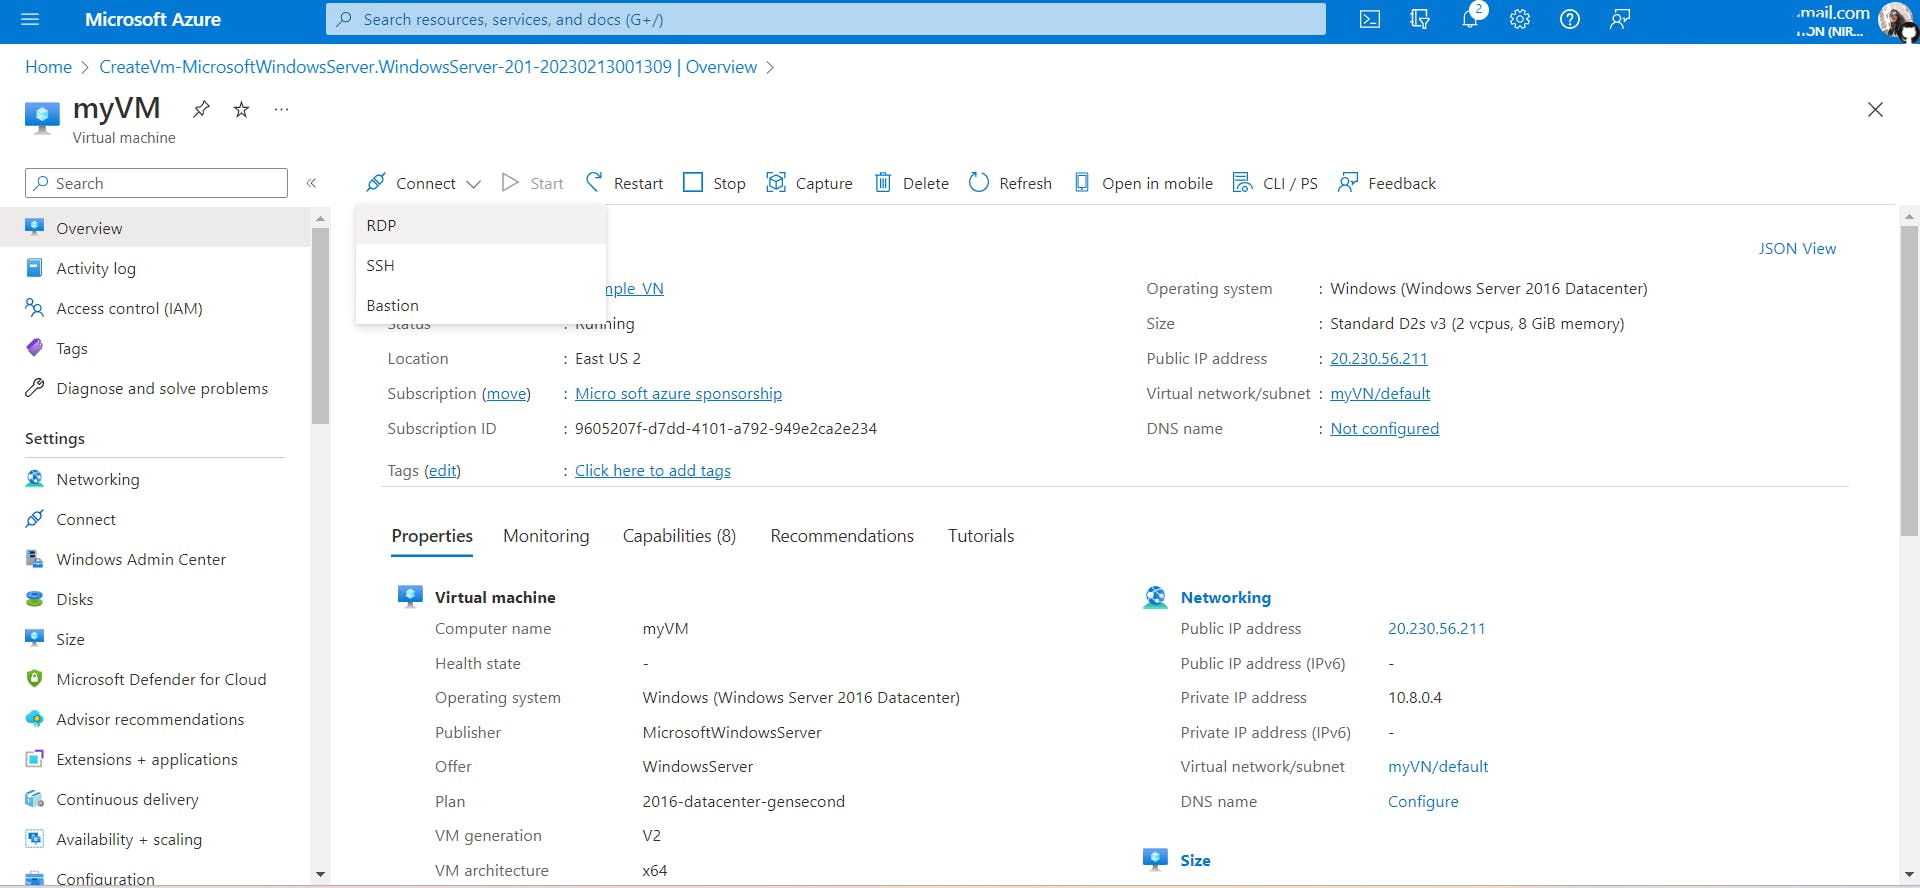
Steps to connect to a VM using RDP (Remote Desktop protocol):
RDP (Remote Desktop Protocol): Remote Desktop Protocol is a proprietary protocol developed by Microsoft which provides a user with a graphical interface to connect to another computer over a network connection. The user employs RDP client software for this purpose, while the other computer must run RDP server software. The RDP port number is 3389.
Note: If you are using Windows 11 Home, you can't access any VM, because this OS doesn't support RDP. So upgrade to Windows 11 Pro (from the Microsoft store).
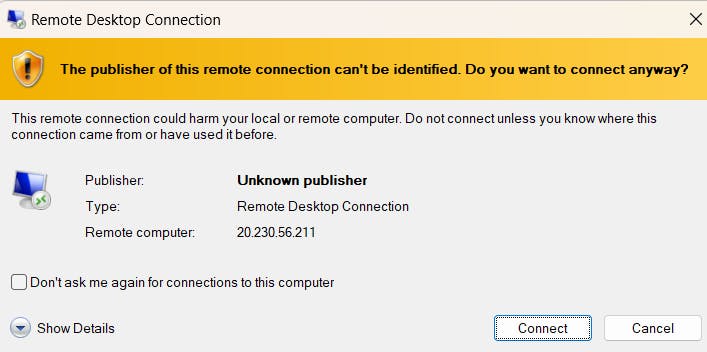
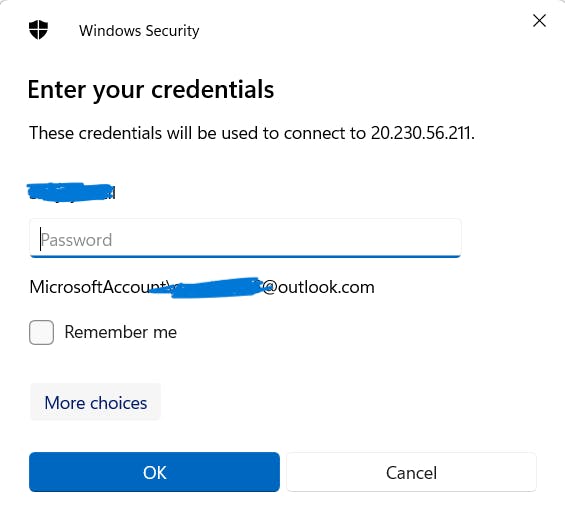
- Open RDP files and connect to VMs. Follow the below images to connect.
Click on more choices
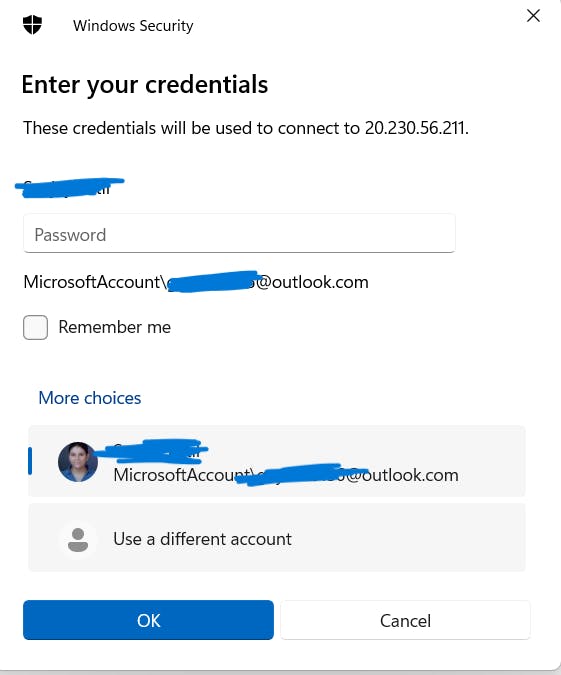
Click on use a different account
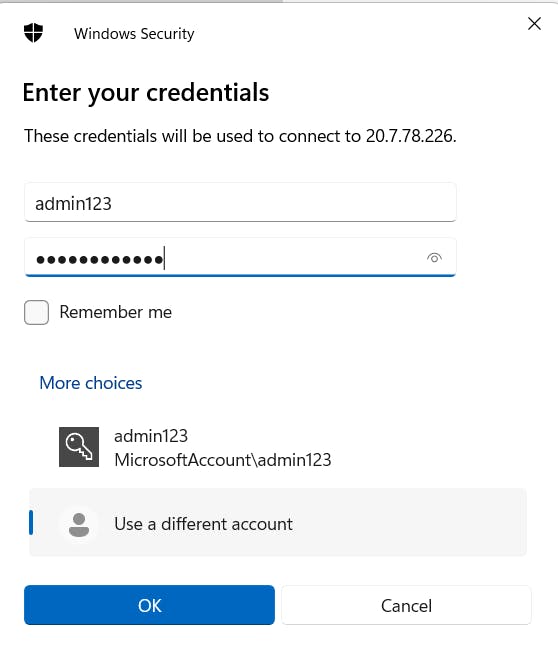
Enter credentials
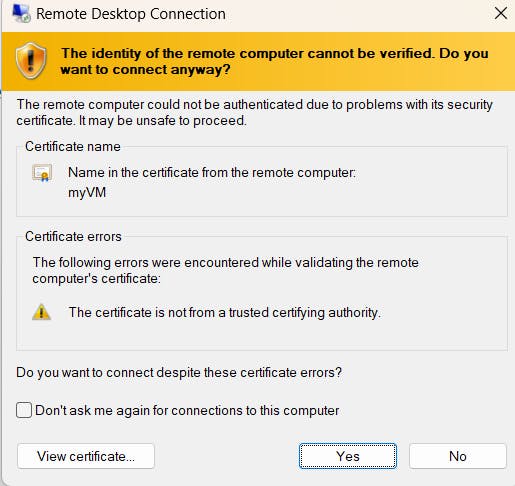
Click on Yes and you will be connected.
Once you have connected to both VMs, you will see this

Because we had selected the Windows 2016 datacenter OS image, basically we use this OS image to create a VM which means you can turn this VM into a server by little configurations. As of now close Server Manager in both machines.
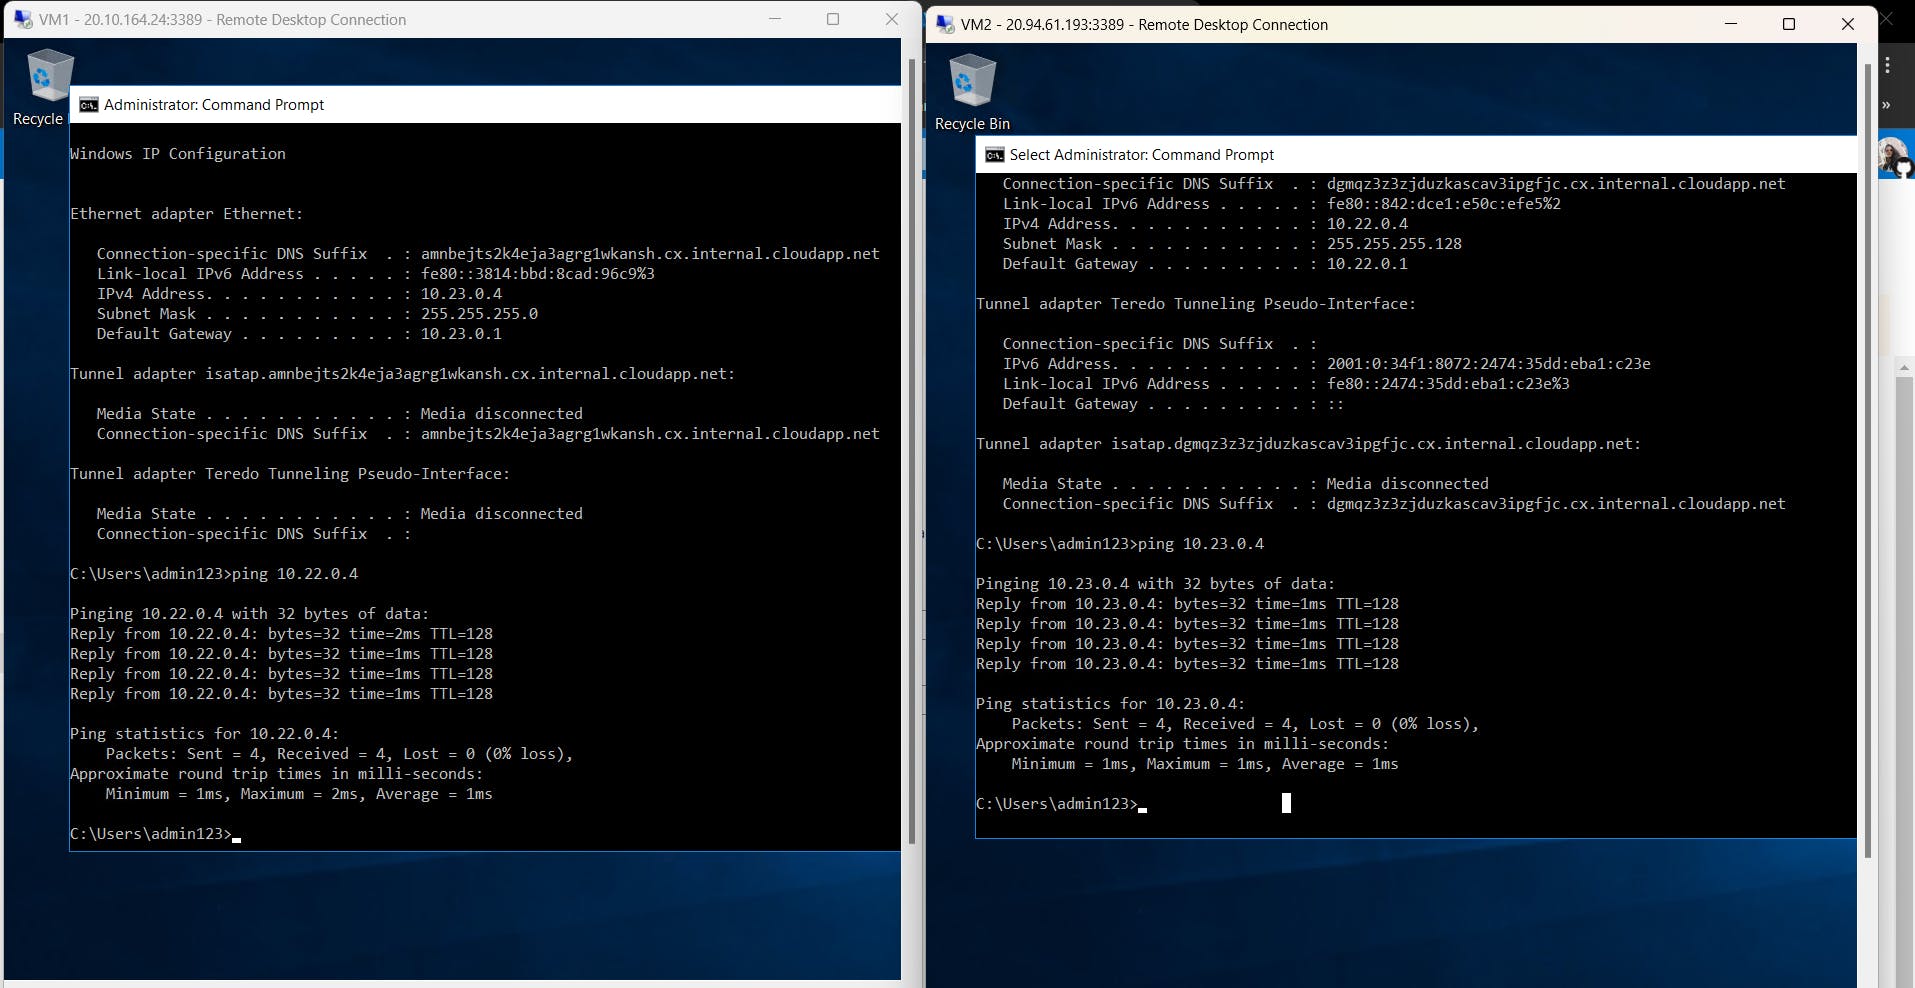
- Open the command prompt in both VMs and try to ping each other.
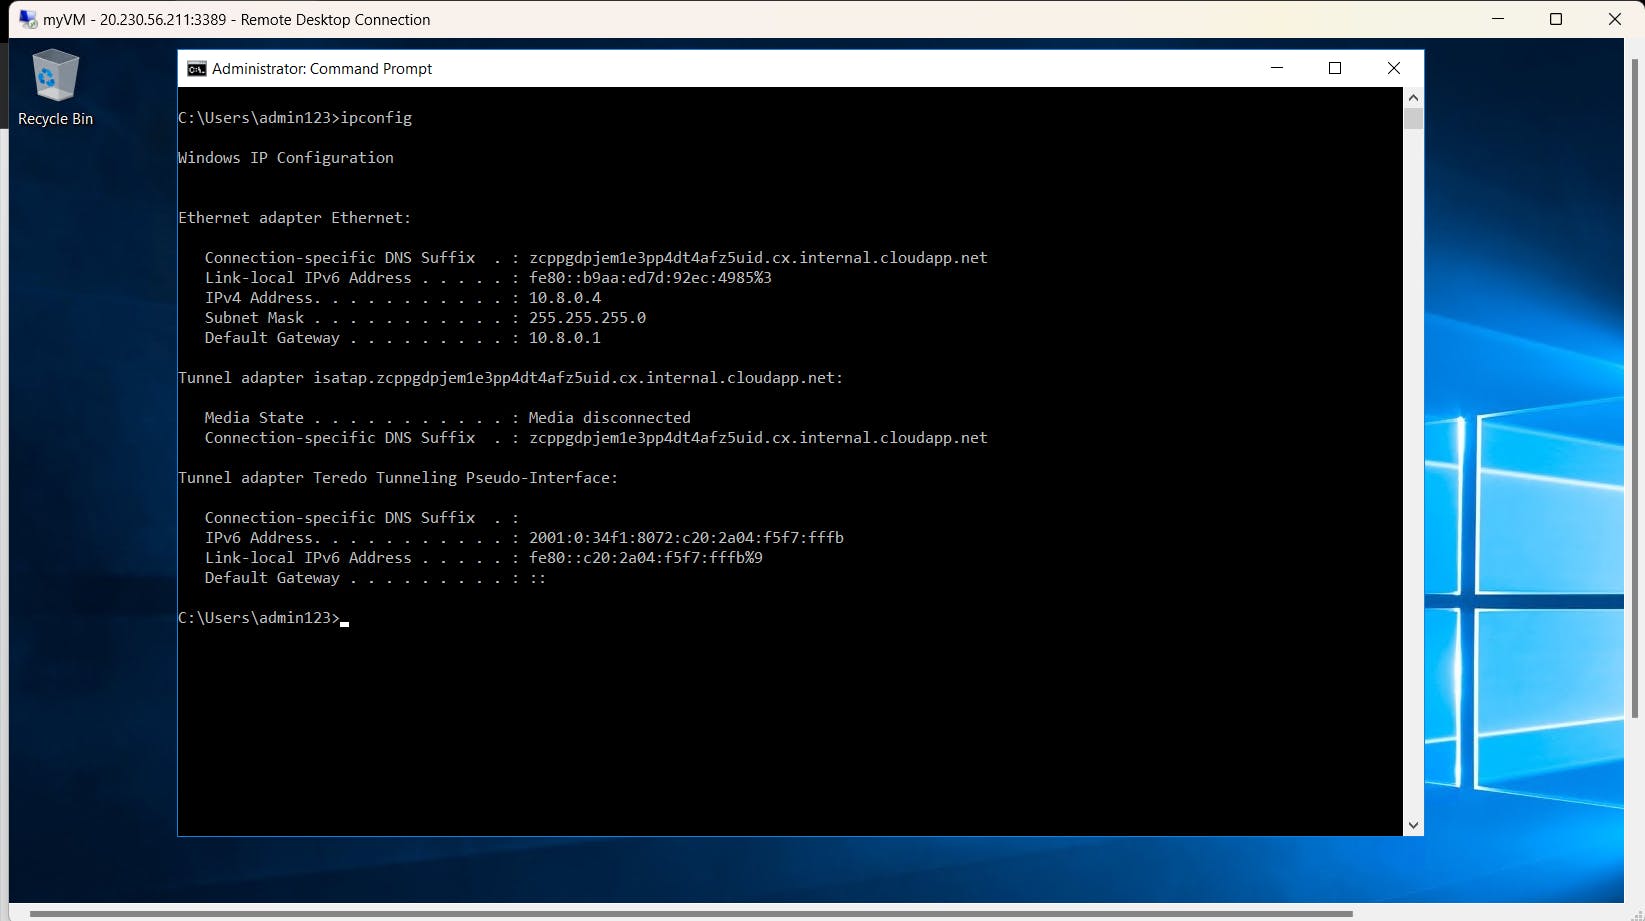
How to know the IP address of the respective VM? You can see it in the overview tab of the VM on the Azure portal or use the command ipconfig.Now try to ping them. Ping is a command-line utility, that acts as a test to see if a networked device is reachable.
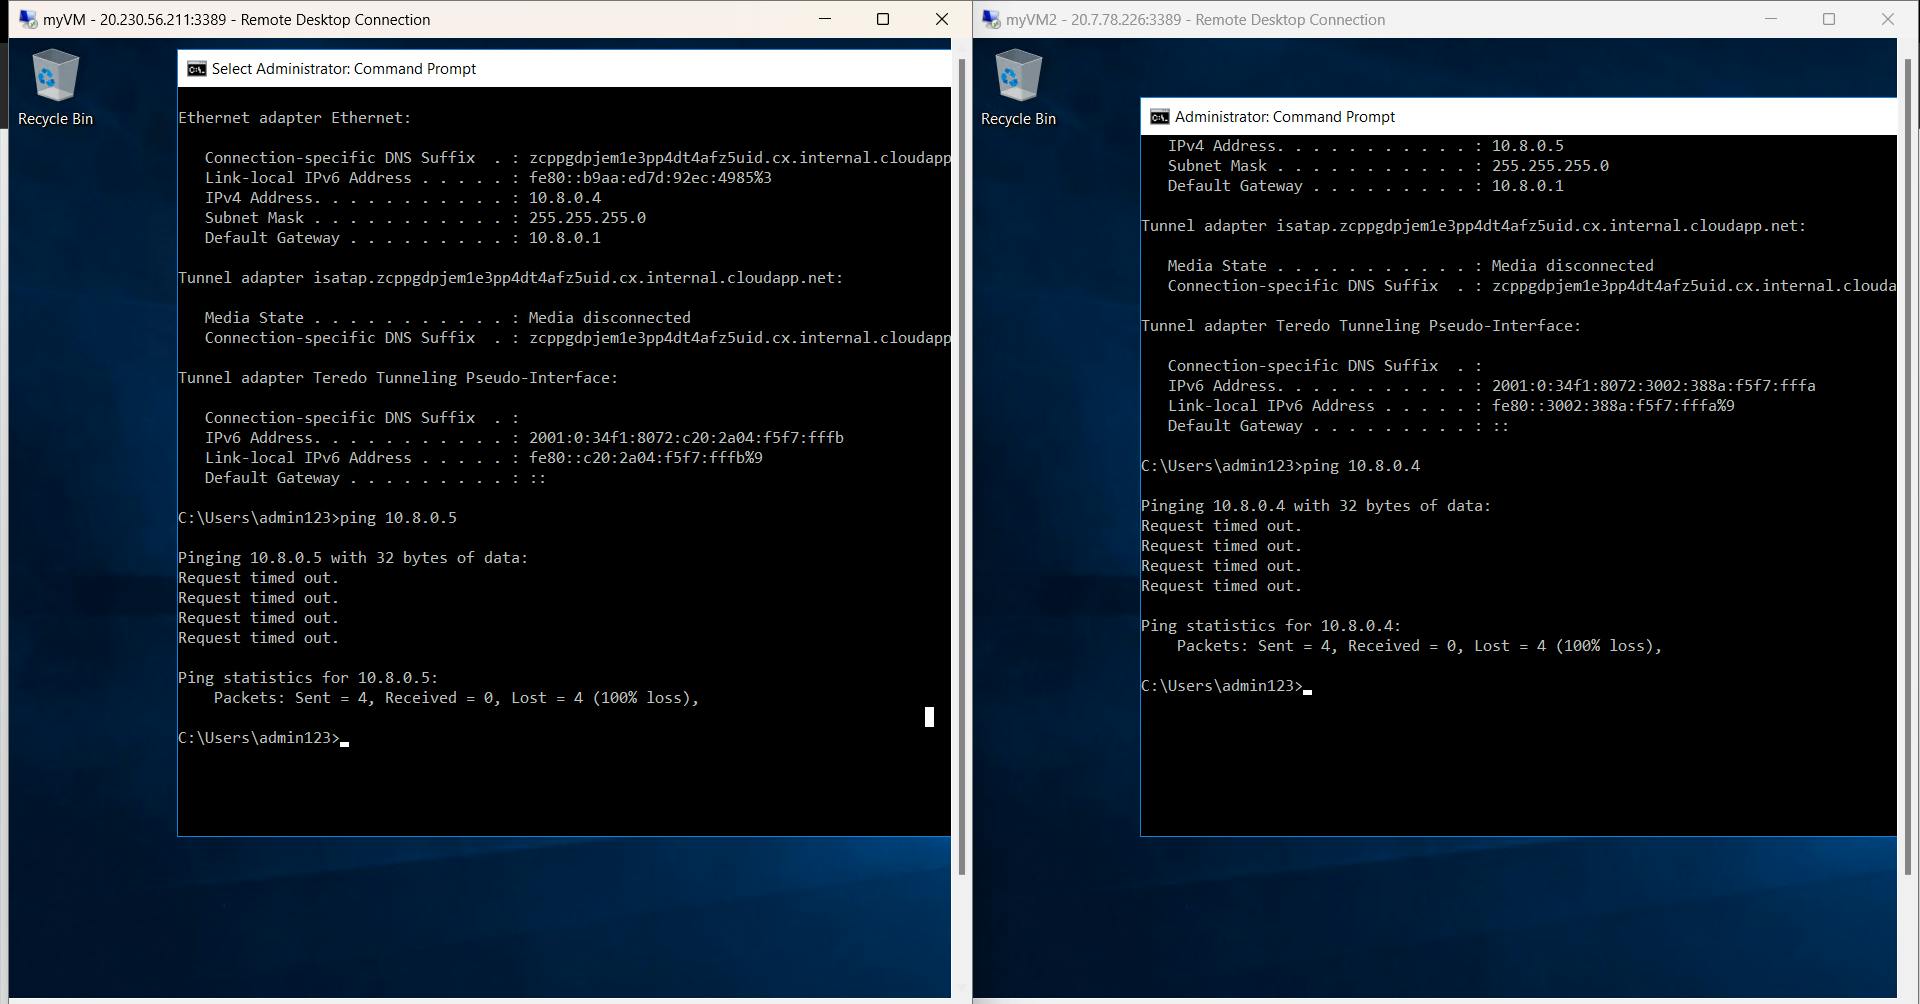
Request timed out and received packets are 0. It means the VMs are not reachable because firewalls are ON and they block ICMP traffic/packets.
Turn off the firewall in both VMs. Follow the below steps.

Go to Control Panel -> View network status and task
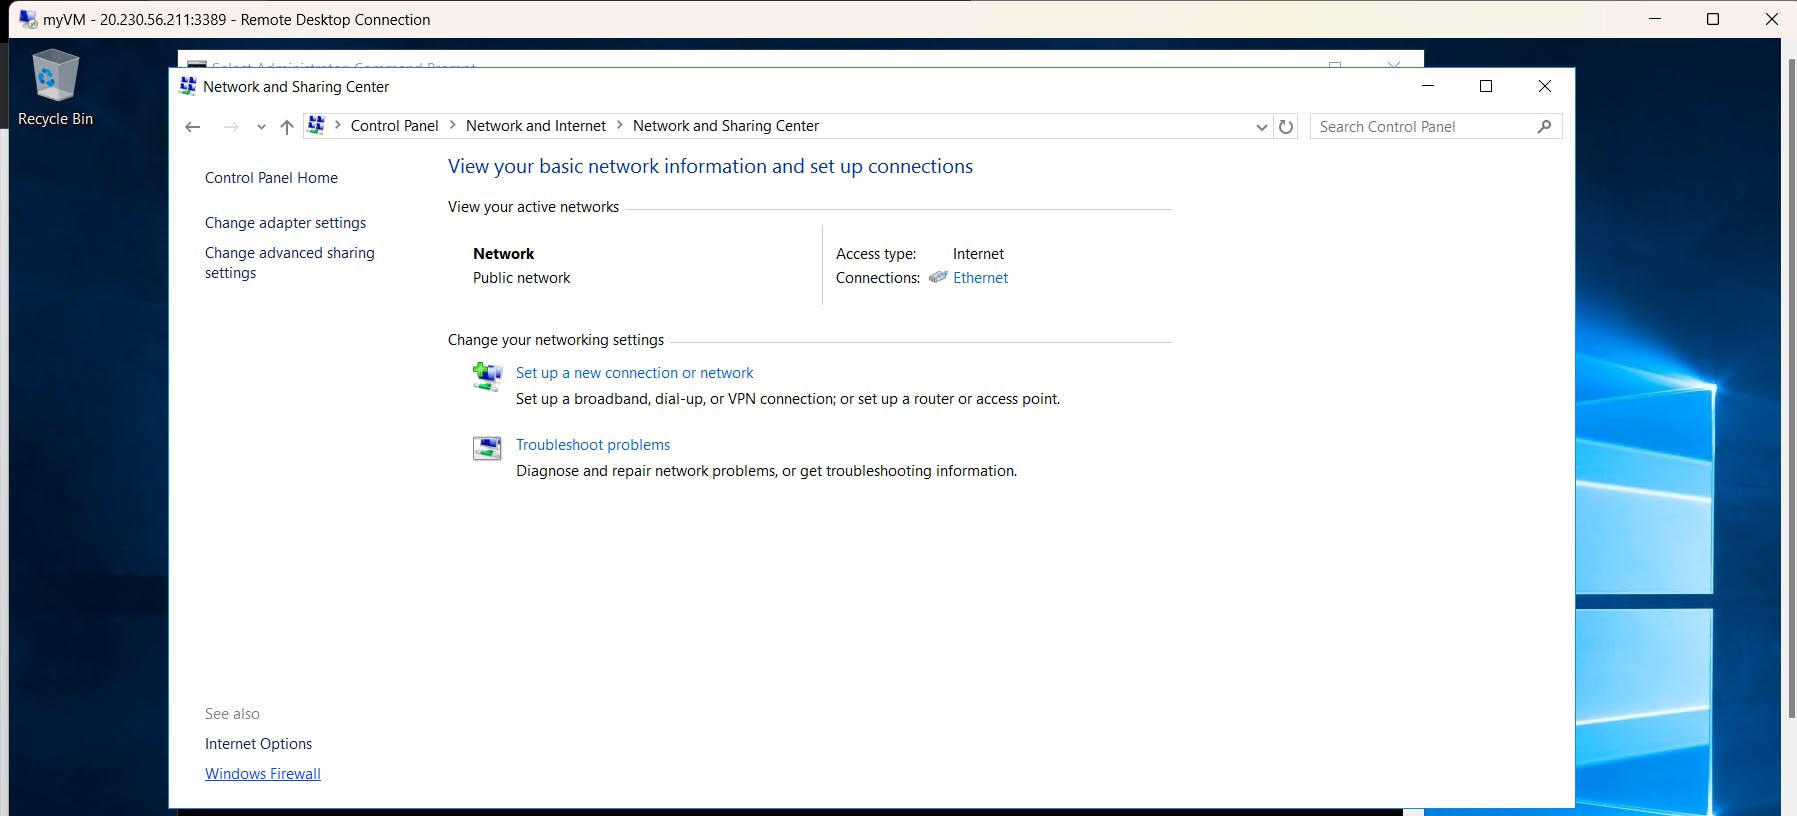
Click on Windows Firewall
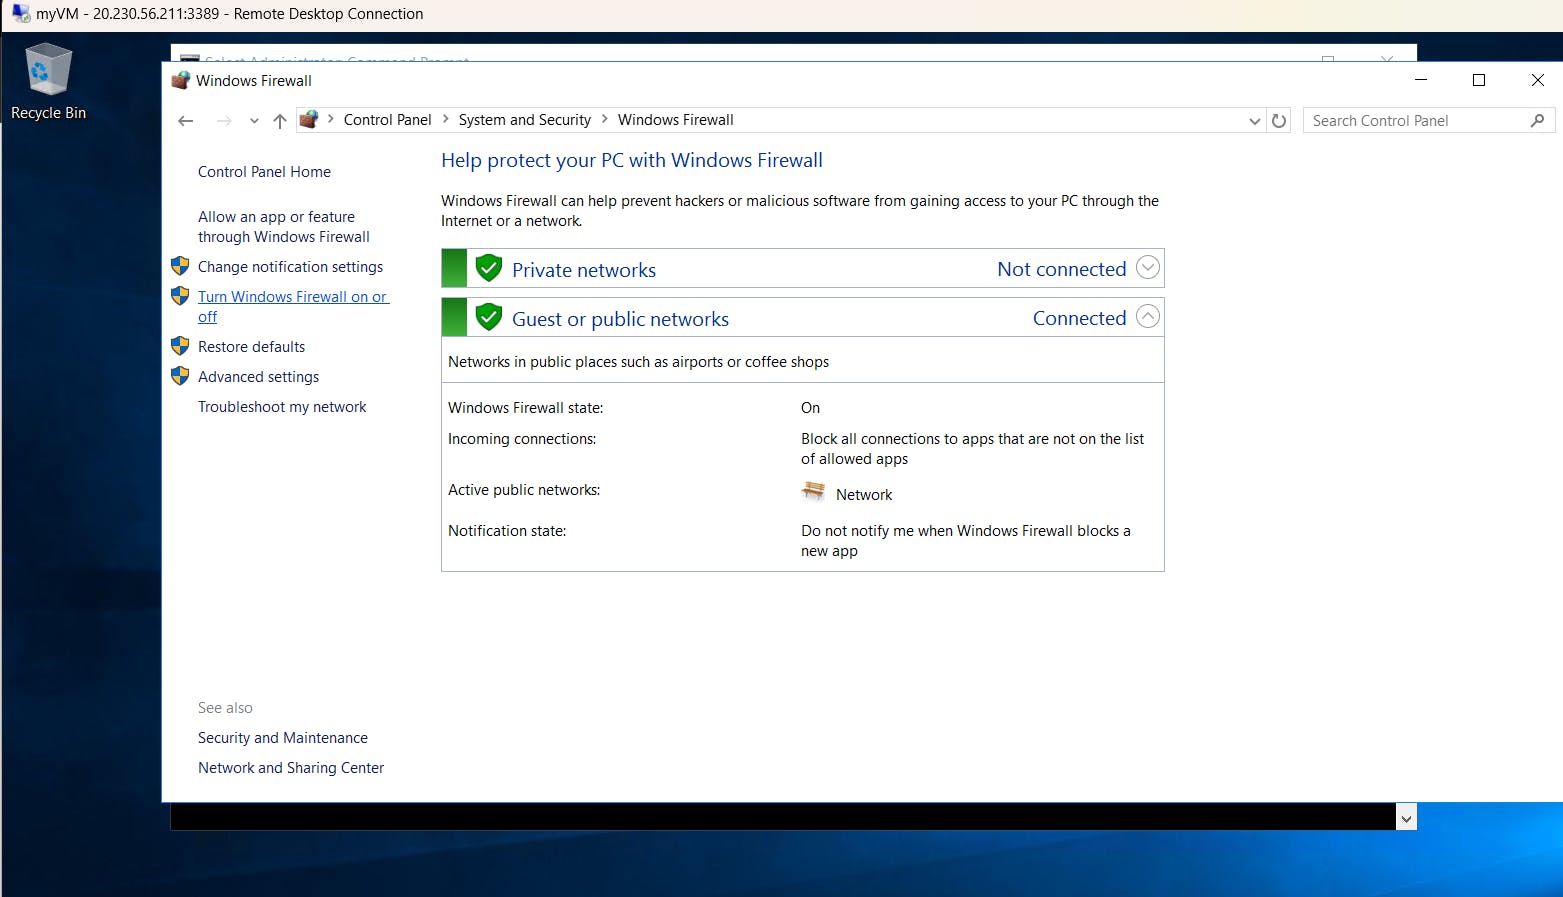
Click on Turn Windows Firewall on or off.
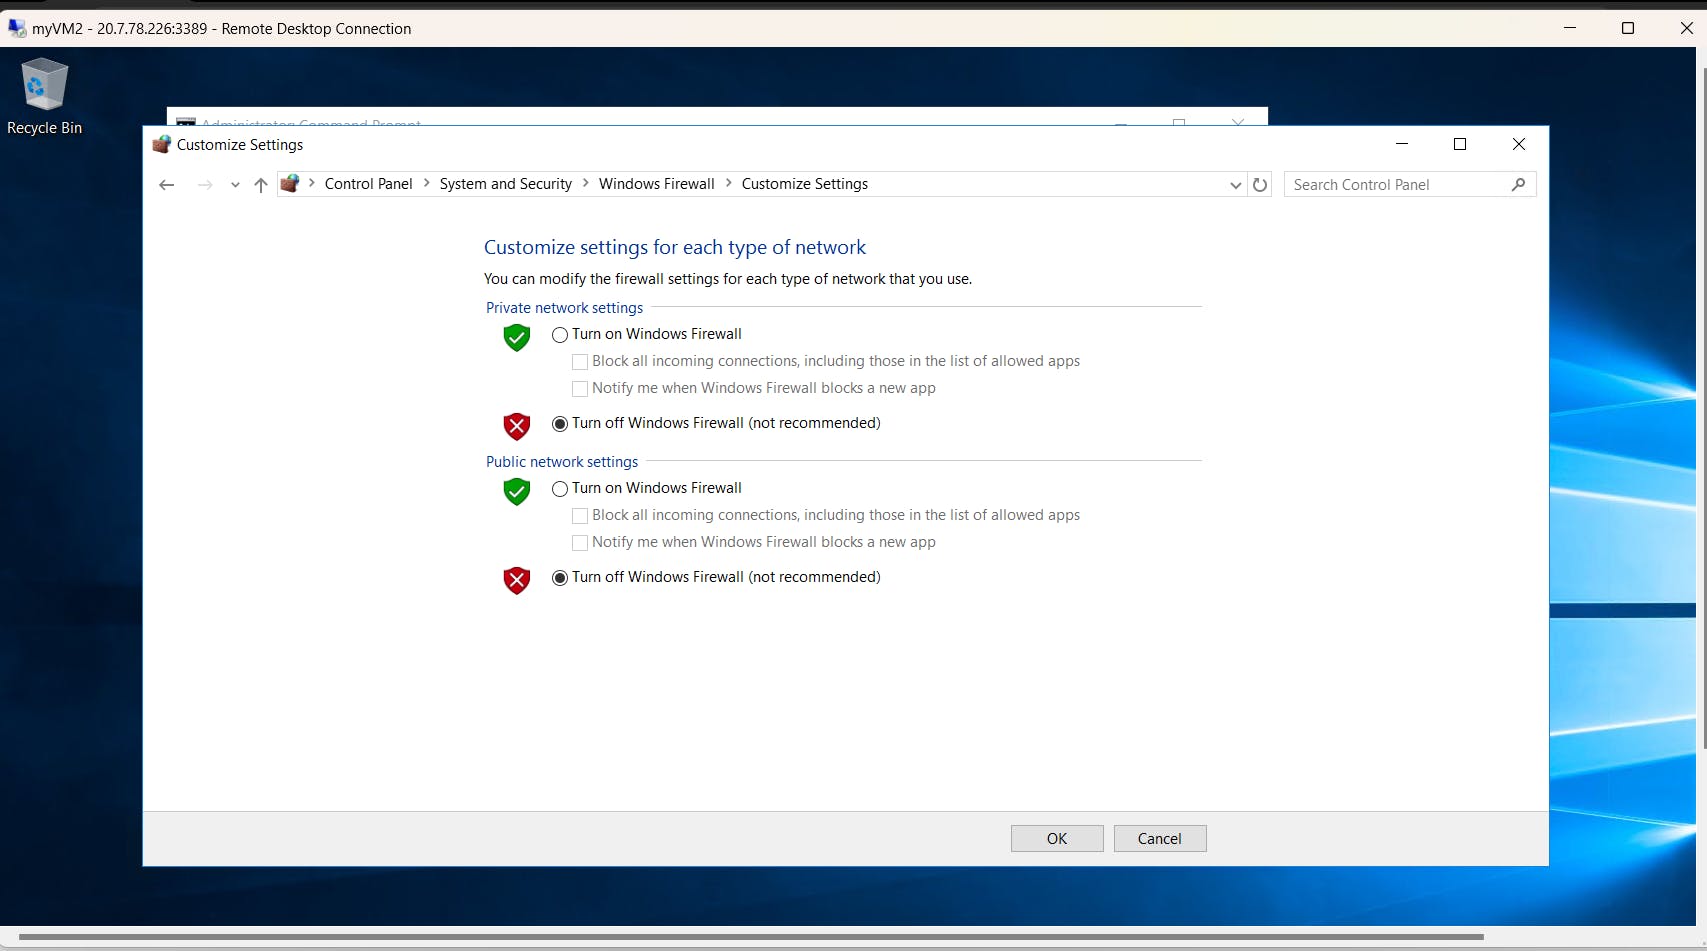
Turn off the firewall for both private and public network settings and try to ping again.
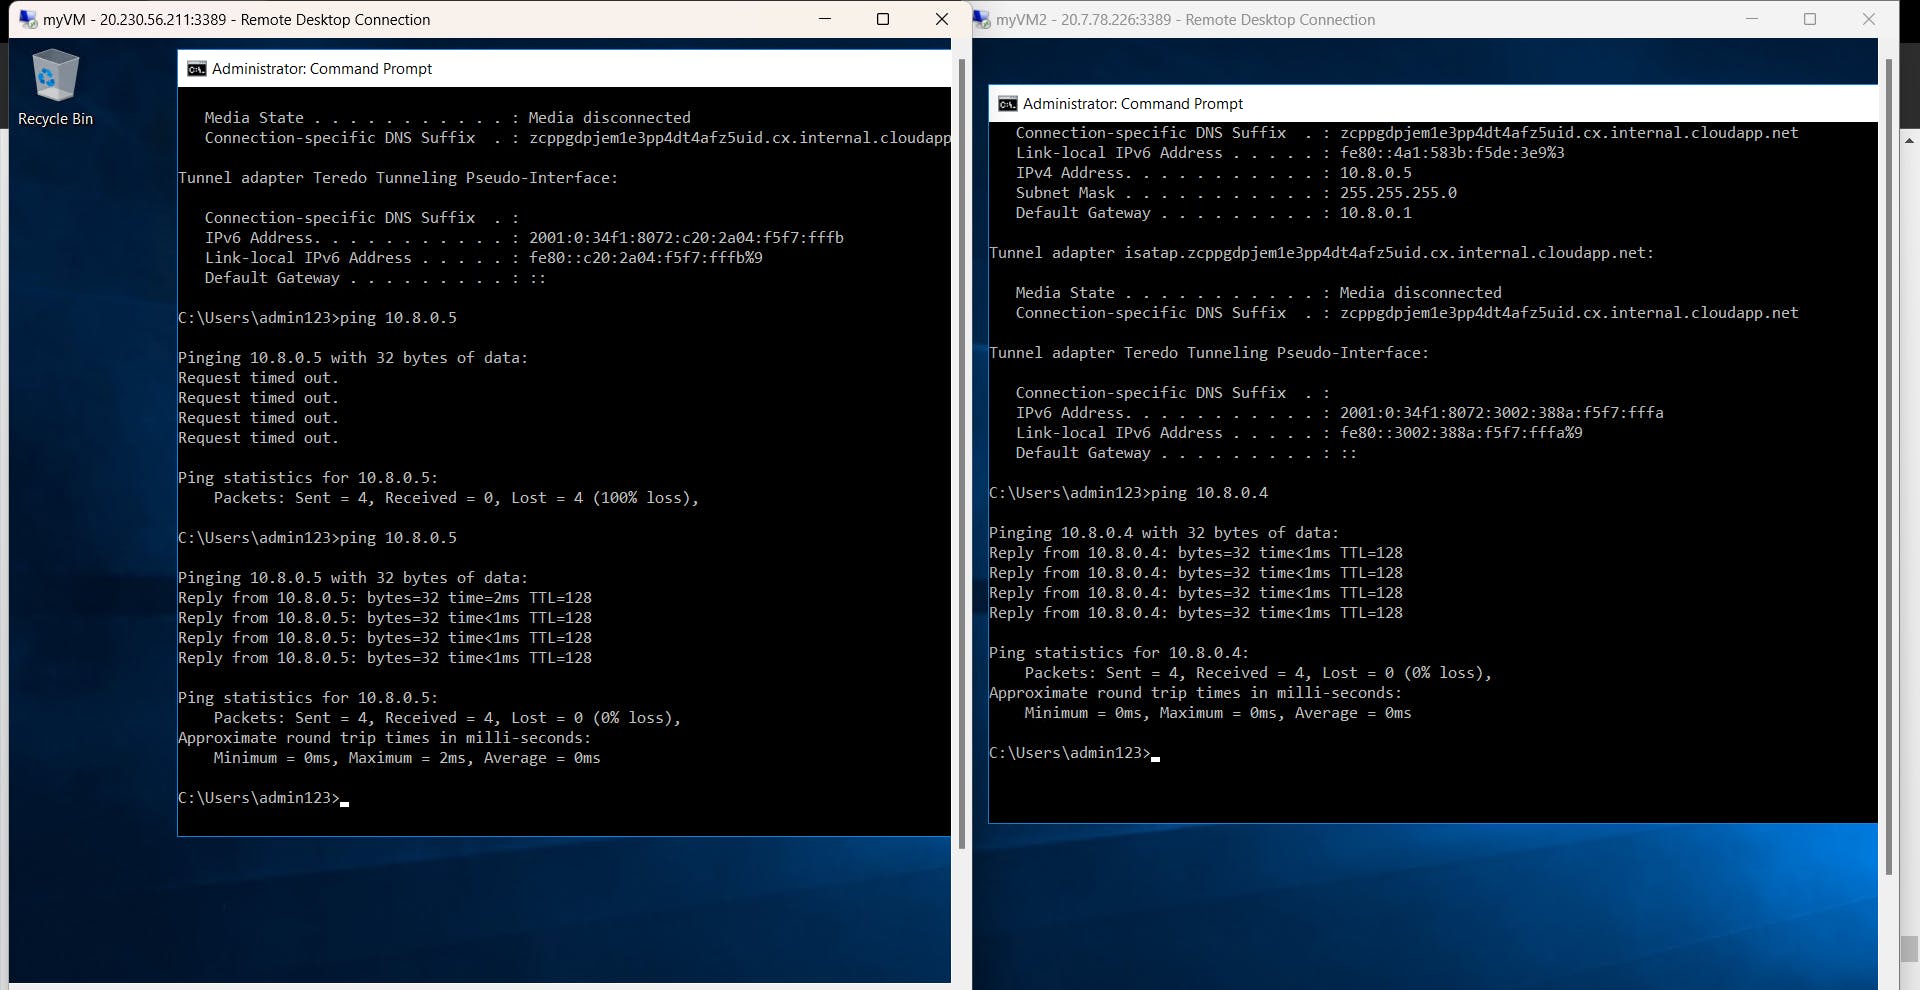
Woah!!! Great!
Note: Sometimes it may happen that you can't select resources like VNet, virtual network gateway, etc to solve this simply log out and then again log in, to your Azure account. Sometimes you have to try it a few times these are because resources take time to reflect in the portal.
Hands-on3: Connecting two VNets from the same region using VNet peering
Create two VNets in the same region (you can use East US 2) and create one VM in each VNet and establish communication between those VMs.
Virtual network peering connects two Azure virtual networks. Traffic between virtual machines in the peered virtual networks is routed through the Microsoft backbone infrastructure (Microsoft network), through private IP addresses only. No public internet is involved. You can also peer virtual networks across Azure regions means you can connect a VNet deployed in the East US region with VNet deployed in the West US region. This is called Global peering. Virtual network peering provides a low-latency, high-bandwidth connection.
Create two VNets,
VNet1andVNet2. Remember to put all related resources like this hands-on under one resource group. In my case it isexample_VN.Create
VM1(East US 2) inVnet1andVM2(East US 2) inVnet2.Now we have to do Vnet peering.
By doing peering vm1 and vm2 can communicate with each other.
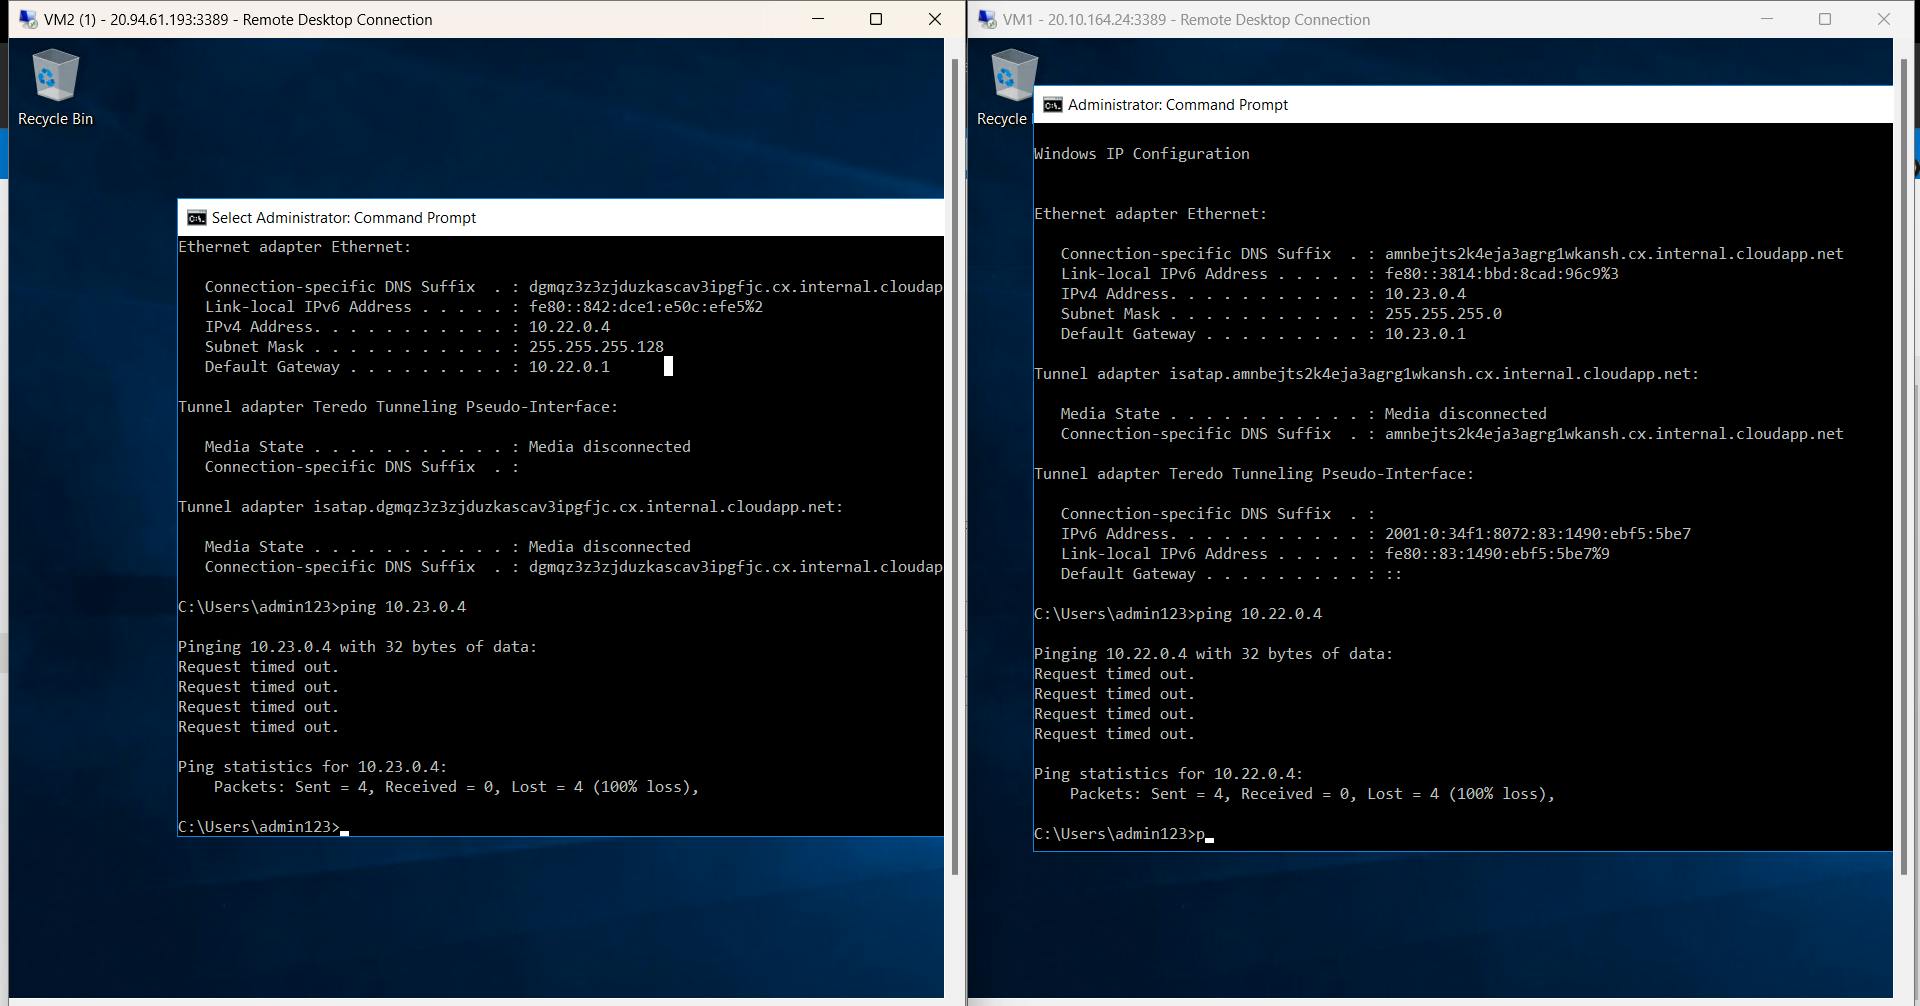
Without peering it will look like this!
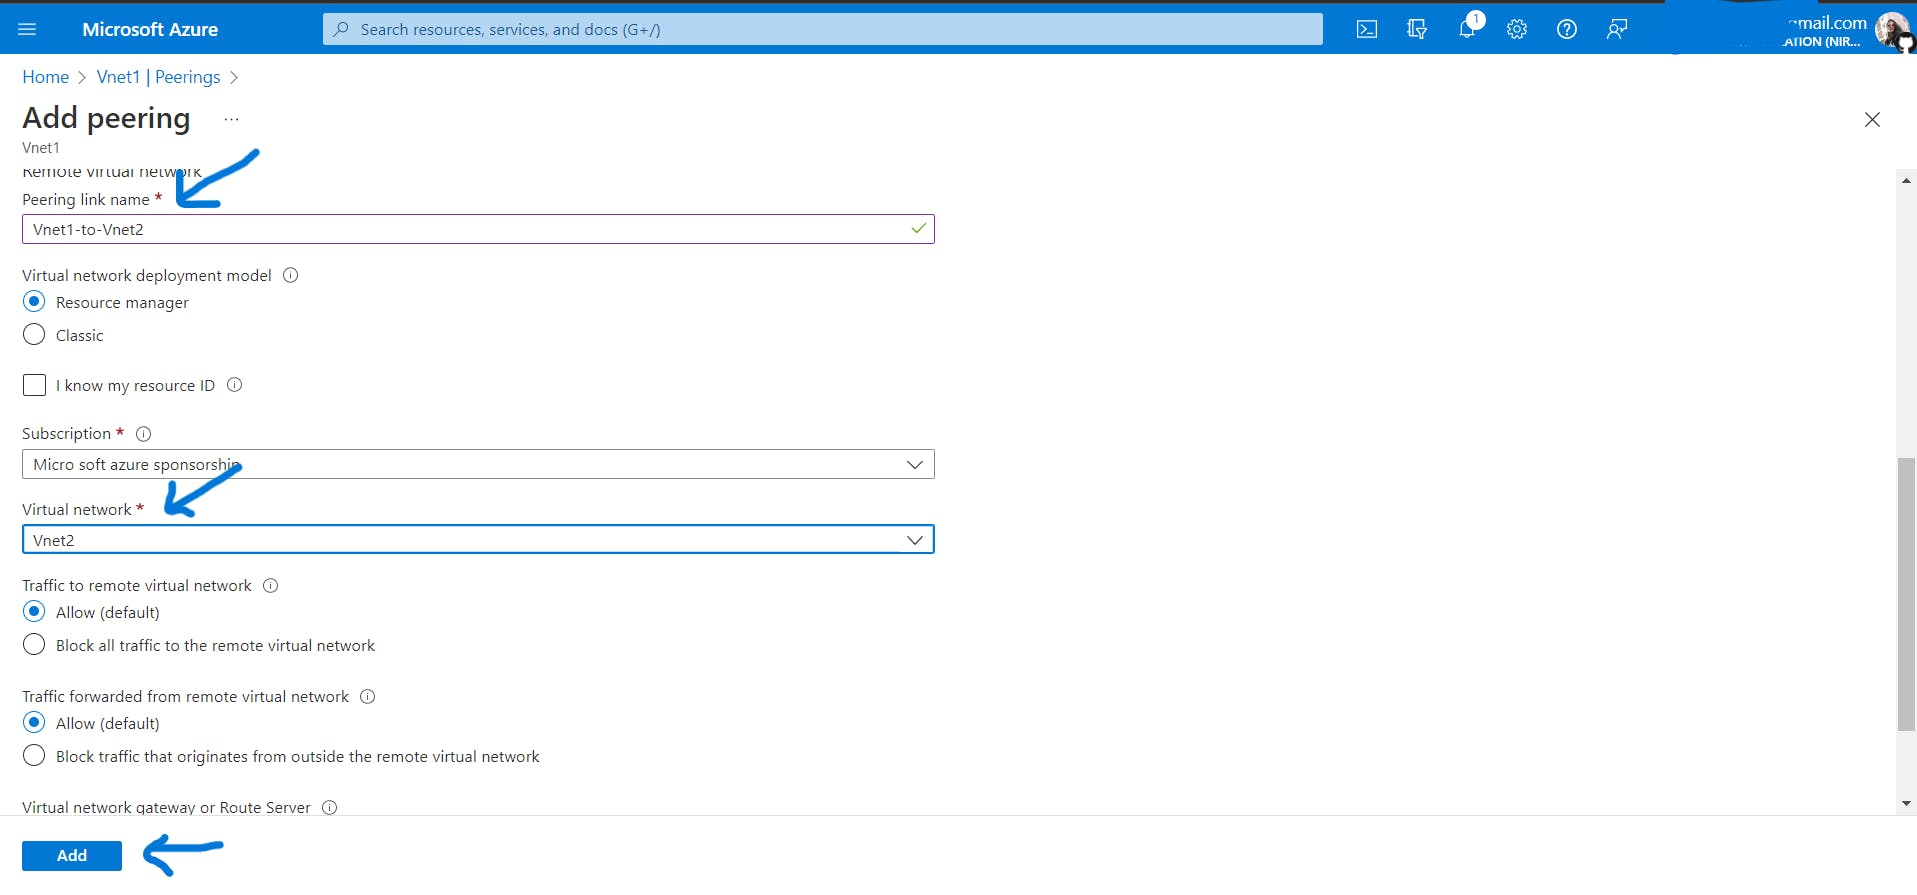
Go to
Vnet1-> Go to Peerings -> Add -> Name the peering link -> select the Vnet you want to connect to, Vnet2 in our case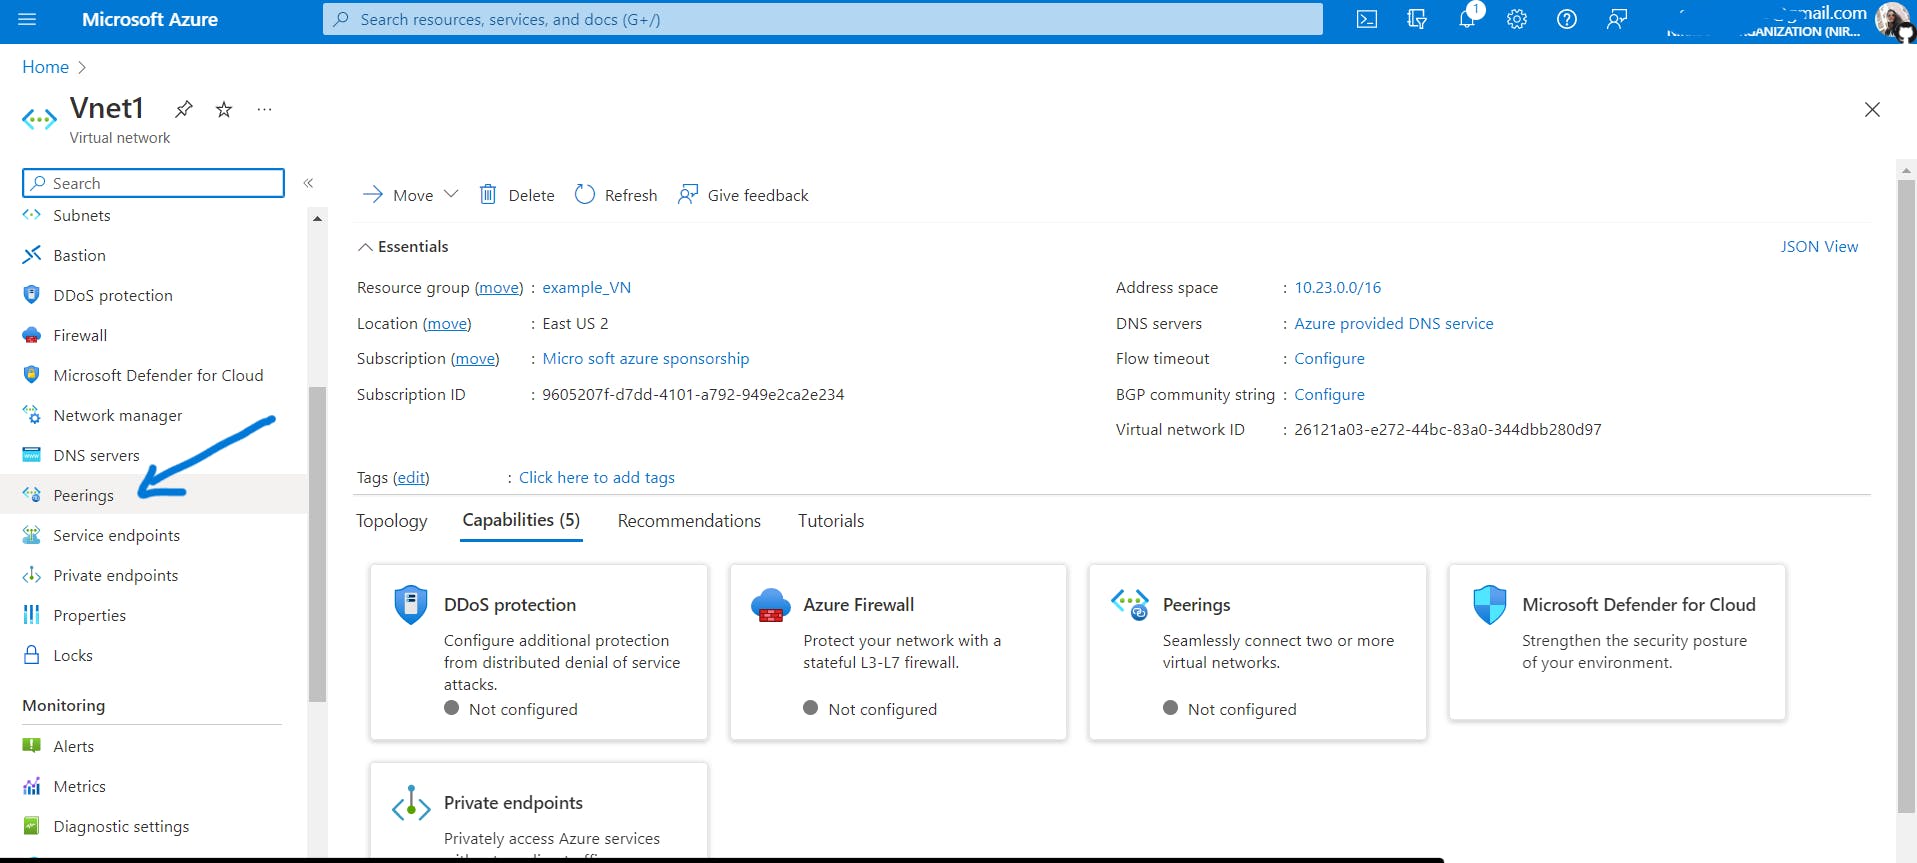

In azure, when you add peering from
Vnet1toVnet2, peering fromVnet2toVnet2also gets added. It's like a bidirectional connection between Vnets.What about when you try to connect three Vnets? (Not a part of hands-on, just for understanding)

Just add peering between virtual networks to which you want to connect.

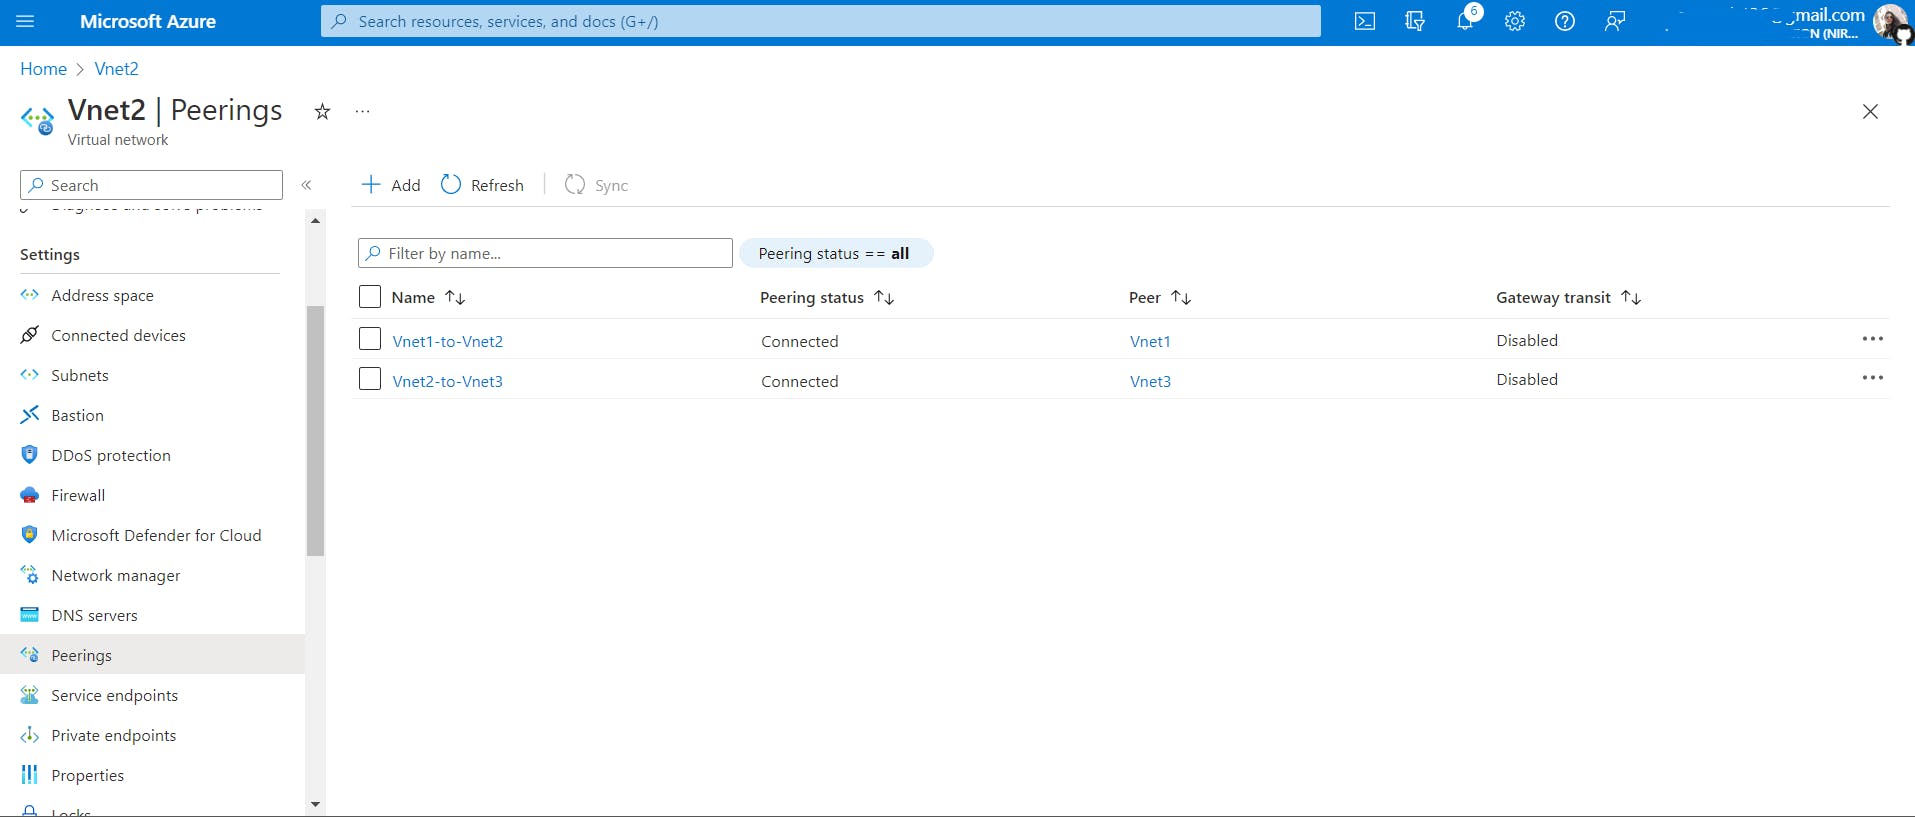
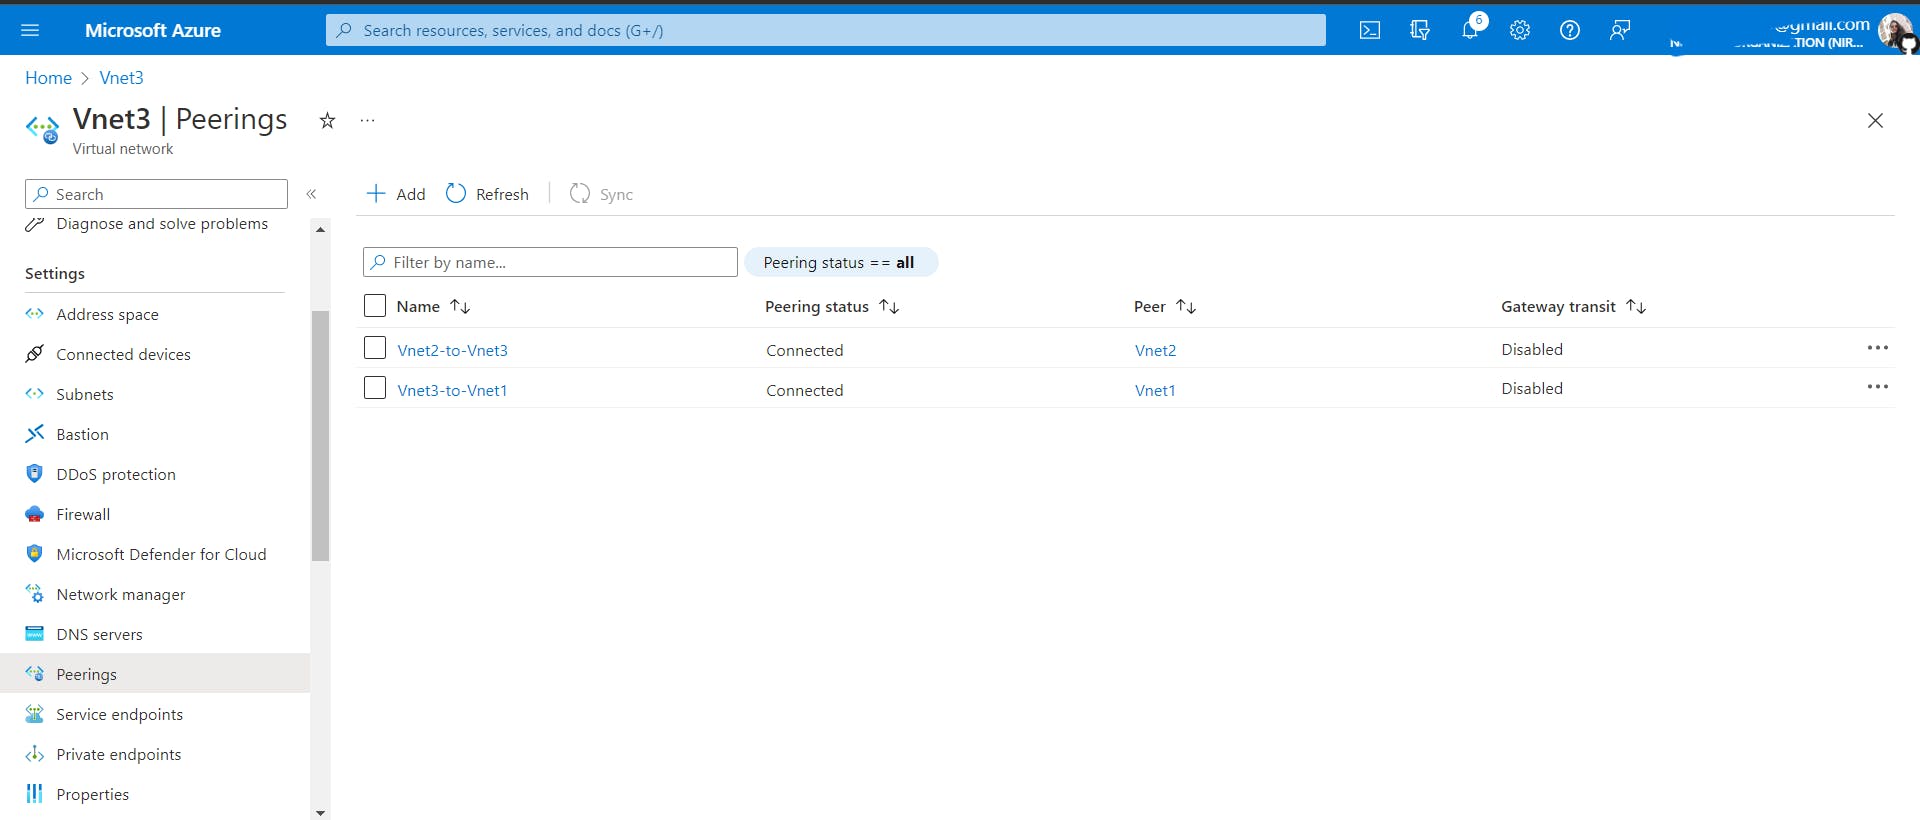
Note: Connecting
Vnet1toVnet2and thenVnet2toVnet3, doesn't mean thatVnet1andVnet3get connected automatically(Azure Vnet does not follow transitive property) unless you do it yourself as I have done above.
Back to hands-on3, we have peered Vnet1 and Vnet2, we can try to communicate VM1 and VM2 with each other. Download RDP files, connect to the VMs, turn off the firewall and ping VMs.
And there you go!
The next hands-on will be on Virtual Network Gateway. Before that I would like to explain and differentiate between virtual network connection types, VNet peering and Virtual network gateway (we will use VPN gateway), both are ways to connect virtual networks. By default, traffic cannot be routed between two virtual networks. However, it's possible to connect virtual networks (using peering or gateway), either within a single region or across two regions, so that traffic can be routed between them.
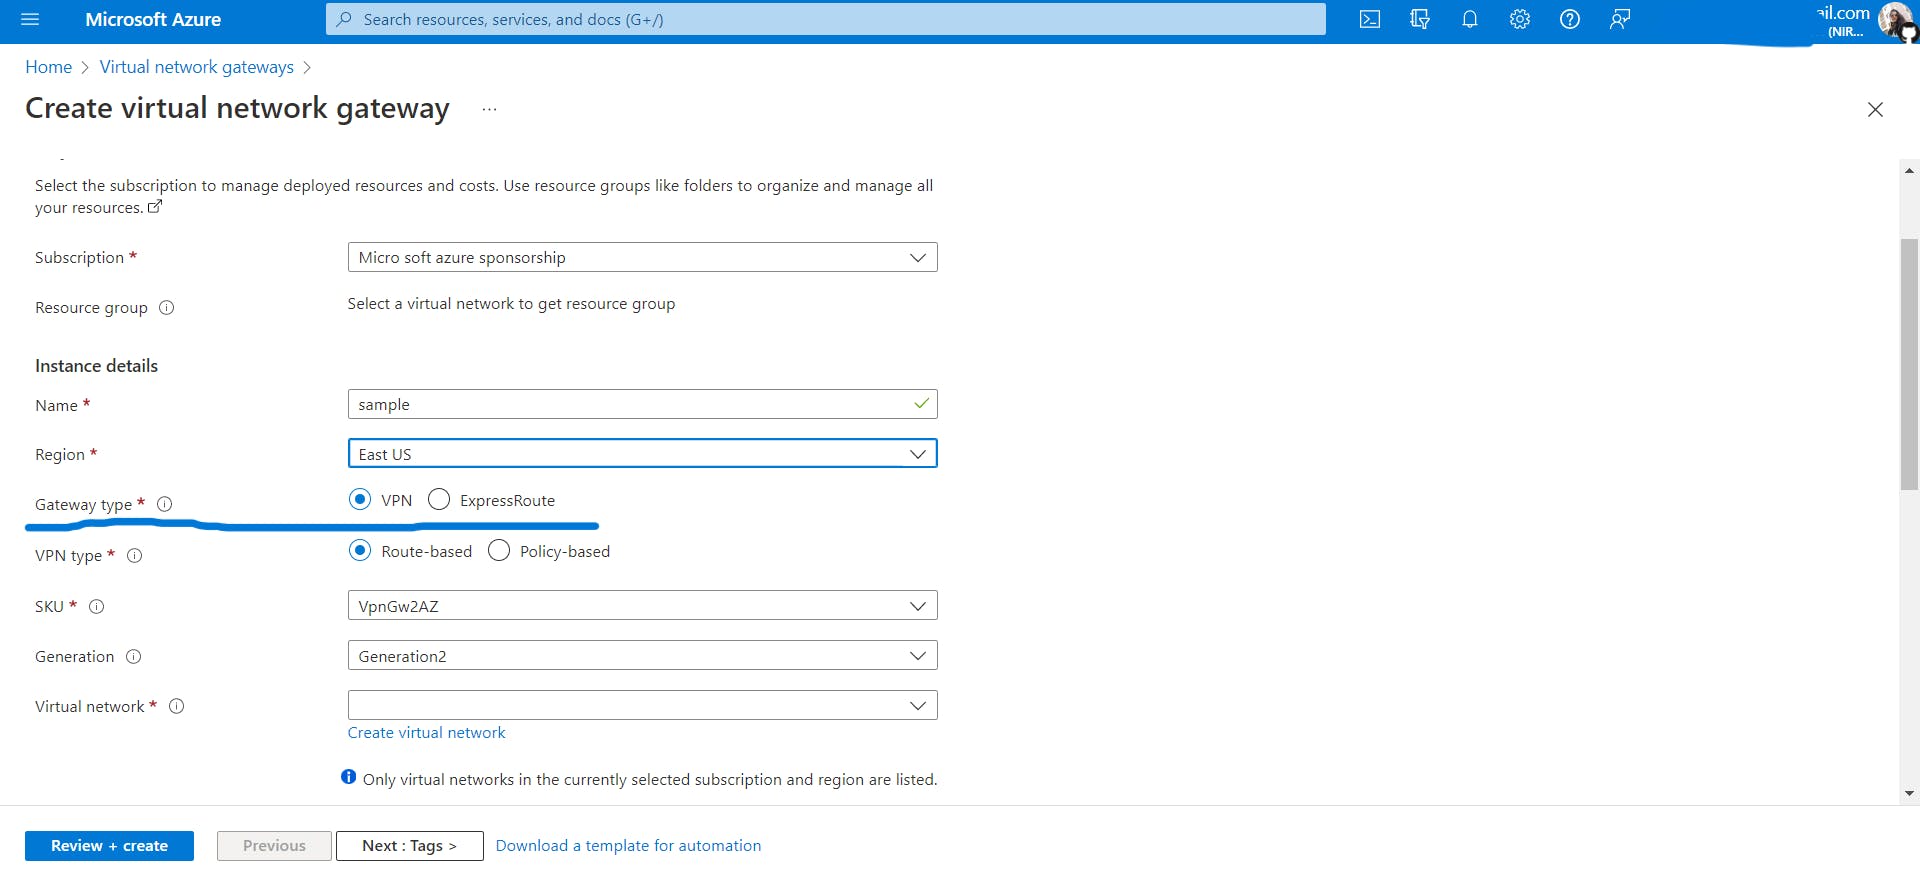
VPN gateways: A VPN gateway (It is called VPN Gateway because you can select the gateway type, VPN or ExpressRoute ) is a specific type of virtual network gateway that is used to send traffic between an Azure virtual network and an on-premises location over the public internet. You can also use a VPN gateway to send traffic between Azure virtual networks. Each virtual network can have at most one VPN gateway. VPN gateways provide a limited bandwidth connection and are useful in scenarios where you need encryption but can tolerate bandwidth restrictions.
Virtual network peering and VPN gateways both support the following connection types:
Virtual networks in different regions
Virtual networks in different Azure subscriptions.
Lastly, let's compare both of them.
| Item | Virtual Network Peering | VPN Gateway |
| Limits | Up to 500 virtual network peerings per virtual network | One VPN gateway per virtual network. The maximum number of tunnels per gateway depends on the gateway SKU. |
| Bandwidth limitations | No bandwidth limitations. | Varies based on SKU. |
| Private? | Yes. Routed through Microsoft backbone and private. No public internet is involved. | Public IP is involved. |
| Transitive relationship | Peering connections are non-transitive. Transitive networking can be achieved using NVAs or gateways in the hub virtual network. | If virtual networks are connected via VPN gateways and BGP is enabled in the virtual network connections, transitivity works. (A->B, B->C then A->C) |
| Initial setup time | Fast | Fast |
| Typical scenarios | Data replication, database failover, and other scenarios need frequent backups of large data. | Encryption-specific scenarios that are not latency sensitive and do not need high throughout. |
What is SKU?
Stock Keeping Unit, is a retail term that says, stock keeping unit is the unit of measure in which the stocks of a material are managed.

In terms of the Microsoft Azure cloud, SKU signifies a purchasable SKU (stock of any service like the number of VNet-to-VNet connections) under a product (like VPN Gateway in our case). It has a bunch of different shapes of the product.
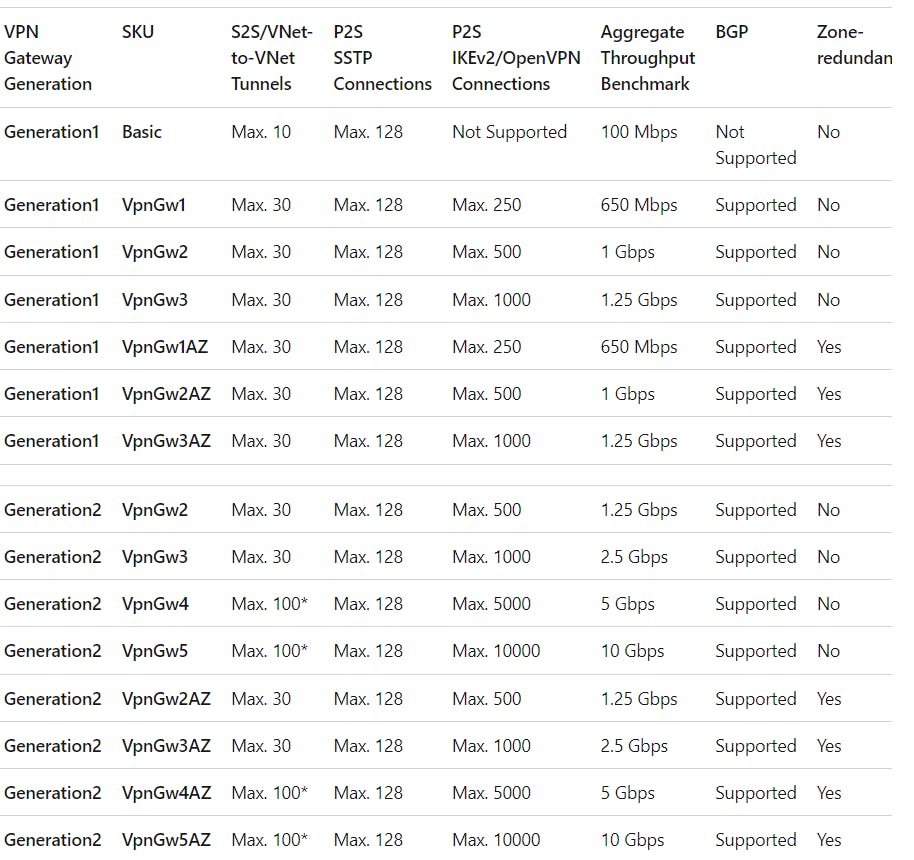
Photo by Microsoft Learn
The above Image shows different SKU options under VPN Gateway, the number of connections each SKU supports and other stuff.
Hands-on4: Connecting two VNets across regions using VPN Gateways.
Create two VNets in different regions (one in the east and another in the west) and connect them using two VPN gateways (one gateway for each region).
Note: A VNet can have at most one VPN gateway only.
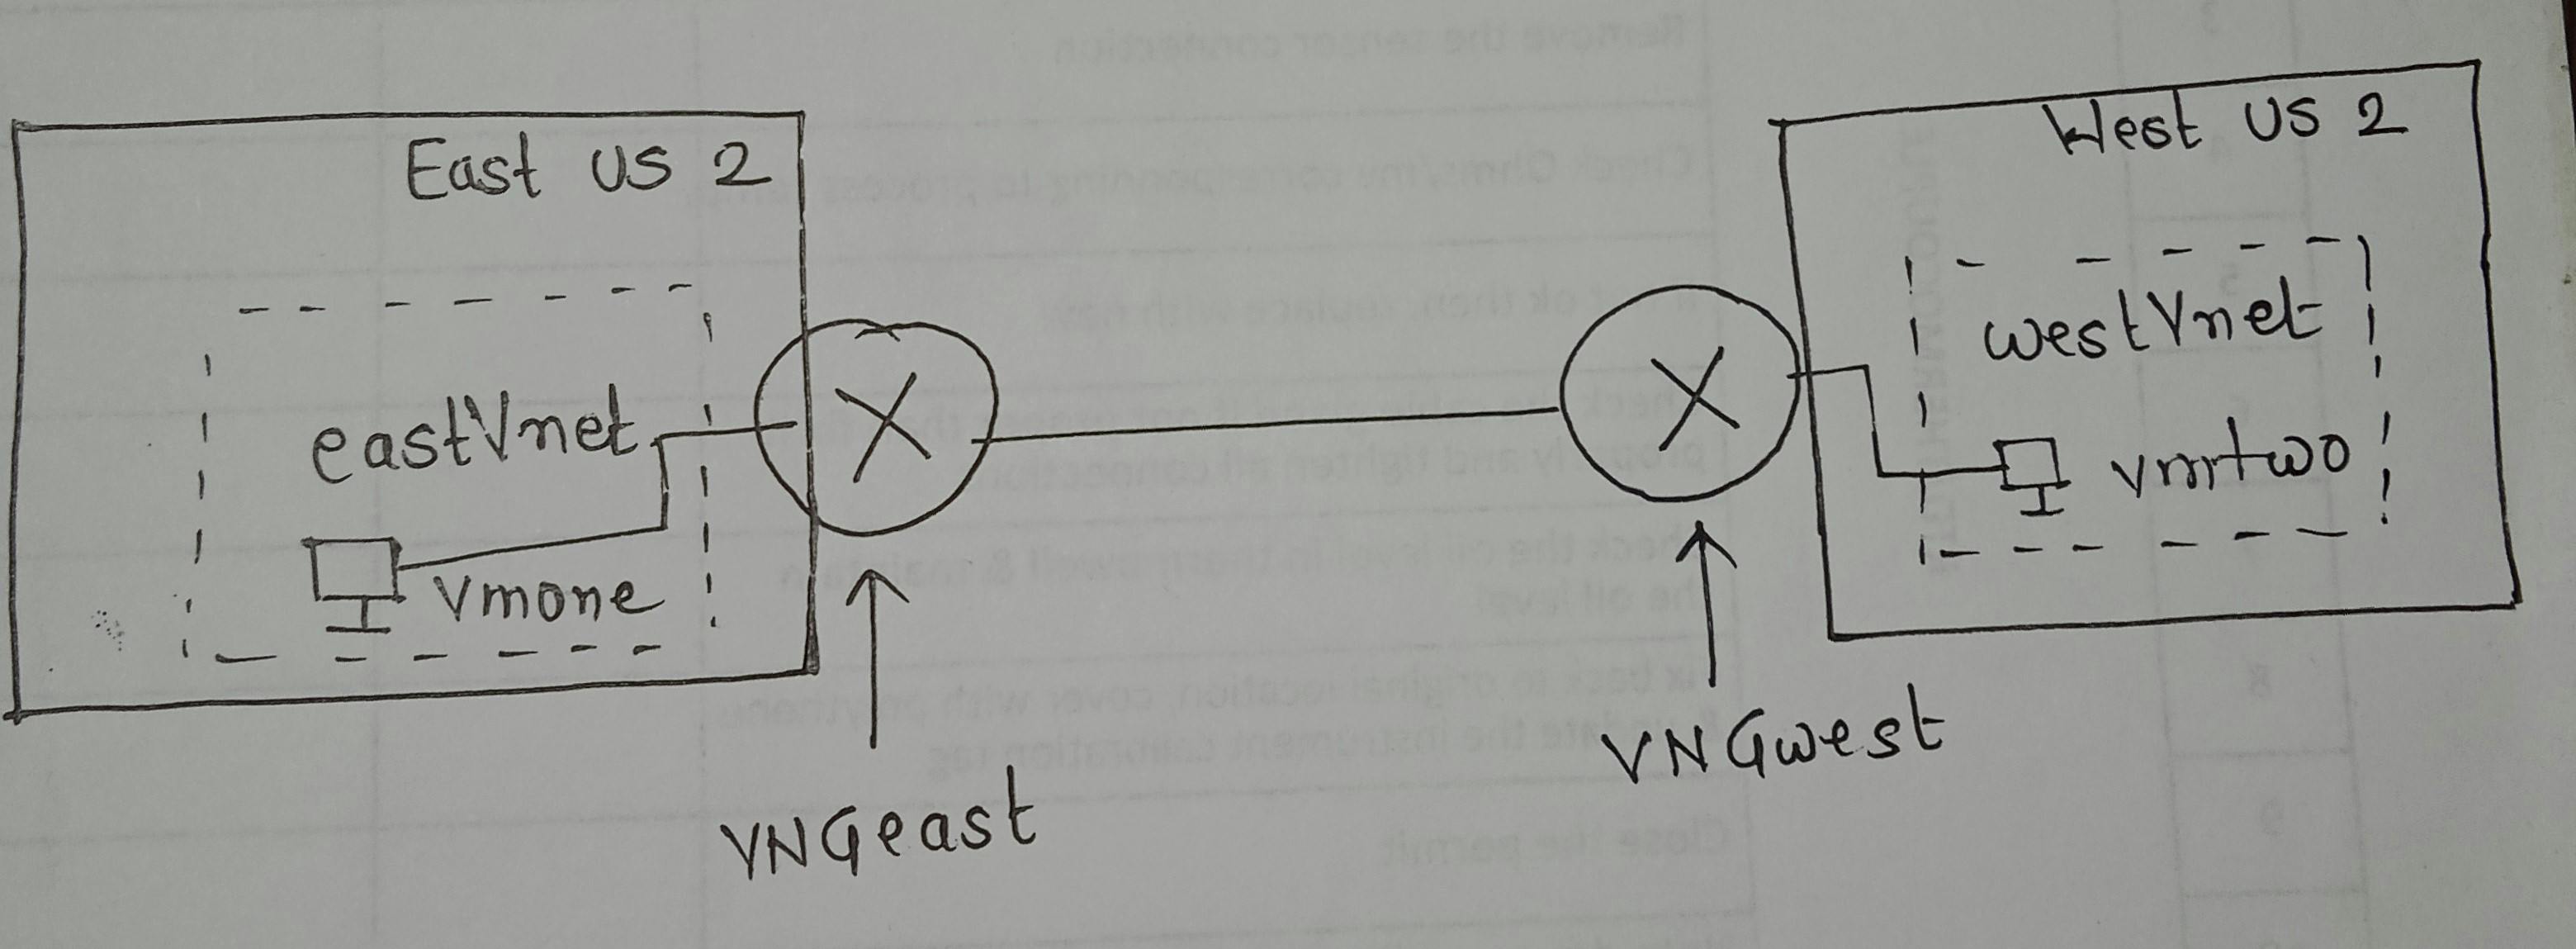
The above Image is a rough visual representation of this hands-on4
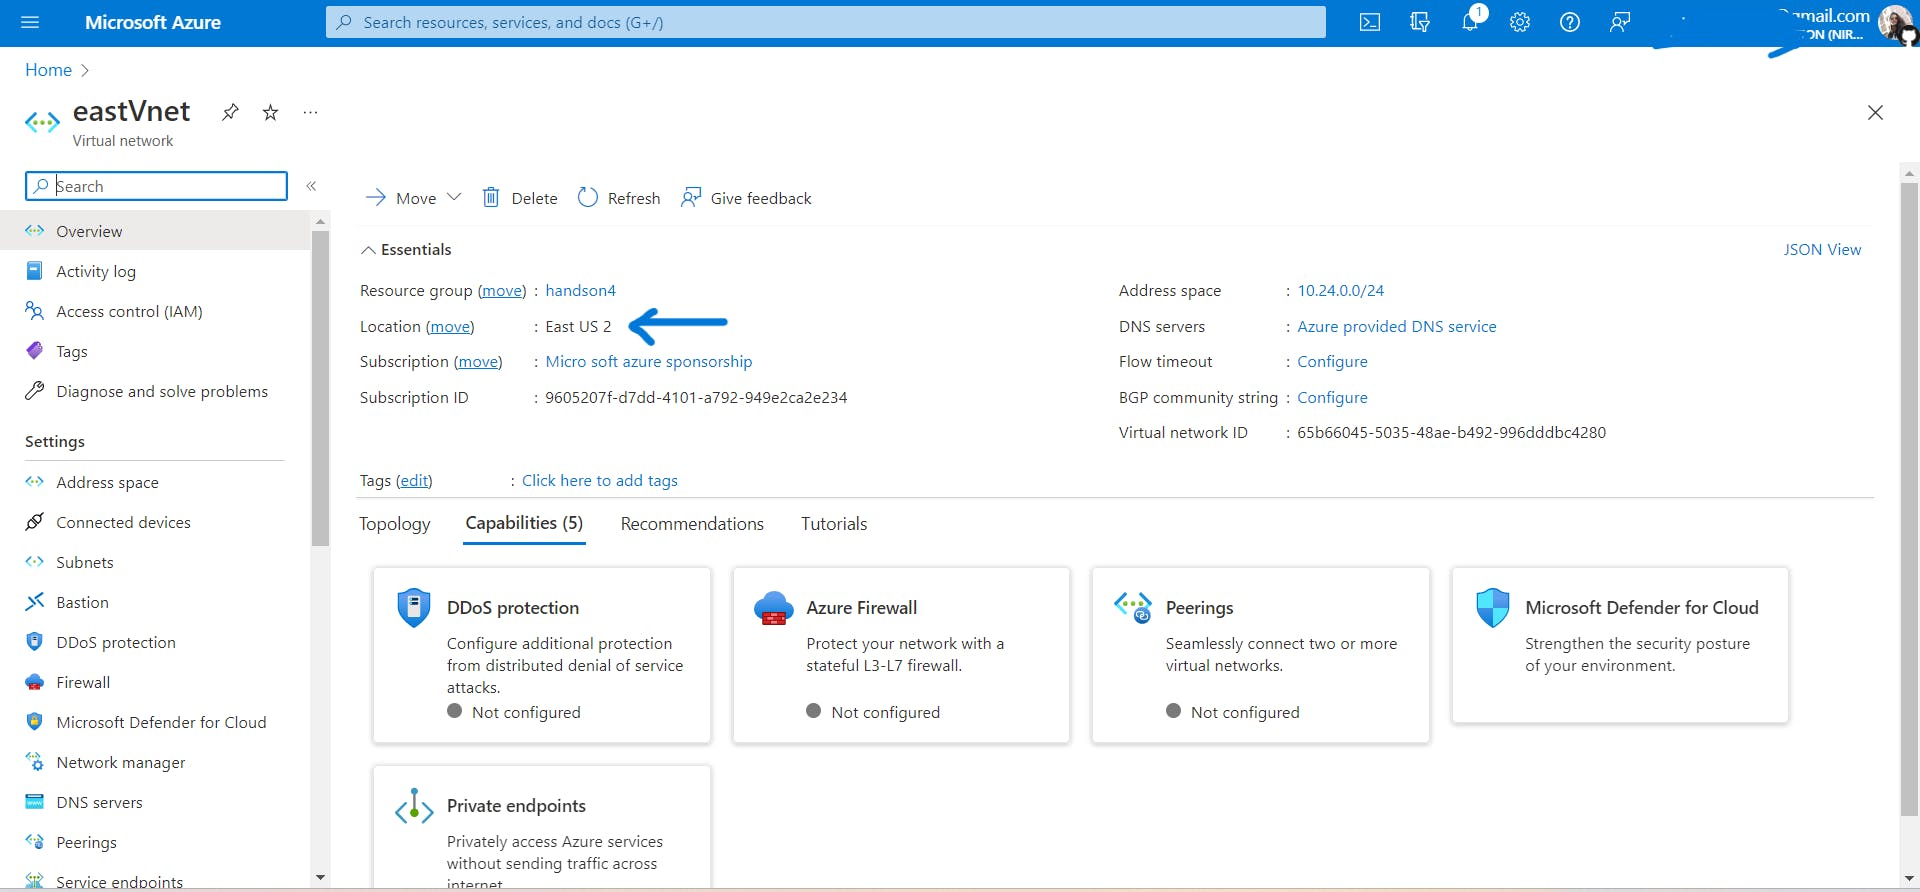
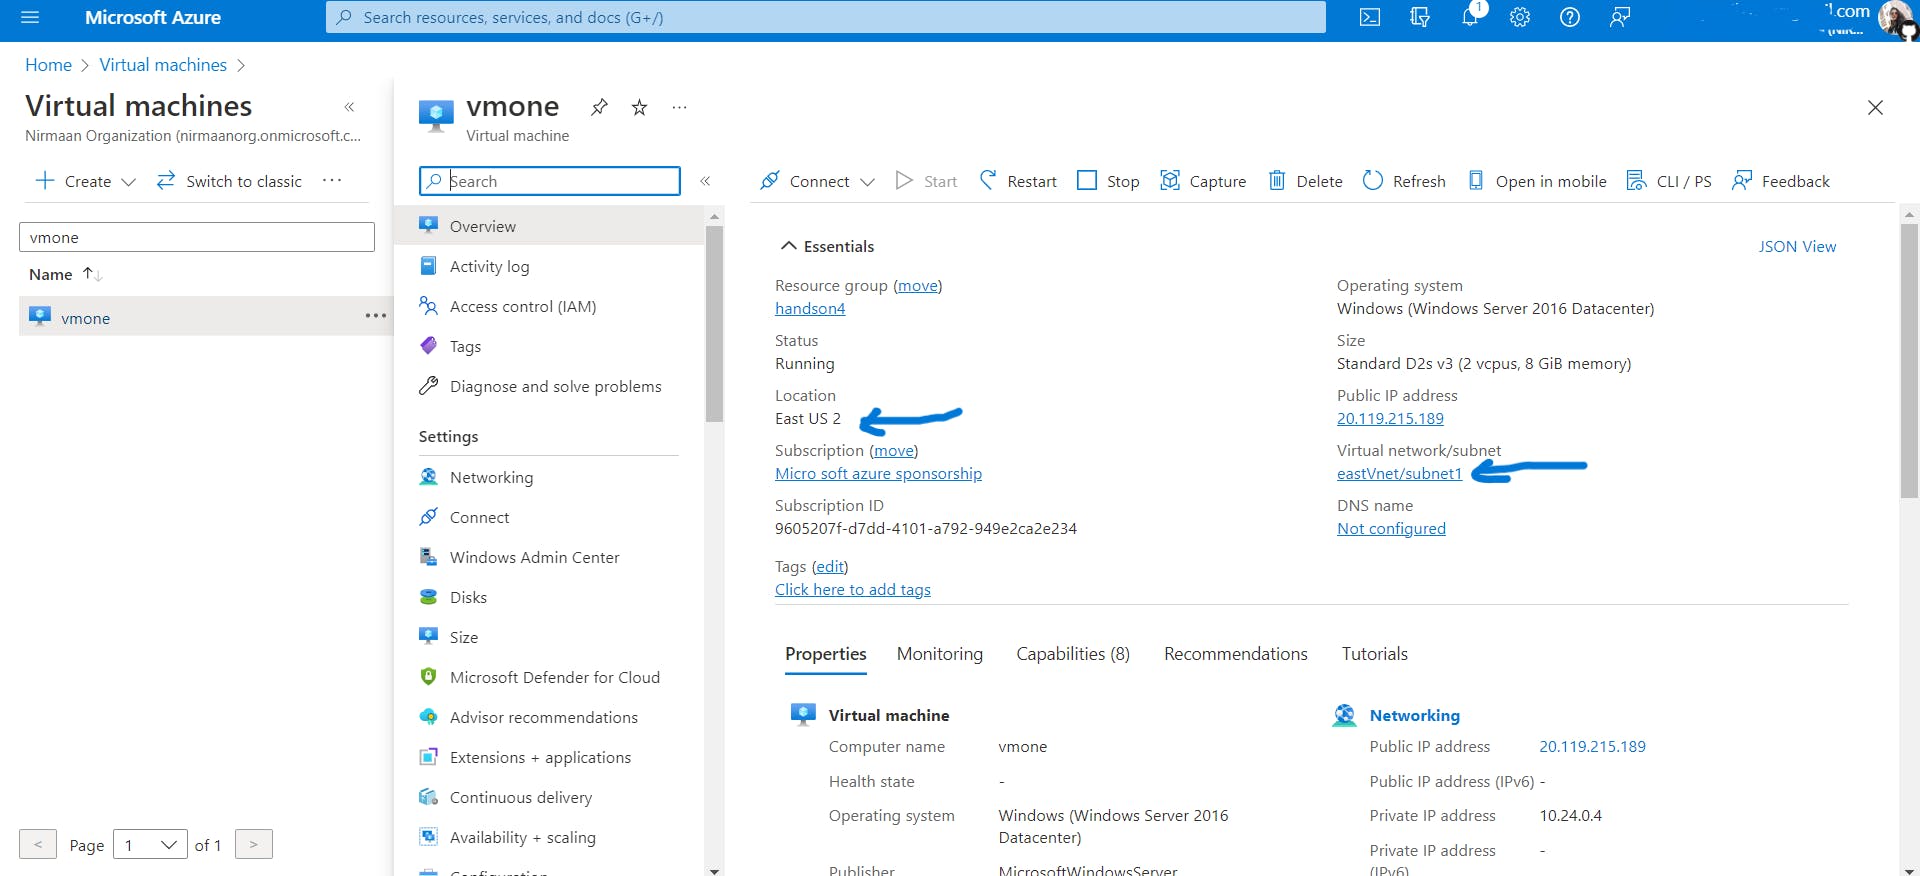
Create Vnet named
eastVnetin the East US 2 region and create a VM namedvmonein the East US 2 region insideeastVnet.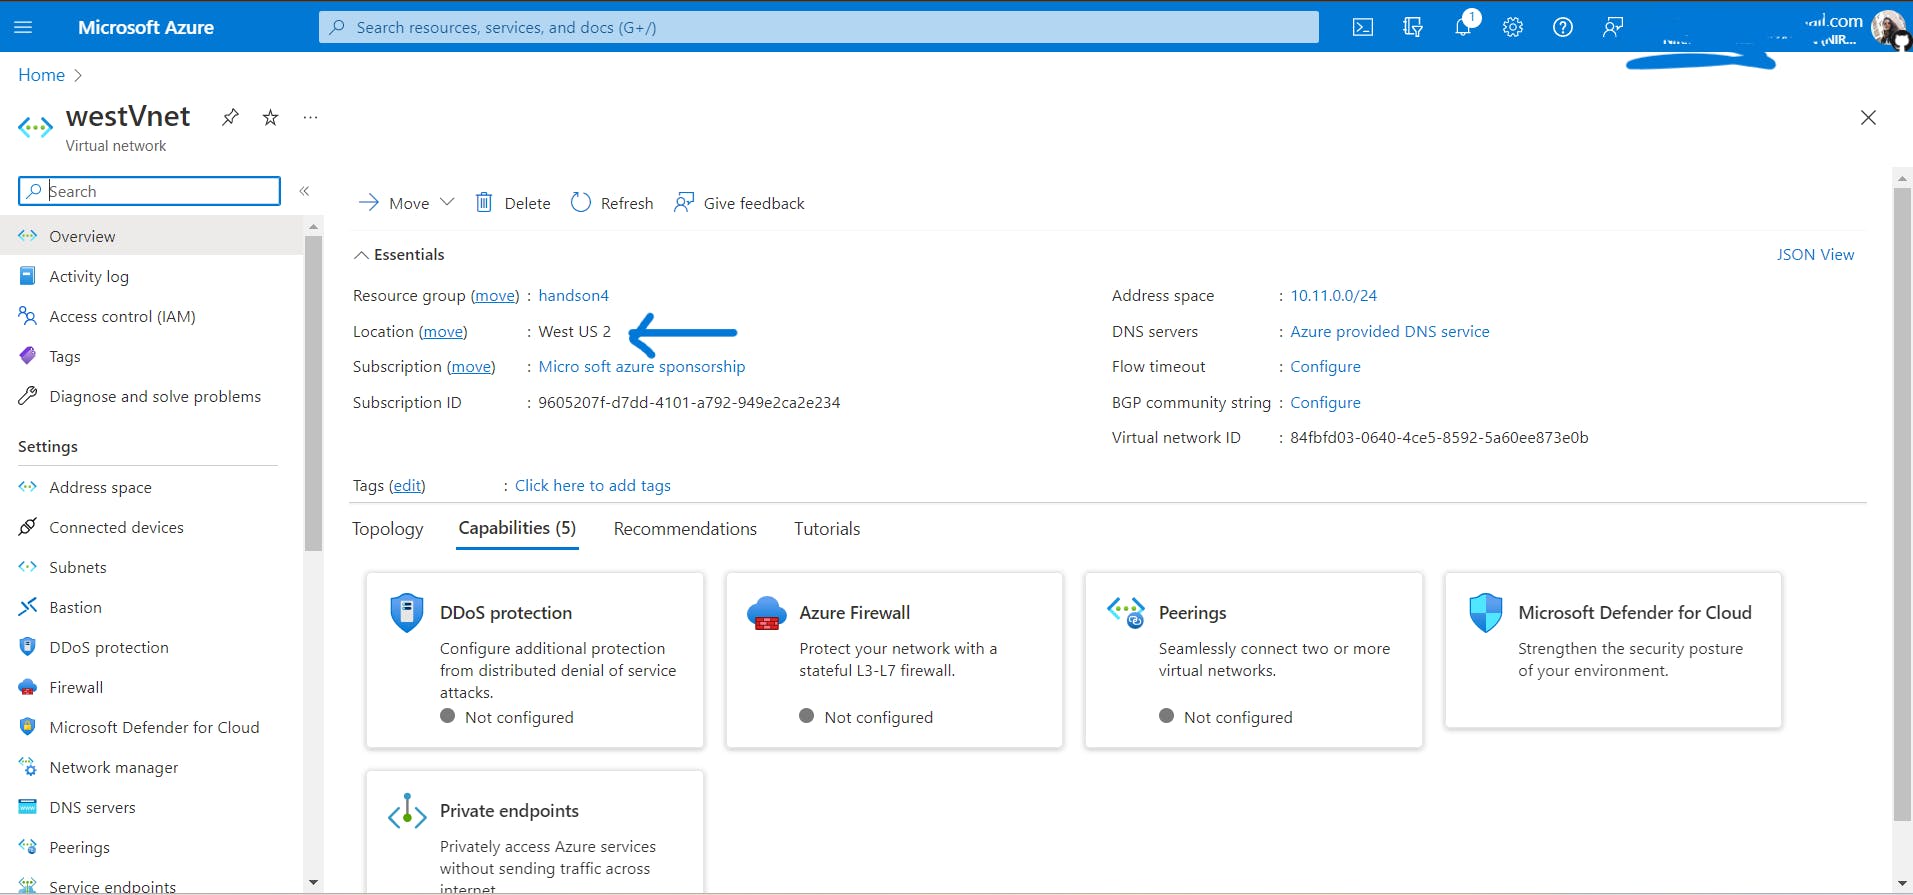
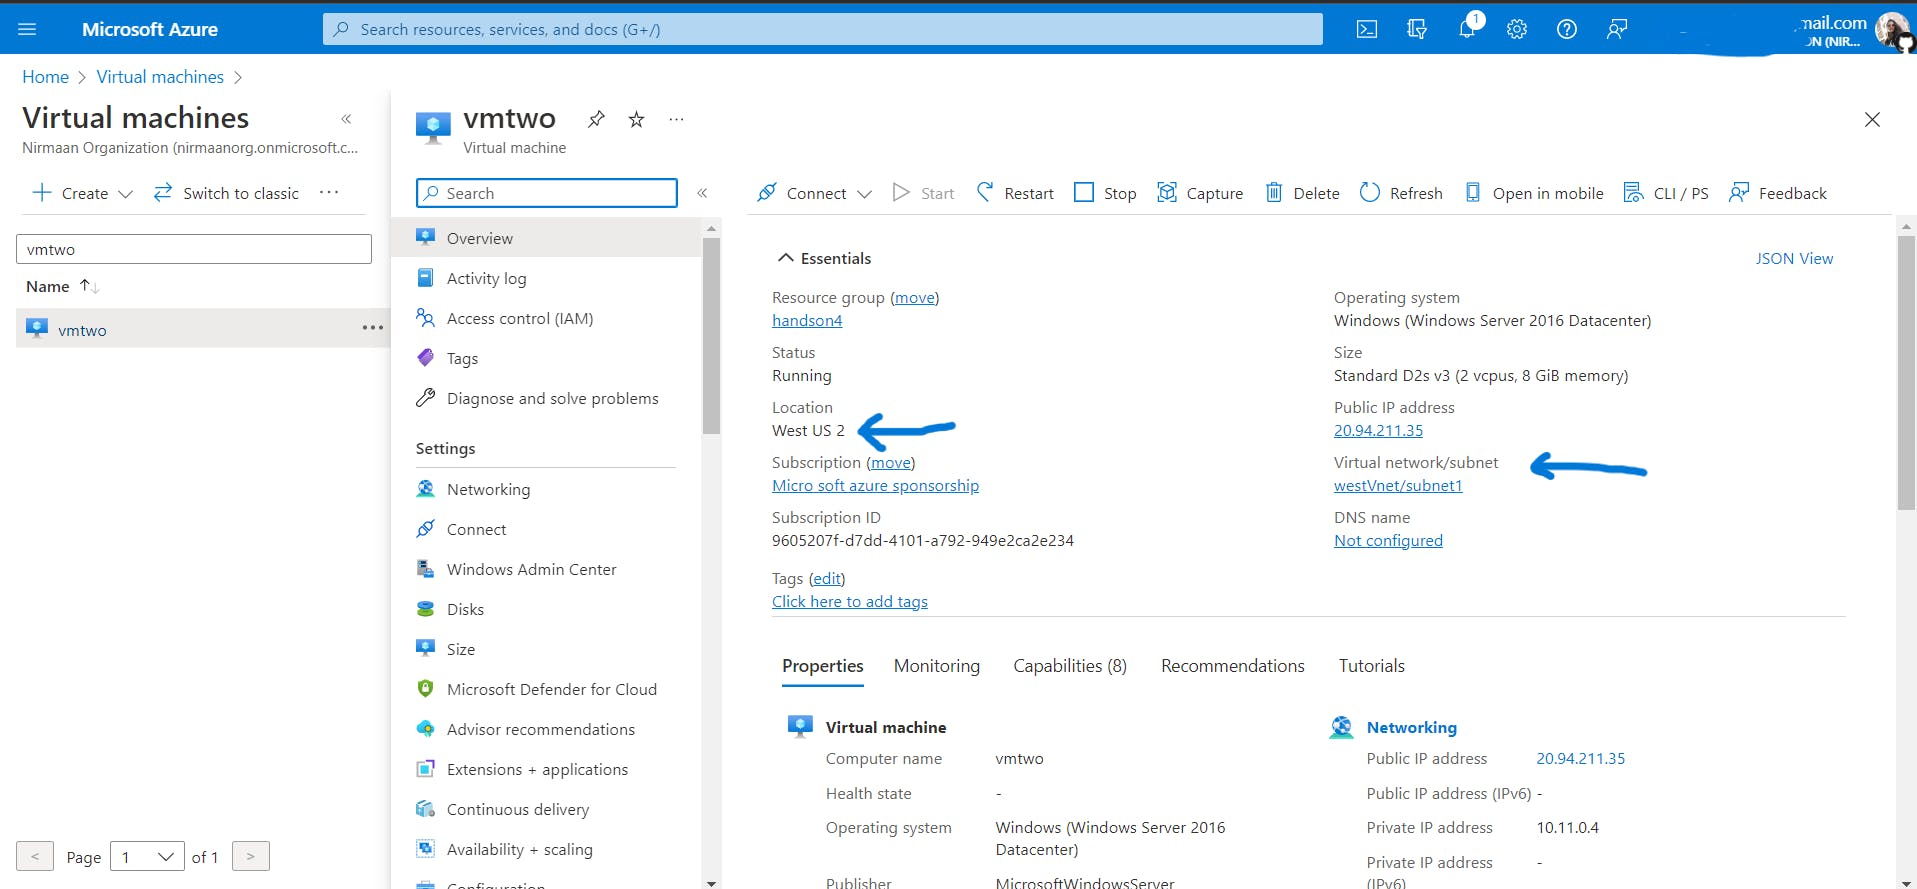
Create Vnet named
westVnetin the West US 2 region and create a VM namedvmtwoin the West US 2 region insidewestVnet.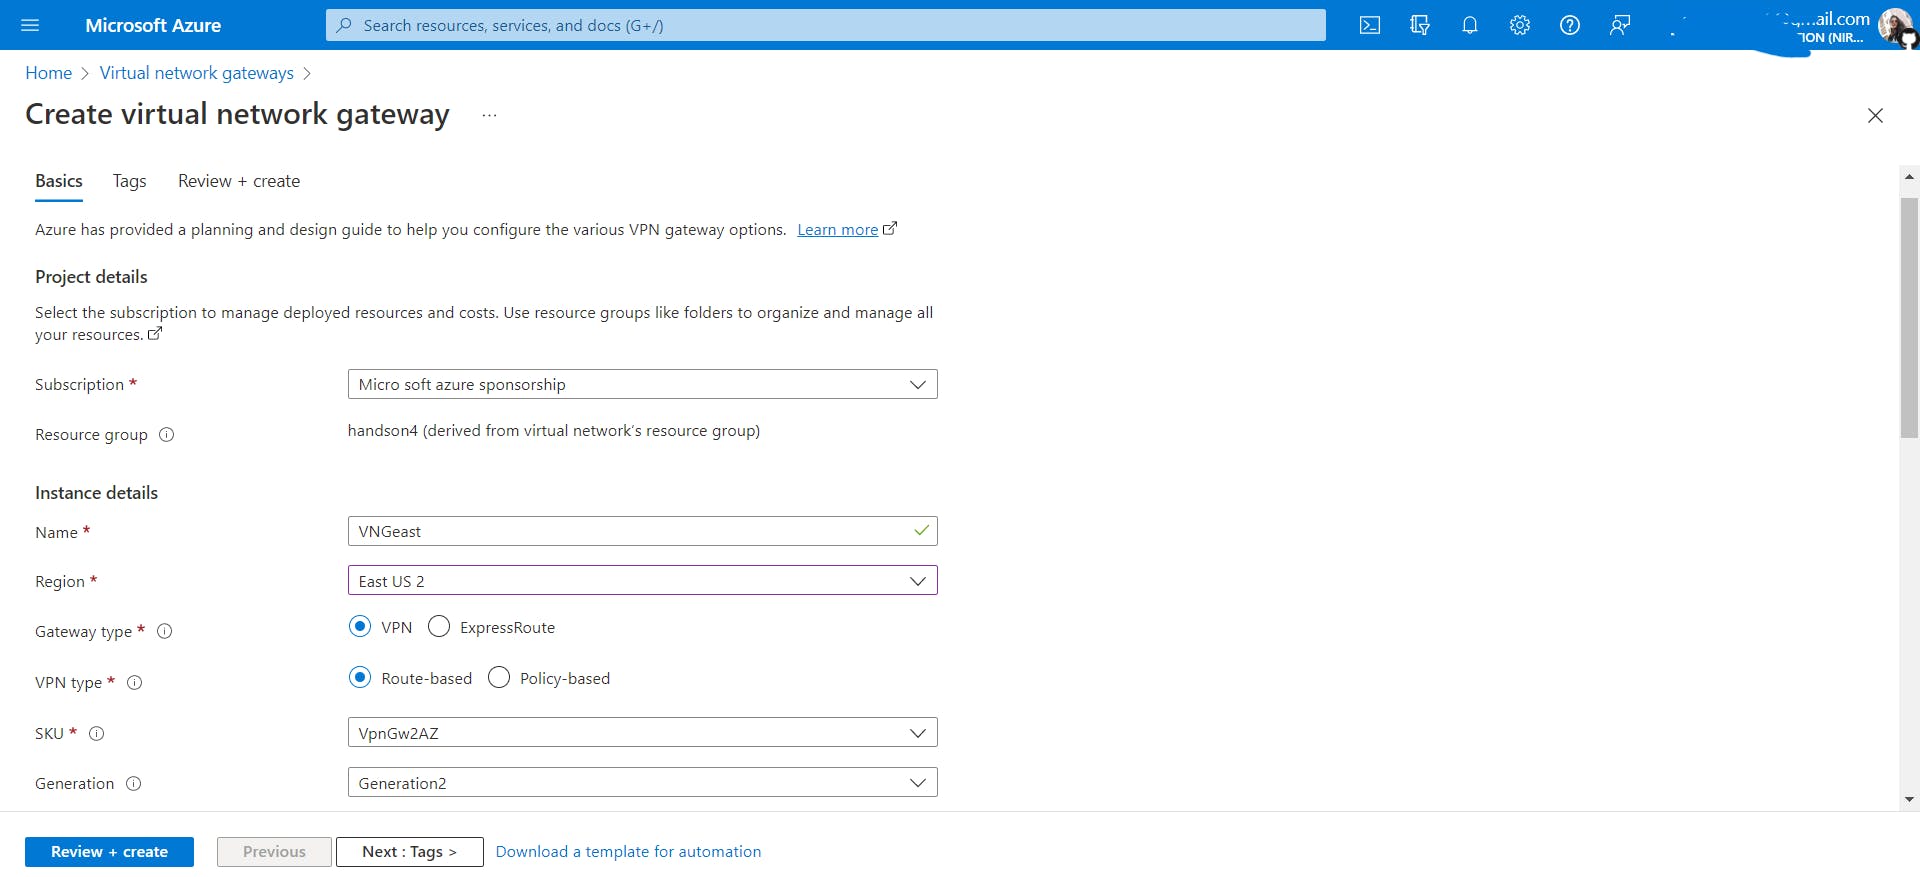
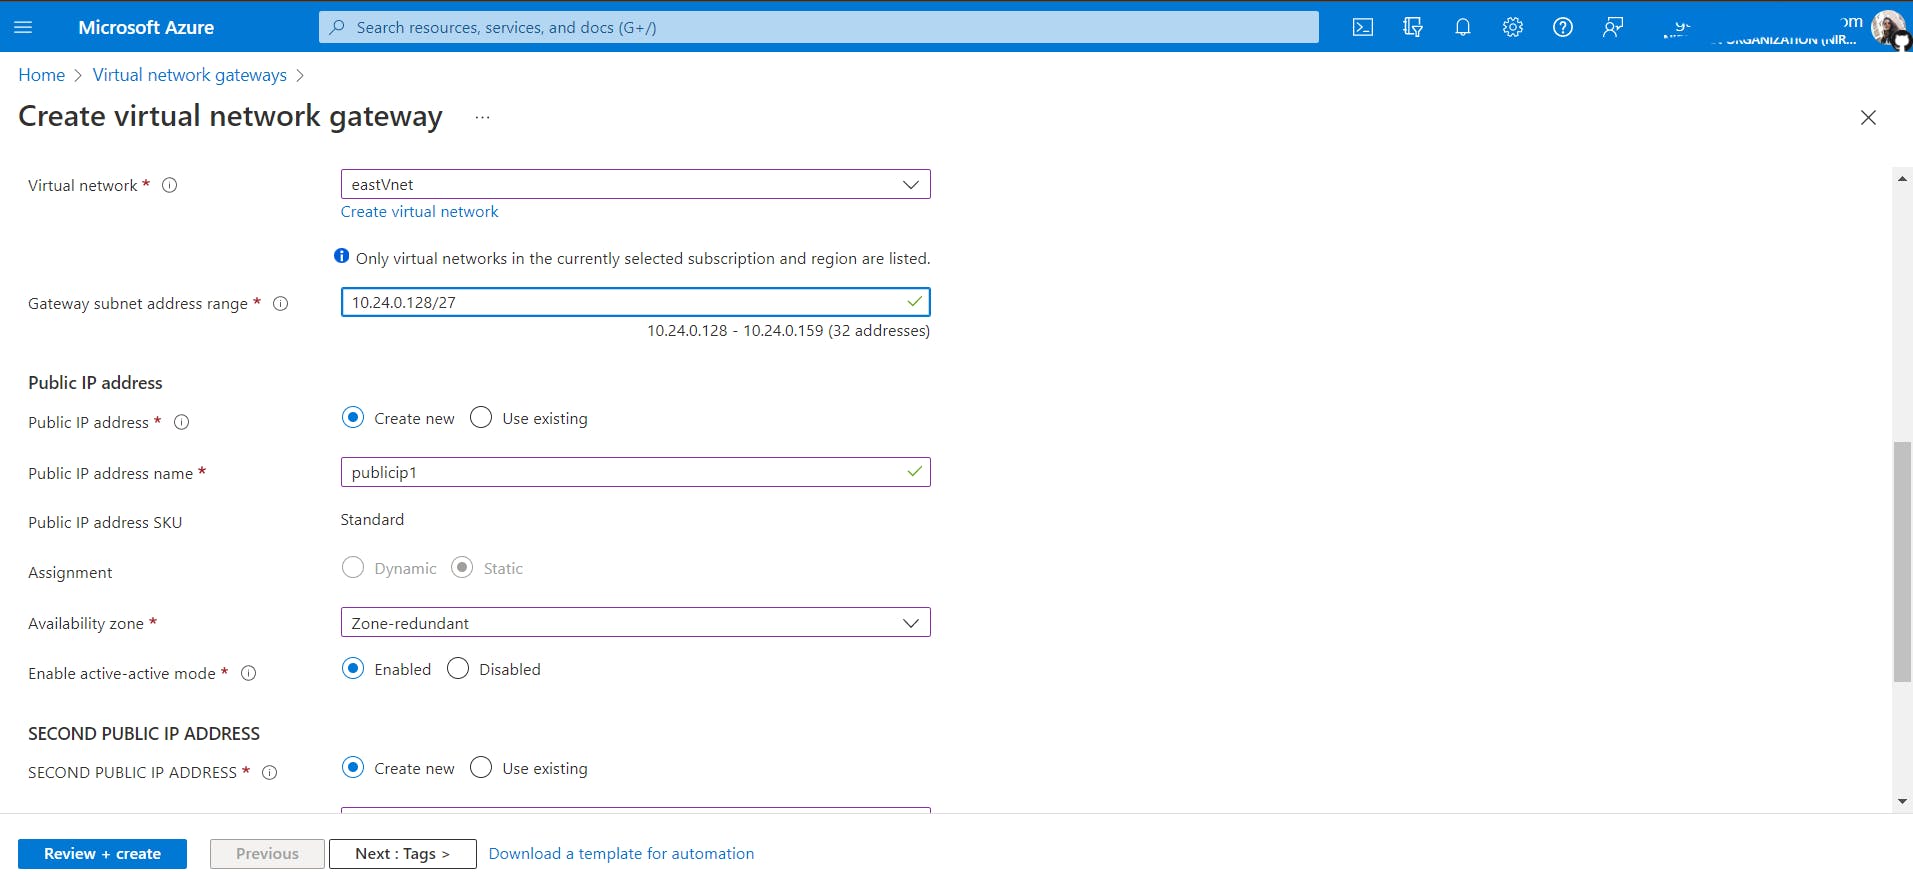
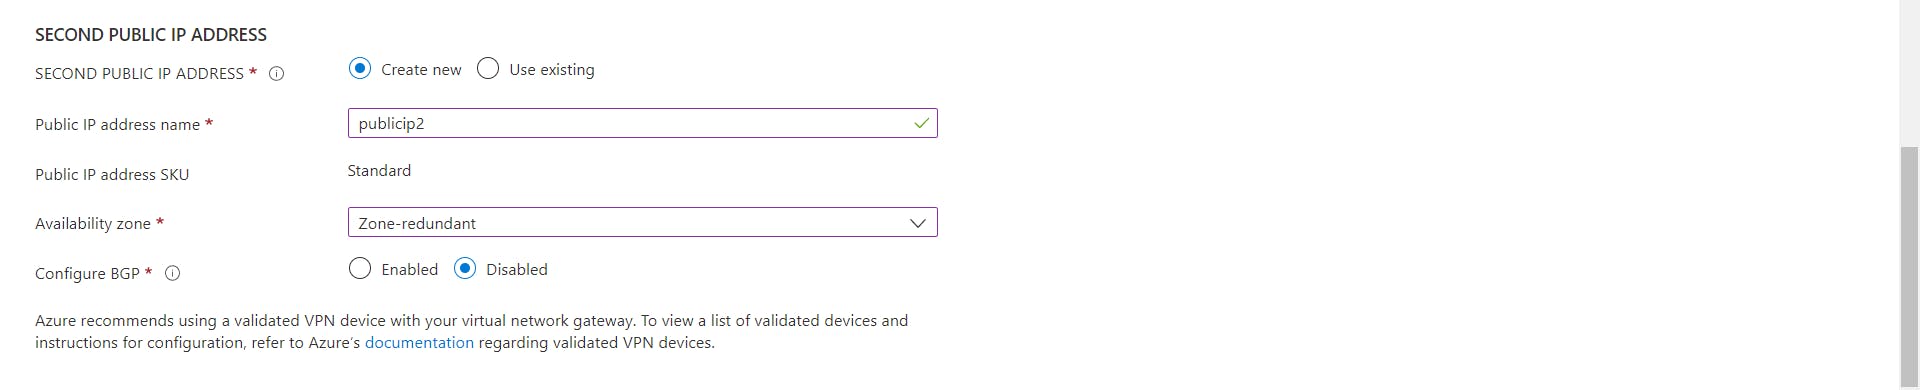
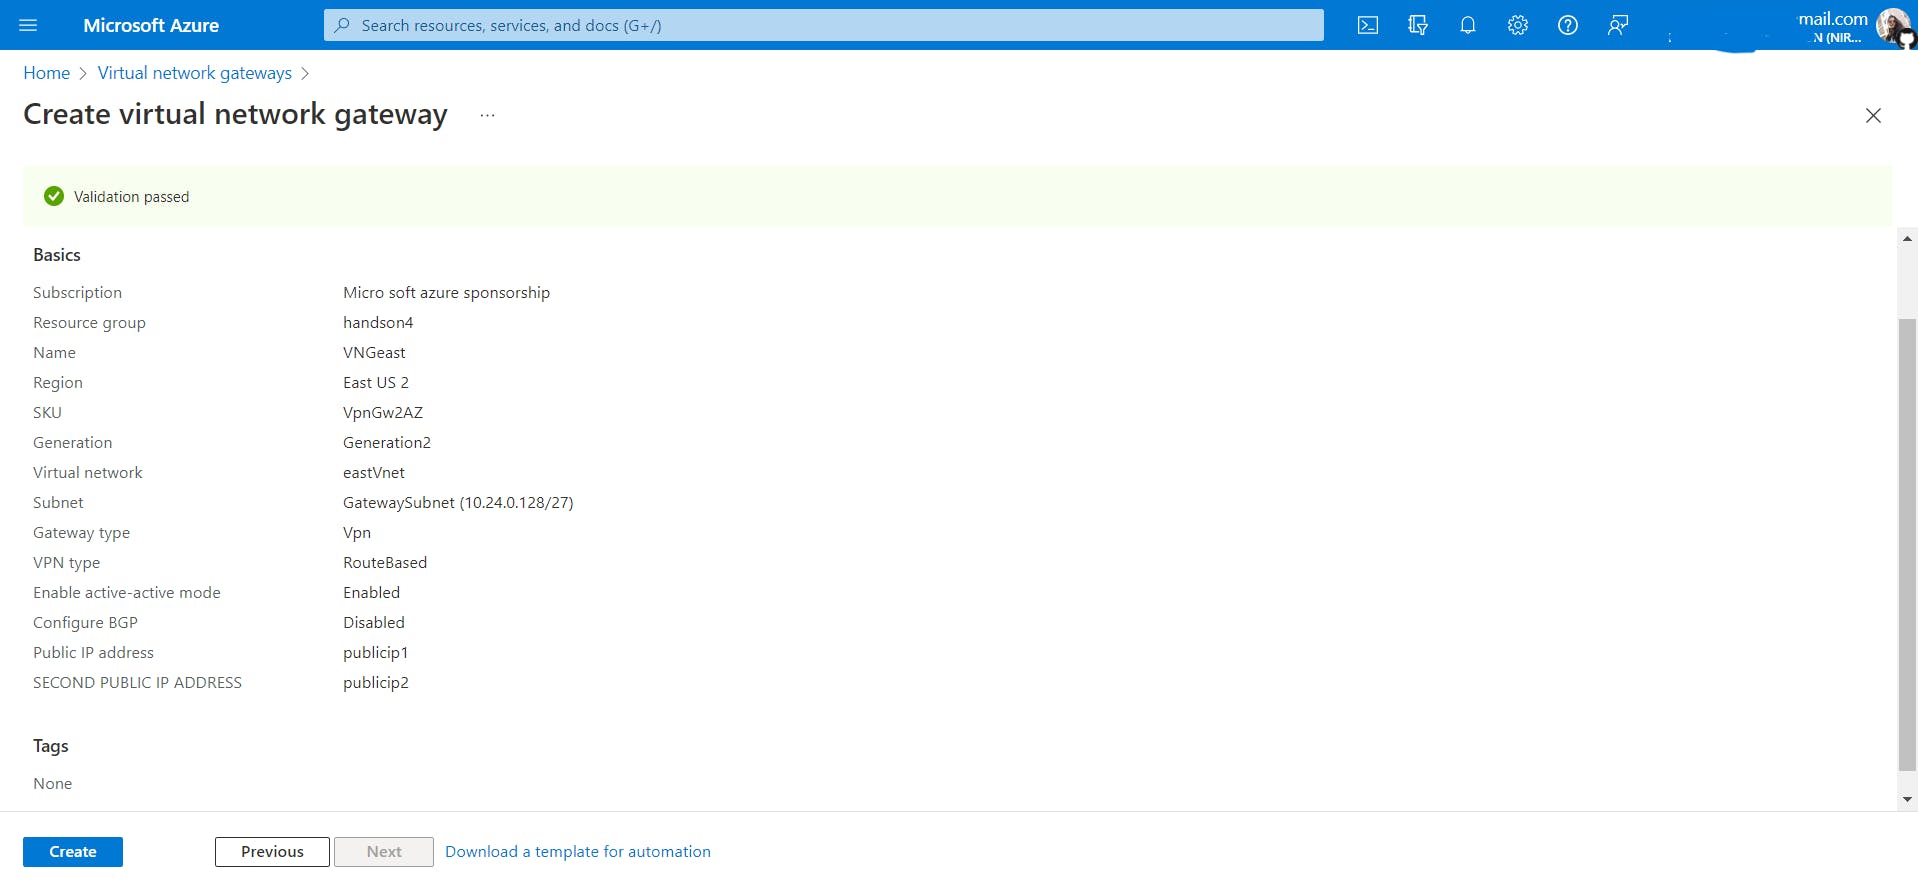
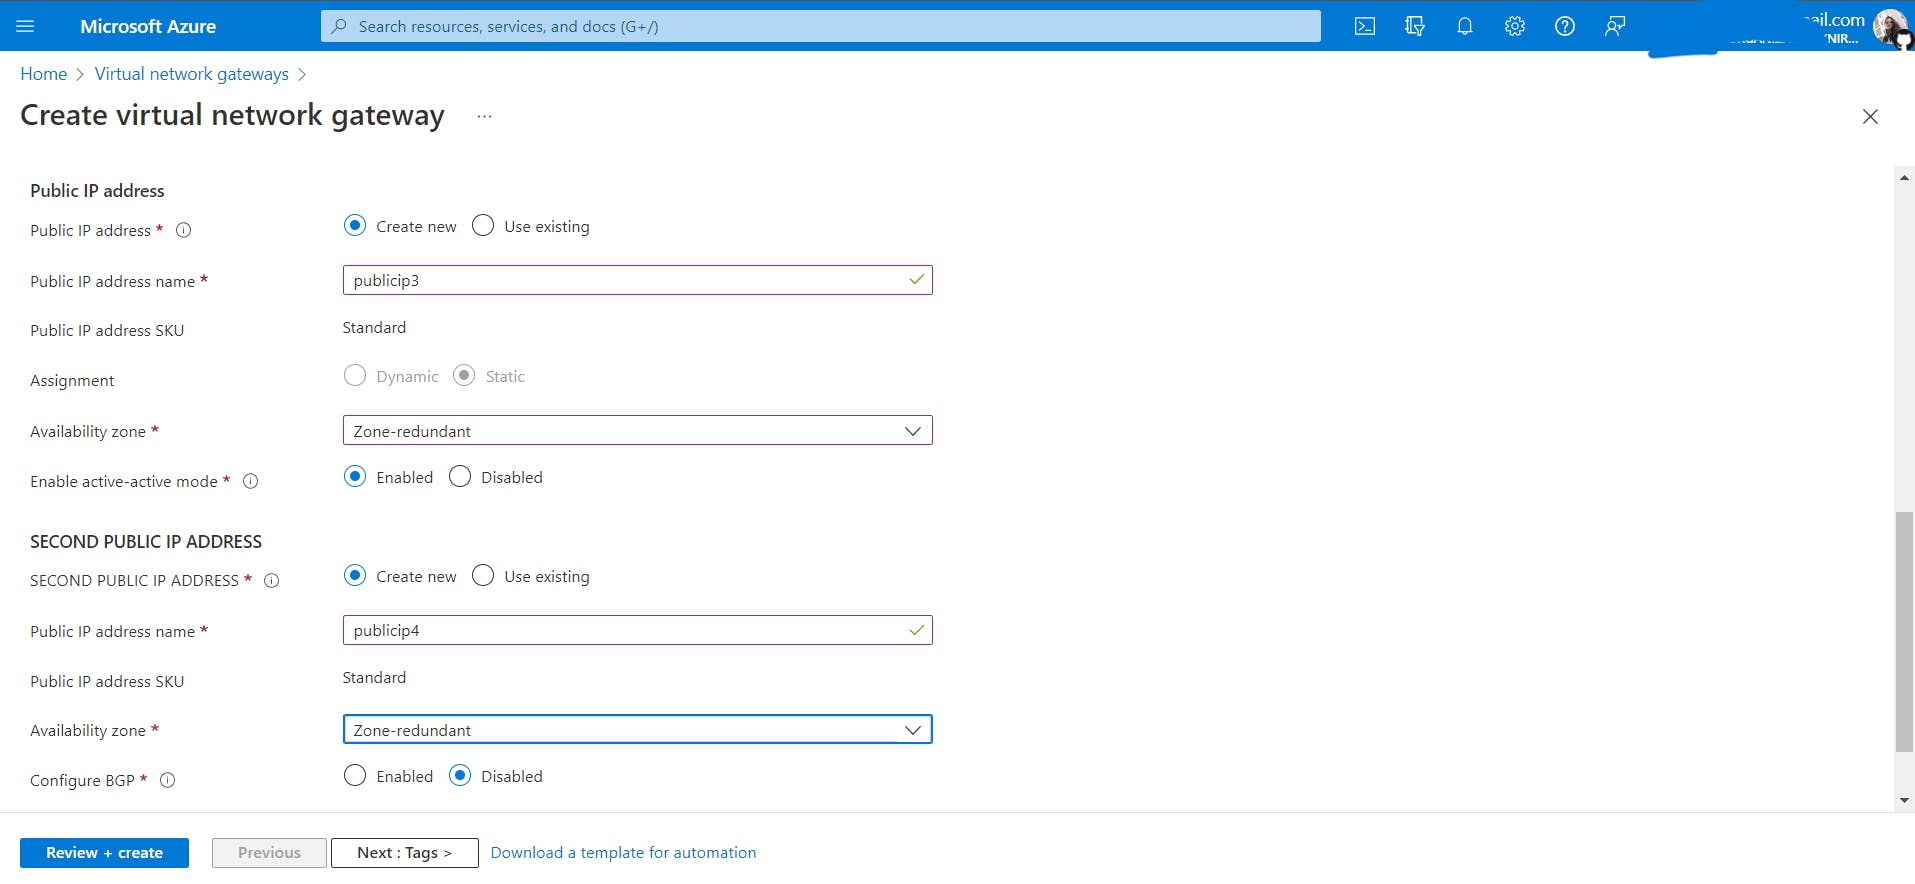
Create a virtual network gateway named
VNGeastineastVnet.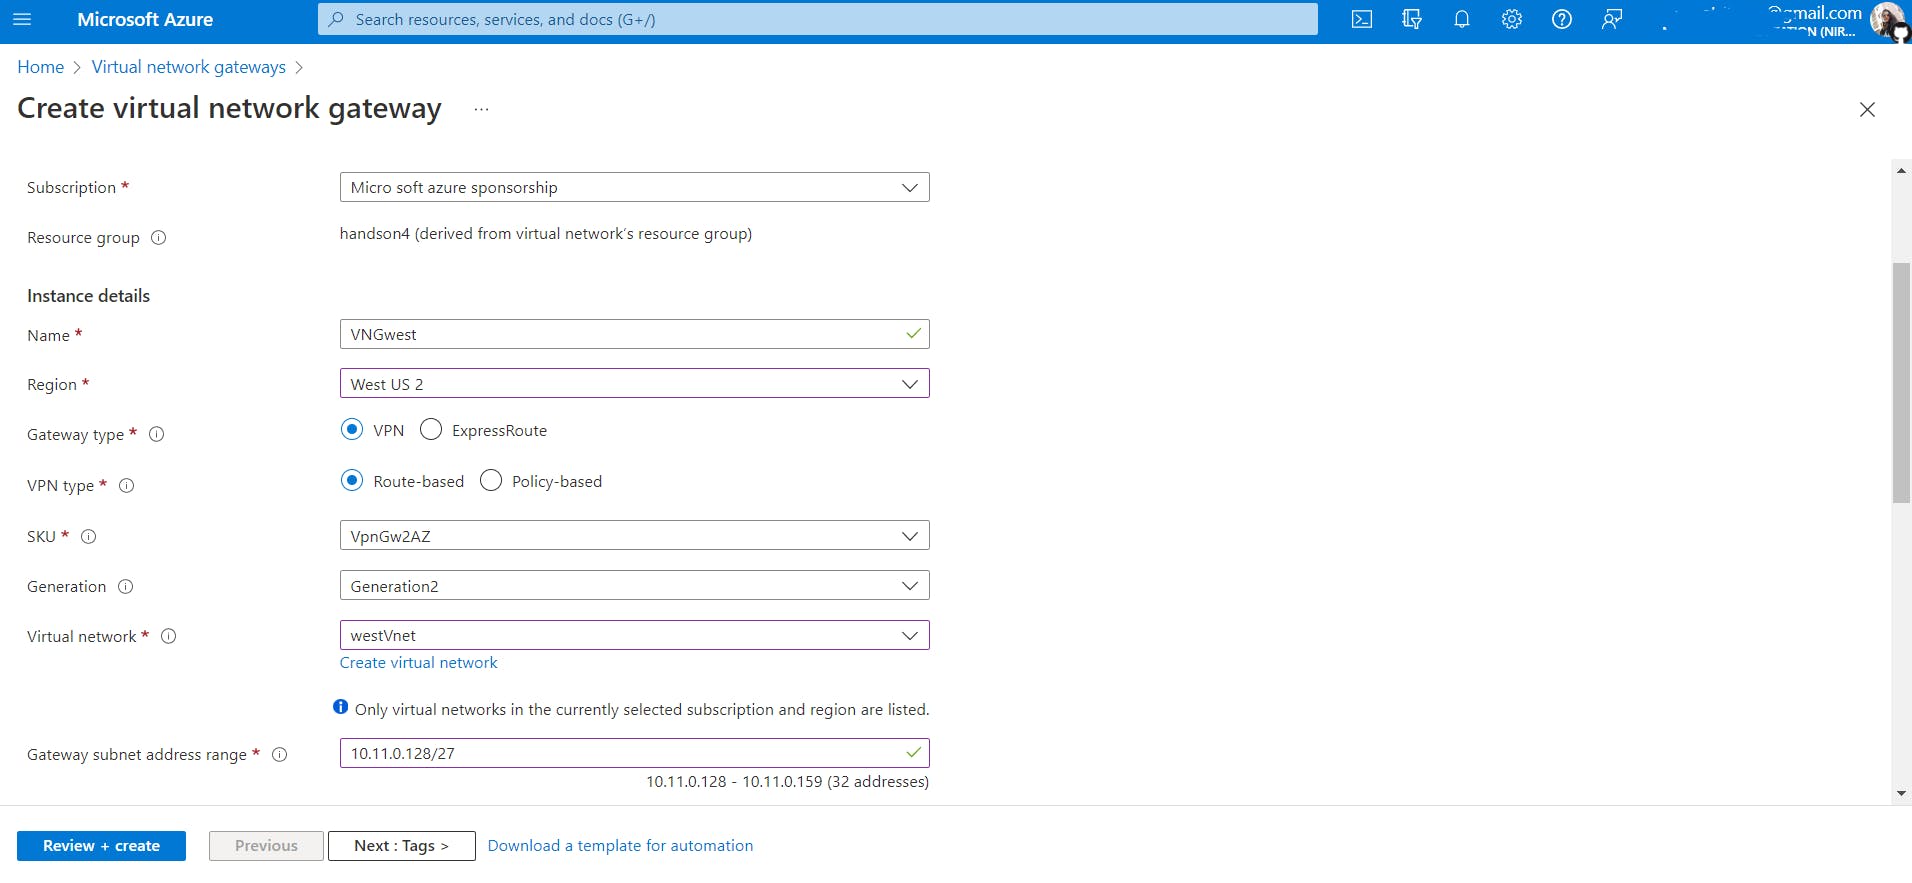

Create a virtual network gateway named
VNGwestinwestVnetPlease note that it can take about 30 minutes to create a virtual network gateway.
Create VM
vmeast(region: East US 2) in eastVM.create VM
vmwest(region: West US 2) in westVM.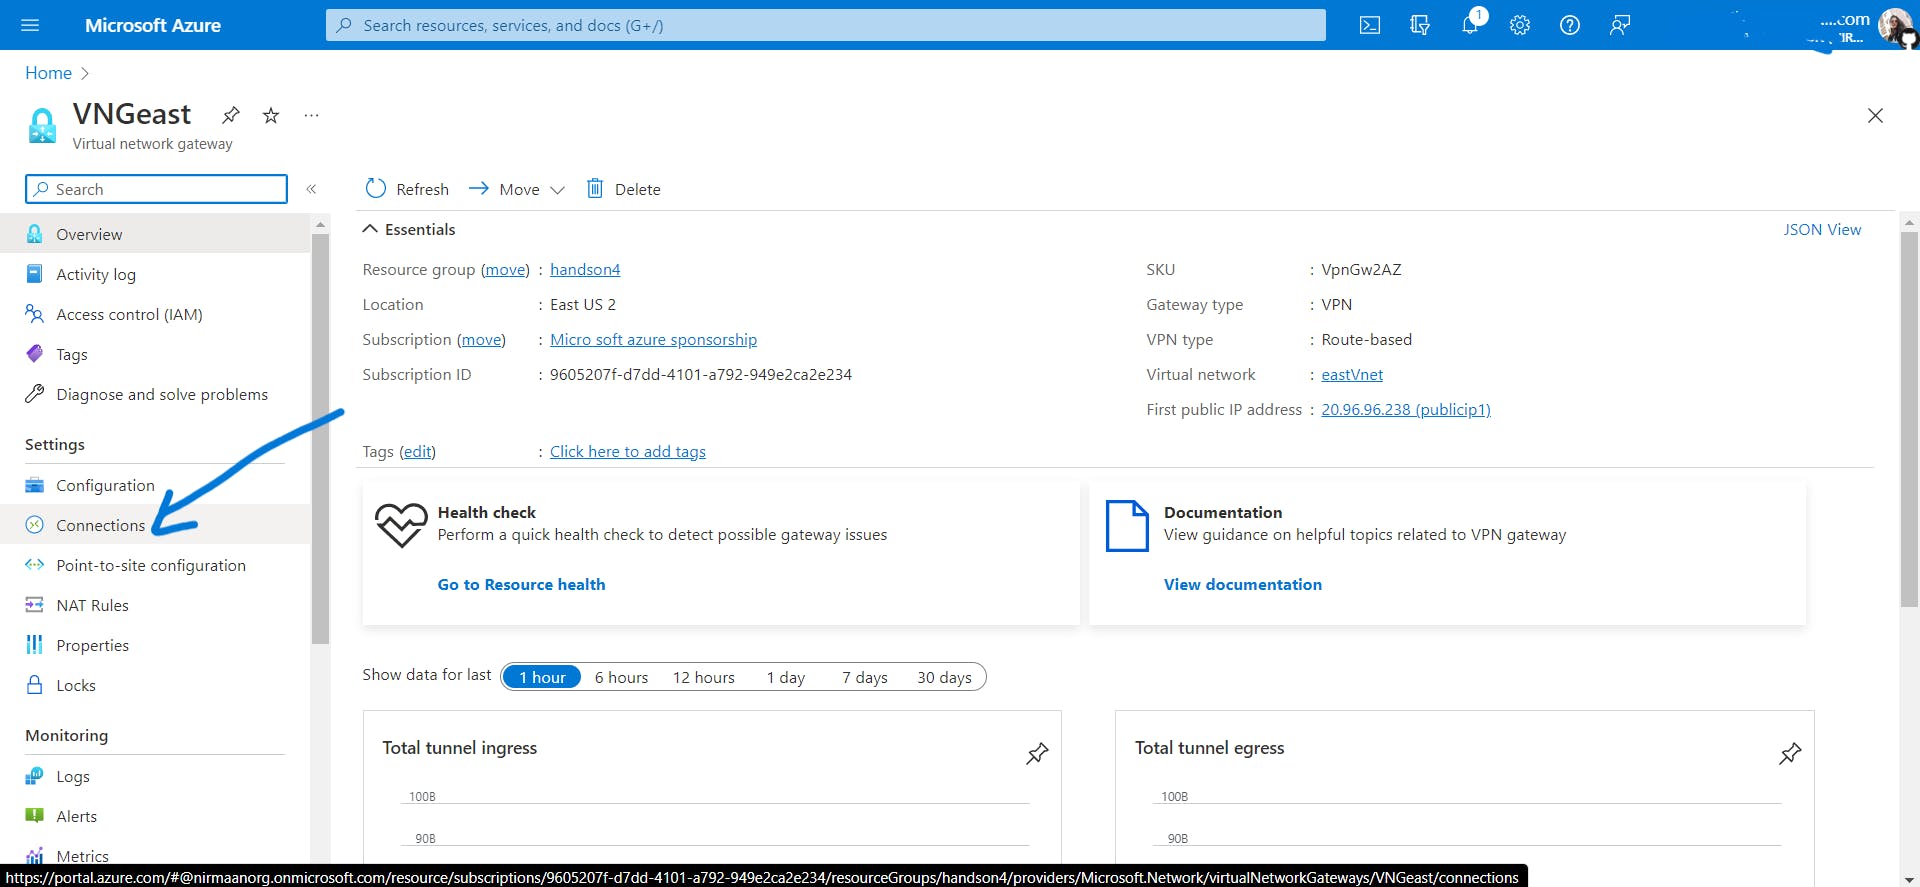
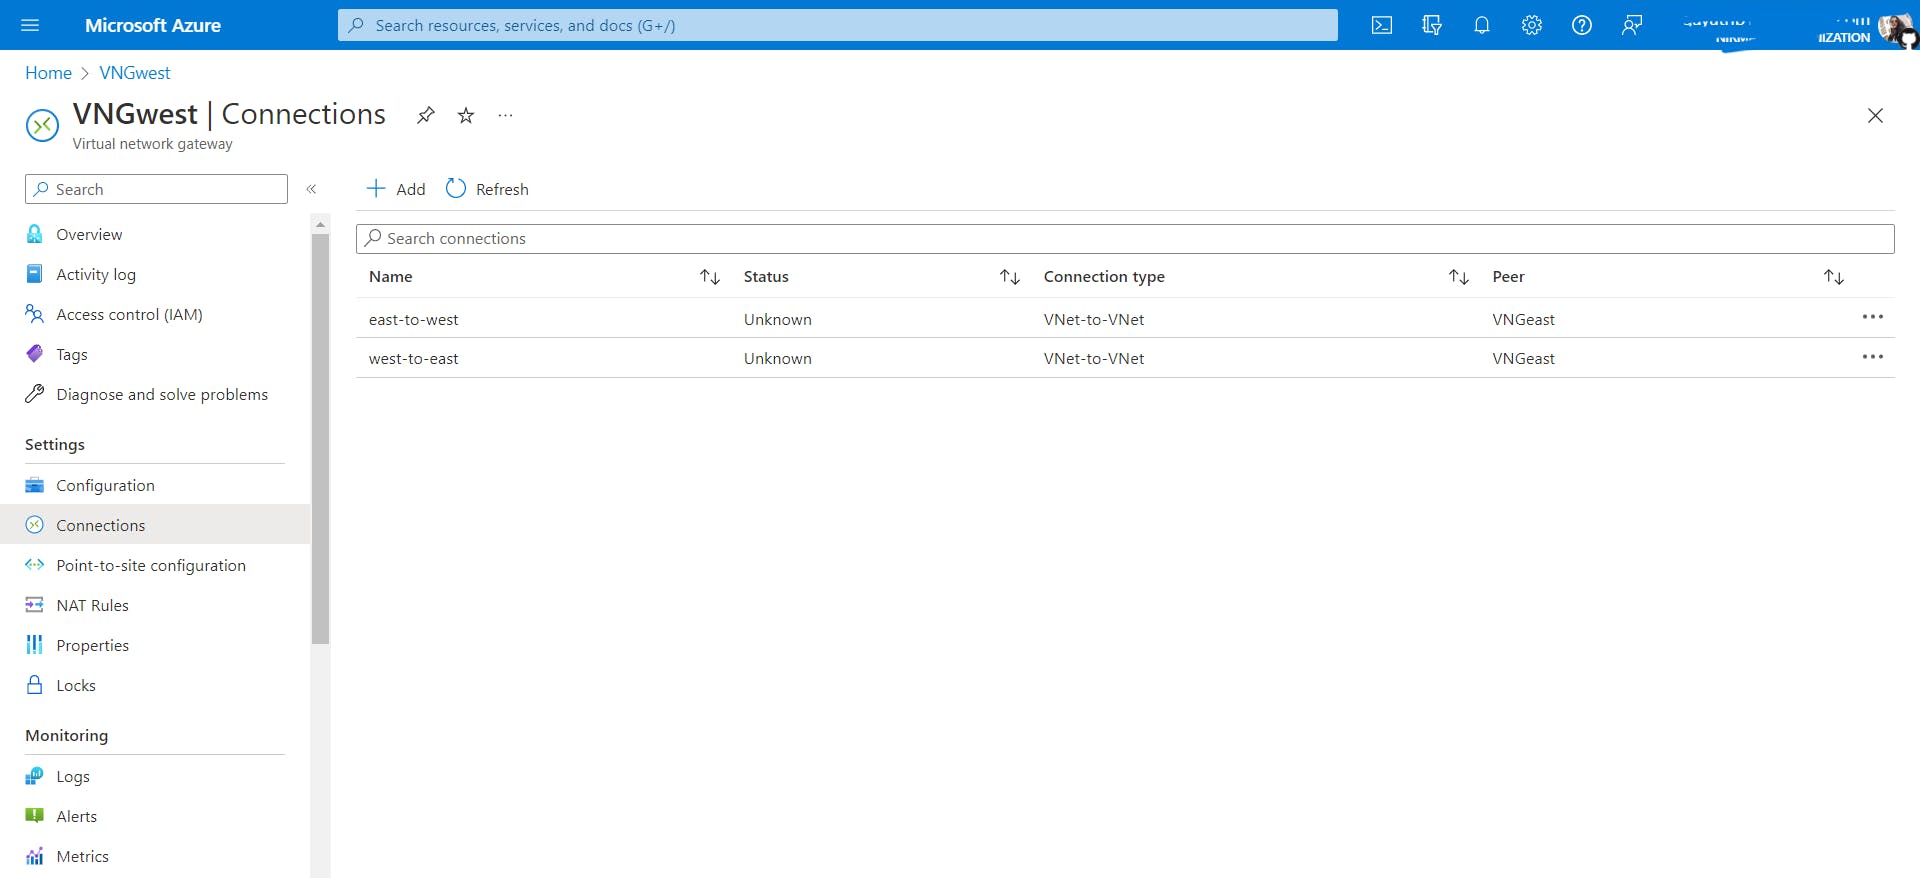
Go to
VNGeast-> connections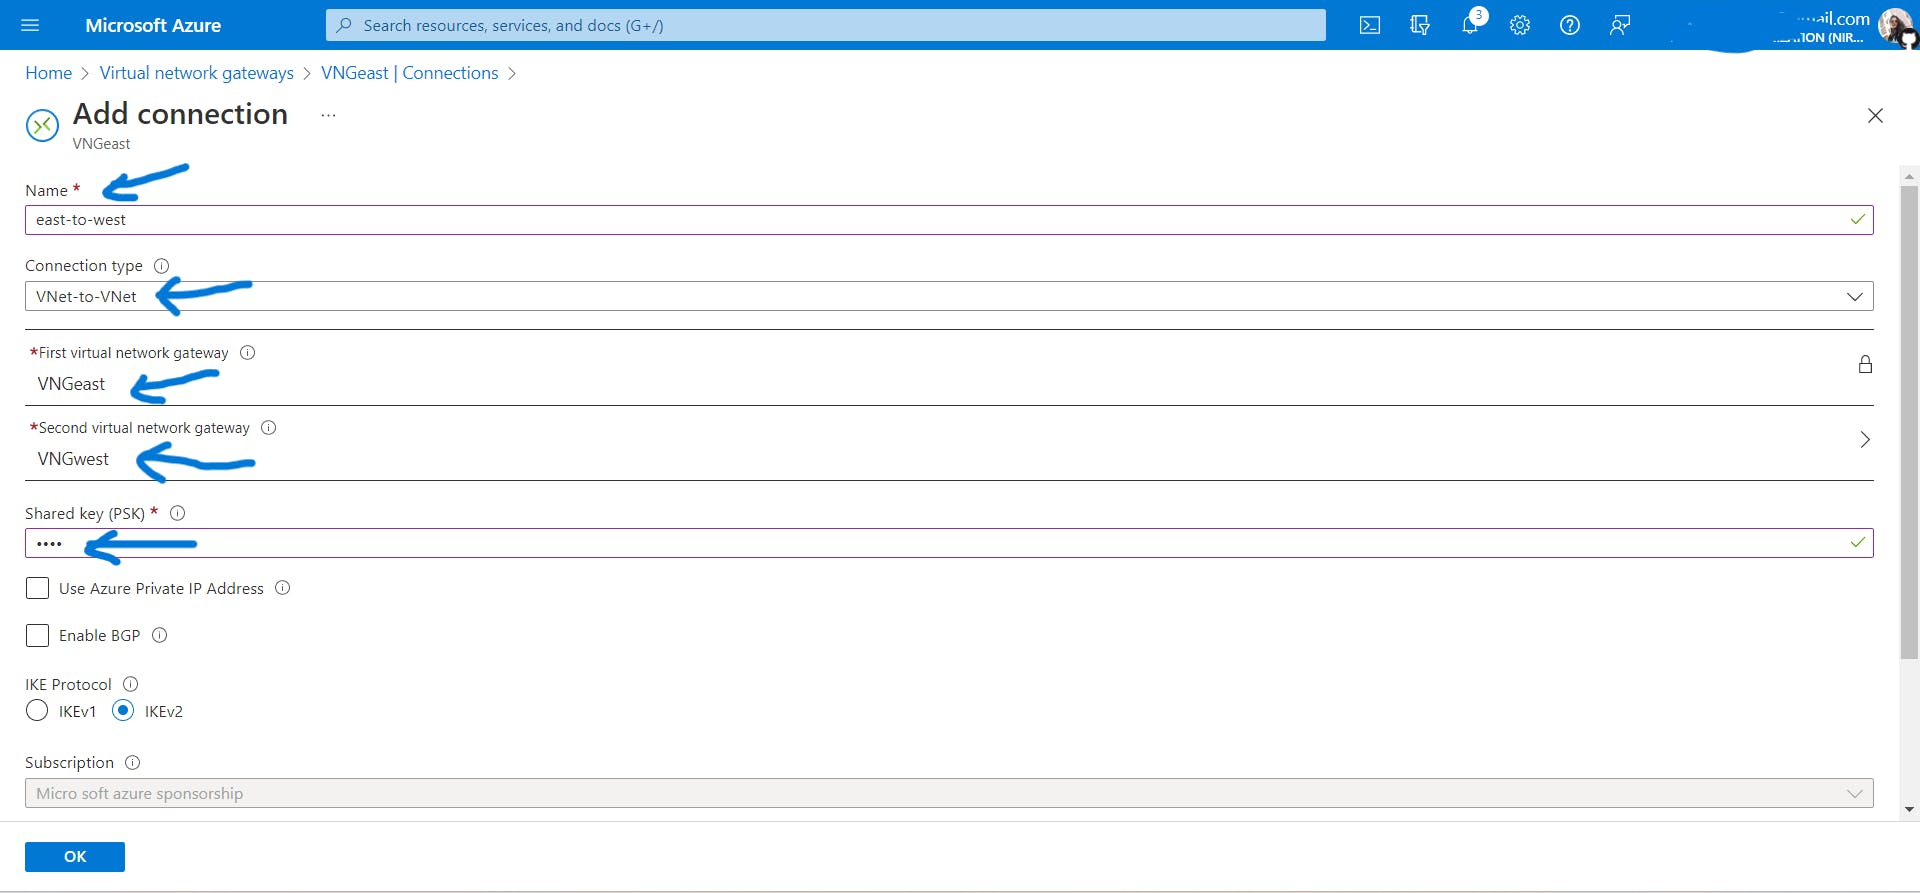
Click on add, add connection and keep other settings as it is.
Here shared key or pre-shared key (PSK) is
test.In cryptography, a pre-shared key is a shared secret that was previously shared between the two parties using some secure channel before it needs to be used. It is used here to authenticate the Cloud VPN tunnel to your peer VPN gateway.
While adding a connection, you will encounter three options:
VNet to VNet: It is a simple way to connect VNets. When you connect a virtual network to another virtual network with a VNet-to-VNet connection type (VNet2VNet), it's similar to creating a Site-to-Site IPsec connection to an on-premises location.
Site-to-Site VPN: Suppose you are at your TCS office in Bangalore and you need to connect with some employees at another office let's say Mumbai then, in this case, you will be using a site-to-site VPN. Companies or organizations, with branch offices in different locations, use Site-to-site VPN to connect the network of one office location to the network at another office location.
ExpressRoute: ExpressRoute connections don't go over the public Internet. They offer higher security, reliability, and speeds, with lower and more consistent latencies than typical connections over the Internet. By bypassing the public internet altogether, an ExpressRoute connection ensures greater uptime as well as faster transfer speeds.

You can see the connection and the peer is VNGwest.
Go to VNGeast and add a connection to
VNGwestsimilarly.Note:
When you add a connection from
VNGeasttoVNGwest, you will also see the connection fromVNGwesttoVNGeastin theVNGwestconnections tab. Azure does it automatically.

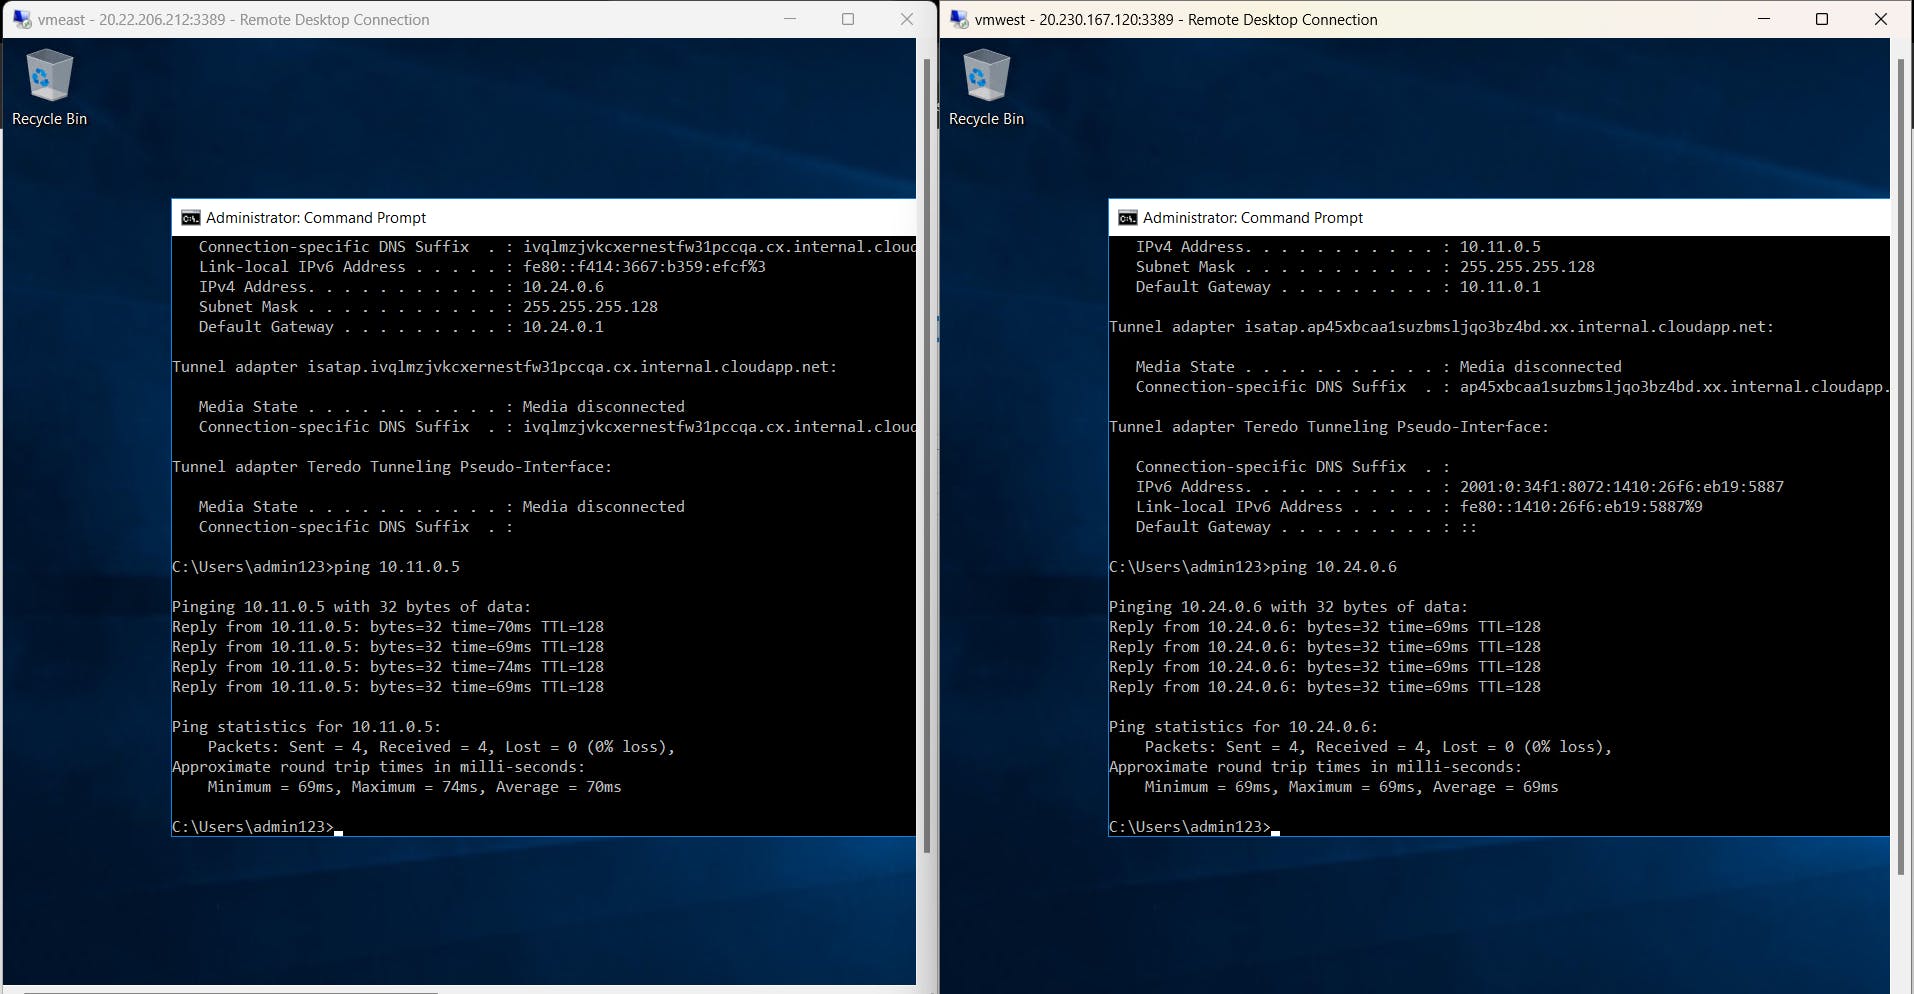
Now ping both VMs and you should be able to communicate them with each other as shown above.
FINALLY, we are done with hands-on4. I am frazzled!
Try it Yourself!
Connect two VNets in different regions using VNet peering (which is called global peering)
Connecting two VNets in the same region using VPN Gateway.
You can go for more than two VNets also.
That's all for this article. If you got any doubt, please do comment and I will help you. Also if you folks want a dedicated blog on networking topics like classful addressing, CIDR, and Subnetting (fixed and variable length subnetting), then please suggest me in the comment section because these are super important concepts.
Please like and comment! Thanks for reading🥰👍