

Alternative to Chef and Ansible - The Puppet
Puppet - The Configration Management Tool

I'm a Tech-Enthusiast worked on different technologies like Cloud computing, DevOps toolset, and web technologies
What is Puppet
Puppet is a system management tool for centralizing and automating the configuration management process. It helps an administrator to declare the system configuration and apply it across one or many systems at a time. It is an open-source configuration management software, which is built with Ruby and offers custom Domain Specific Language (DSL) and Embedded Ruby (ERB) templates to create custom Puppet language files, offering a declarative-paradigm programming approach.
It is a Pull Type of Configuration Management Tool.
Puppet implements “Infrastructure as code,” coding an IT organization’s policies, tasks, instructions, and others.
Why Use Puppet?
Puppet enables smaller teams to accomplish more tasks through advanced automation. Data and server center updates can occur in seconds. The fallout from server failures is mitigated as Puppet can instantly roll back to previous working states. Puppet eases deployment hassles with on-demand server deployments and enforced security. It’s all enabled via simple Ruby scripts.
For example, you have an infrastructure with about 100 servers. As a system admin, it’s your role to ensure that all these servers are always up to date and running with full functionality. To do this, you can use Puppet, which allows you to write a simple code which can be deployed automatically on these servers. This reduces h
uman effort and makes the development process fast and effective.
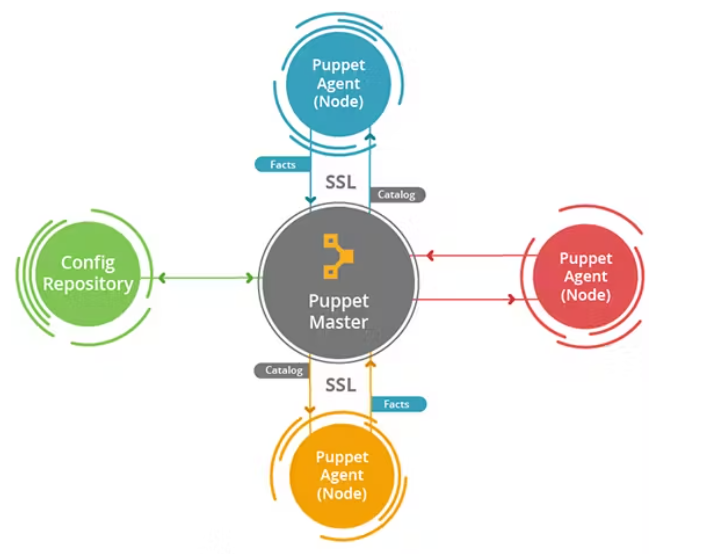
Puppet Architecture
Built on a master-slave architecture comprising a Puppet-master and Puppet-client, multiple clients may connect to the Puppet-master, where coding is written and stored. If the client requires configuration codes, he simply requests them.

Puppet Master
Puppet master stores all the Configuration files, It is place where the system administrator write and store codes and there are N numbers of clients connected to Puppet master. There are three as follows,
These three sub-components ( manifests, templates, and files) tie into a single unit called Modules
Manifest
Where Ruby code is written, These codes dictate the instructions for performing various tasks for the client.
Templates
Templates contain the data. For instance, if a user wished to create a file called index.html on one of the client machines, that user could write the code in the manifest. The file’s content is written in the templates. By linking the manifests and templates, files are sent to the client for downloads.
Certificate Authority (CA)
The certificate authority (CA) is a critical Puppet master component. Puppet-master and the Puppet client communicate through an exchange of SSL certificates; when the client sends the certificate to the master, CA provides the master authority to sign the certificates. Once the master signs a certificate, it confirms the client is registered and grants authority to exchange data.Puppet-client
Puppet-client
Agent
The agent is the service installed on the client, The agent component is solely responsible for communication between the master and the client, agent continuously interacts with the master and sends the certificate
Factor
The factor component collects all data on the client’s present state then sends it to the Puppet-master. Data is compared against the manifest, which is sent to the client (depending on the comparison results).
The Working of Puppet
In a scenario with a master and three clients, each component identifies itself to the others, forming an encrypted channel of communication. All data is transferred between the master client flows through this channel.
The SSL (Secure Socket Layer) Certificates which provide an encrypted channel are at the core of this procedure. The certificates ensure data passing through an encrypted channel is inaccessible to outside systems.
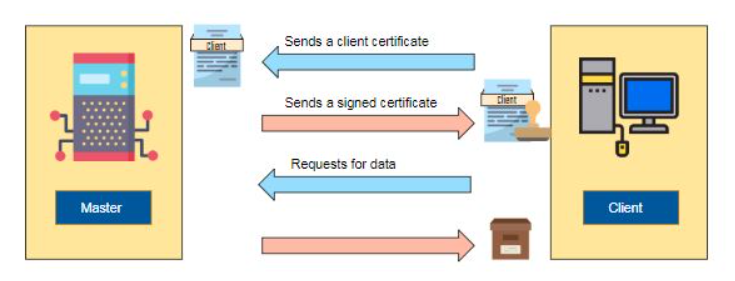
Factor collects the state of the clients and send it to the master. Based on the information sent, master compiles manifests into catalogs, then sends them to the client. Agents execute any required change s and send reports back to the master. If a system fails, the master has a record of all system changes for a rollback to a previous working state. This procedure can be repeated at regular intervals -- automatic settings to run every 30 minutes, for instance.
Writing the Manifest Or Puppet Coding
The most basic component of Puppet Code is a resource. A resource describes something about the state of the system, such as a certain user or file should exist, or a package should be installed, etc.
Syntax
resource_type { 'resource_name':
    attribute => value,
    ....
}
For Example
package { 'nginx':
    ensure => 'installed'
}
Manifest
Manifests are basically a collection of resource declarations, using the extension .pp
For Example
package { ‘nginx’:

    ensure => ‘installed’,

}

file { '/tmp/hello.txt’:

    ensure => present,

    content => ‘hello world’,

    mode => ‘0644’,

}
Components of manifest
Variable
Variables can be defined at any point in a manifest. The most common types of variables are strings and arrays of strings, but other types are also supported, such as booleans and hashes.
For Example,
‘$text = “hello world”

file {‘/tmp/hello.txt’:
    ensure => present,
    content => ‘hello world’,
    mode => ‘0644’,
}
Loop
Loops are typically used to repeat a task using different input values. For instance, instead of creating 10 tasks for installing 10 different packages, you can create a single task and use a loop to repeat the task with all the different packages you want to install.
Spackages = [‘nginx’mysql-server’]

    package { Spackages:
    ensure => installed,
}
Conditions
Conditionals can be used to dynamically decide whether or not a block of code should be executed, based on a variable or an output from a command, for instance.
exec { “Test”:
    command ‘>‘/bin/echo apache? is installed >  /tmp/status.txt’,
    onlyif => ‘/bin/which apache2’,
}
Puppet Installation
Puppet Server Installtion
Installing puppet server on the master machine
Download the the Puppet repository to get Puppet components using the URL in CLI
rpm -Uvh https://yum.puppet.com/puppet7-release-el-8.noarch.rpmInstall Puppet server form the downloaded repository
yum install puppetserver -yStart the Puppet Server service with systemd:
systemctl start puppetserverYou can always enable it at start too
systemctl enable puppetserverChange the Puppet Server memory allocation, you can edit the
init configfile.vi /etc/sysconfig/puppetserverEdit the file with an allocation of memory in 512MB
# Modify this if you'd like to change the memory allocation, enable JMX, etc JAVA_ARGS="-Xms2g -Xmx2g" to
JAVA_ARGS="-Xms512m -Xmx512m".
For communication between master and client, there is need to remove certain firewall
systemctl stop firewalld
Installing Client/Slave
Login to Client/ Slave machine
Need to edit the host file with root privilege, So that Puppet Master will communicate with client.
vi /etc/hostsEdit by adding
<IPV4ofPuppetMasterMachine> puppet puppet-masterDownload Puppet repository for the slave machine
rpm -Uvh https://yum.puppet.com/puppet7-release-el-8.noarch.rpmInstall the puppet Agent
yum install puppet-agentStart the puppet-agent service
/opt/puppetlabs/bin/puppet resource service puppet ensure=running enable=trueThis command will start running the puppet-agent service but also it will create an SSL certificate.
Usually the name of certificate is the Hostname of the machine
SSL certificate is a must to create a secure connection, But Certificate needs to be signed by the master to establish the secure connection between the Master and Client.
Signing the Certificate with the help of CA
Access the Puppet Master terminal,
To get the list of SSL certificates available on the Puppet master
/opt/puppetlabs/bin/puppet cert listSigning the SSL certificate
/opt/puppetlabs/bin/puppet cert sign <NameOfPuppetAgentCertificate>
In these way Connection get Established between the node and master.
Writing Manifest and Applying on node
Manifests are stored in Manifests directory located at /etc/puppet/code/environments/production/manifests, which contains the manifest file with " .pp " extension.
Created Nano file with .pp extension.
sudo nano /etc/puppet/code/environments/production/manifests/site.pp
Edit the manifest file on master with ruby code,
file{'/tmp/it_works.txt':
    ensure => present,
    mode =>'0644',
    content => "It works on ${ipaddress_eth0}!\n",}
Restart Puppet master
sudo systemctl restart puppet-master
Puppet is based on Pull configuration, Slave will check updation in /tmp directory by, command to be executed on slave
sudo puppet agent --test

Finally, result will provide the output of file.
Comparison Betweeen Different Configuration Mangement Tools

And here we are concluding the Configuration Management Tool topic.
Stay tuned!!
For any query, you can contact to Atharva Deshpande


