


In a previous blog, we have seen the installation, workstation interpretation, cookbooks, and drafting recipes. There we create two cookbooks with some recipes. With reference to the previous blog https://teckbakers.hashnode.dev/chef-the-configuration-management-tool.
In this blog, we are going to connect the Workstation to Chef-server using chef-repo and Chef-server to node using bootstrapping.
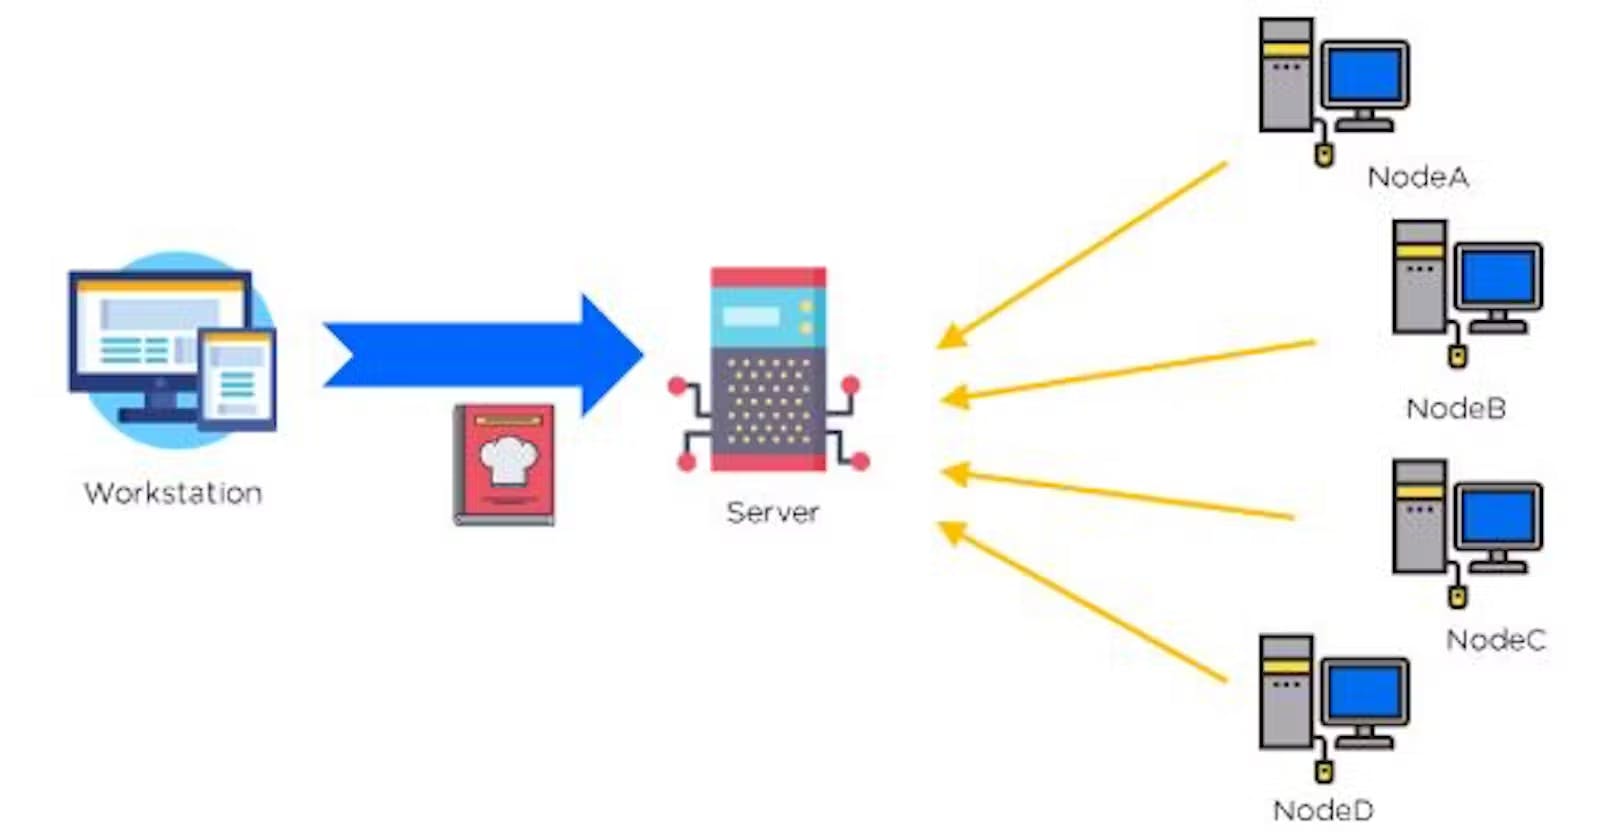
Connect a workstation to chef-server to the node using chef-repo, bootstrap
The Chef server works as a mediator between the workstation and node, there is a need to interconnect for both the workstation and node should be in the same AZ.
Two actions will be done while bootstrapping,
Adding a node to the chef server
Installing chef package.
Connecting workstation with chef server through Chef.id/chef-repo
First, we download the starter kit from chefManage.io. This will be downloaded in the form of zip file. If we extract this zip file, we will get the chef-repo folder. This chef-repo folder we need to place this in the chef workstation. Inside the chef-repo folder, we can see a total of three folders. They are .chef, cookbooks, and roles.
The .chef folder is responsible to establish communication between the chef-server and chef workstation. Because, inside the " .chef " folder, we can see two files. They are "knife.rb " and " privatekey.pem ". Inside "knife.rb ", there will be the URL (address) of the chef-server. Because of this URL, communication will be established between the chef-server and chef workstation. This is how we connect Chef Workstation to Chef Server.
Steps to follow
Create a chef account on “manage.chef.io”
Create New Organization and download the starter kit for that organization.

Go to download and extract file chef-repo, after extracting we get more files inside chef-repo such as (.chef, cookbooks, gitignore, README.md, roles)
Send chef-repo file to Linux Workstation machine,
Using the software called WinSCP.
Open a New session
Enter Login Details,
Hostname - Public DNS of workstation machine
Username - ec2-user
Advance --> SSH --> Authentication --> Private key of workstation machine
Login
Drag Chef-repo from the left window and drop to right Linux window. (by ls command in you can check whether Chef-repo is showing in your workstation or not)
In the chef-repo/.chef/config.rb file,
In config.rb file, contains the URL of the chef server
cat config.rbDue to the presence of a URL in the workstation machine, the workstation gets connected to the chef server.
To verify the workstation is connected to the server
knife ssl check
Connecting the chef-server with the node using Bootstrapping
It is the process of adding a chef node to the chef server or we can call it, bringing any machine into the chef environment. In this bootstrapping process, total of three actions will be performed automatically.
Node gets connected to chef-server.
The Chef server will install the chef package in the chef node.
Cookbooks will be applied to the chef node.
It is only a one-time effort. As and when we purchase any new machine in the company, immediately we add that server to the chef server. At a time, we can bootstrap one machine. We can't bootstrap multiple machines at a time.
Bootstrapping steps
Create Linux machine for (node1) in the same AZ of the workstation with a new security group and new key pair name <node1-key>, and save Private IP for further knife bootstrap commands.
With the help of WinSCP, transfer the downloaded node1-key.pem to Chef-repo for bootstrap command.
Now go to the chef workstation in chef-repo directory and execute the Bootstrap command to attach node1 to the chef-server.
knife bootstrap <privateIP(node1)> -–ssh-user ec2-user -–sudo -i node-1key.pem -N node1

To check the Node connection with the chef-server
knife node list
Moving cookbooks in chef-repo to avoid cookbooks confusion:
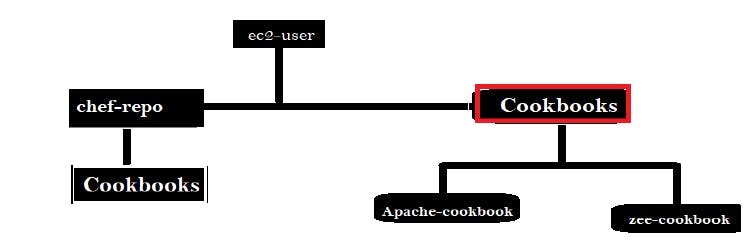
Moving ec2-user/Cookbooks to ec2-user/chef-repo/Cookbooks
mv cookbooks/apache-cookbook chef-repo/cookbooksmv cookbooks/Zee-cookbook chef-repo/cookbooks
Upload apache-cookbook to chef-server
Inside the chef-repo directory,
knife cookbook upload apache-cookbookConfirm Uploading,
knife cookbook listNow we will attach the recipe on node1 which we would like to run on node1, by this Run_list command,
knife node run_list set node1 “recipe[apache-cookbook::apache-recipe]Function of run_list
This is an ordered list of recipes that we are going to apply to nodes. ‘We mention all recipes in the cookbook and then we upload that cookbook to the chef-server. Then, we attach all recipes to node's run-list in sequence order. When chef-client runs, it applies all recipes to nodes in the same order whatever the order you mention in run-list. Because sometimes order is important especially when we deal with dependent recipes.
Now to implement whatever is present inside Chef-server on a node, we have to take access to the node terminal and run the chef-client over it,
chef-client
In this way, Node1 will get updated according to the chef-server configuration But in the above process whenever we update any recipe there is a need to upload the cookbook to the chef-server, and each time we have to call the chef-client at the Node terminal.
Automation for Node Upgradation
To automate this process:
By default, the chef-client runs manually. So we need to automate this manually. For this, we use the “cron tool” which is the default tool in all Linux machines used to schedule tasks to be executed automatically at frequent intervals. So in this “crontab” file, we give a chef-client command and we need to set the timing as per our requirement. Then onwards chef-client runs automatically after every frequent interval. It is only one-time effort. When we purchase any new server in a company, along with Bootstrap, we automate chef-client then and there.
Steps :
Take access of the Node terminal
Create and Edit the "crontab" file
With the help of this command automation will start no need to call the chef-client again=2 Chef-client command to execute periodically according to “*/n crontab method”
***** root chef-clientWere 5 Star denote */n, (HR DAY MONTH YEAR WEEK)
Just to verify, Create one more Linux Machine Node2 with user data as echo”* root chef-client”>> etc/crontab, use bootstrap command to connect with the chef-server and attach the recipe to Node2 run_list.
You will notice the Node2 Updation.
How to see Delete everything from inside chef-server
Run the below command in the Chef-repo directory,
To see cookbook list
knife cookbook listTo delete cookbook
knife cookbook delete cookbookName -yTo see Node list
knife node listTo delete Node
knife cookbook delete nodeName -yTo see list of client present inside chef-server
knife client listTo delete clients
knife client delete clientname -y
Roles
Roles are nothing but a Custom run-list.
We create roles & upload to the chef server & assign them to nodes. If we have so many nodes, need to add a cookbook to run-list of all those nodes, it is very difficult to attach to all node's run-list. So, we create a role & attach that role to all those nodes once. Next time onwards, add a cookbook to that role. Automatically, that cookbook will be attached to all those nodes.
So the role is a one-time effort. Instead of adding cookbooks to each & every node's run-list always, just create a role & attach that role to nodes. When we add a cookbook to that role, it will be automatically applied to all nodes those assigned to that role.
Step to create Role
Inside the chef-repo directory, we have roles directory which contains the default.rb ruby file.
Create One more file with roleName.rb and edit with name, description, and run-list details.
vi roleName.rbEdit this file with,
Name “Engineer”
Description “webserver role”
run_list “recipe[apache-cookbook::apache-recipe]”
You can add multiple run-list, In these case Apache recipe will reflect on the node after bootstrapping
Upload the role to chef server
Back to the chef-repo directory,
knife role from file roles/RoleName.rbIf you want to see the created role
knife role listCreate No. of nodes as you wish, Bootstrap them
knife bootstrap <privateIP(node)> -–ssh-user ec2-user -–sudo -i nodeNokey.pem -N nodeNoNow connect these nodes to roles one by one.
knife node run-list set nodeNo “role[RoleName]”UPLOAD cookbook to server
knife cookbook upload apache-cookbookNow we can check the public IP of any node on the webserver, every node will behave like a server.
Here we conclude chef's topic,
Stay tuned!!
For any query, you can contact to Atharva Deshpande