

Decoding the MLOPS: A Step-by-Step Guide to SetUp Kubeflow on AWS using MicroK8s

Hey I'm Samiksha Kolhe. a Data Enthusiast and aspiring Data Scientist. One day Fascinated by a fact that "We can built Time machines and predict future using AI". That hit my dream to explore the Vector space and find out what the dark matter is about. World and Technology every day brings new challenges, and new learnings. Technology fascinated me, I'm constantly seeking out new challenges and opportunities to learn and grow. A born-ready girl with deep expertise in ML, Data Science, and Deep Learning, generative AI. Curious & Self-learner with a go-getter attitude that pushes me to build things. My passion lies in solving business problems with the help of Data. Love to solve customer-centric problems. Retail, fintech, e-commerce businesses to solve the customer problems using Data/AI. Currently learning MLops to build robust Data/ML systems for production-ready applications. exploring GenAI. As a strong collaborator and communicator, I believe in the power of teamwork and diversity of thoughts to solve a problem. I'm always willing to lend a helping hand to my colleagues and juniors. Through my Hashnode blog, I share my insights, experiences, and ideas with the world. I love to writing about latest trends in AI and help students/freshers to start in their AI journey. Outside technology I'm a spiritual & Yoga person. Help arrange Yoga and mediation campaigns, Volunteering to contribute for better society. Love Travelling, Reading and Learn from world.
Hello Techies👋! Hope you all are doing amazing stuff. As per the discussion in the Full-stack project article, Today will delve into the world of Kubeflow. This article will give you an in-depth understanding on how to launch your kubeflow dashboard using AWS EC-2 and microk8s.
This article is for everyone who aspires to learn Practical Mlops. So, Let's see How to launch your own MLOPS platform🤩.
Note: Follow Every Step one-by-one for an error-free and effortless launch your kubeflow UI on Windows. as each step has been meticulously crafted through extensive effort to ensure a seamless experience for you:)
Excited!! Let's see Our Agenda first
Understanding Key Concepts: Explore fundamental concepts related to Kubeflow, AWS EC2, MicroK8s, and Kubernetes.
AWS EC2 Instance Setup: Dive into the practical aspects of setting up your first AWS EC2 instance.
Launching Kubeflow: Step-by-step guide on how to initiate and deploy Kubeflow for streamlined machine learning workflows.
Preview the next steps: Short glimpse and discussion of next steps of the project journey.
Let's get Started!!
1. What is Kubeflow:
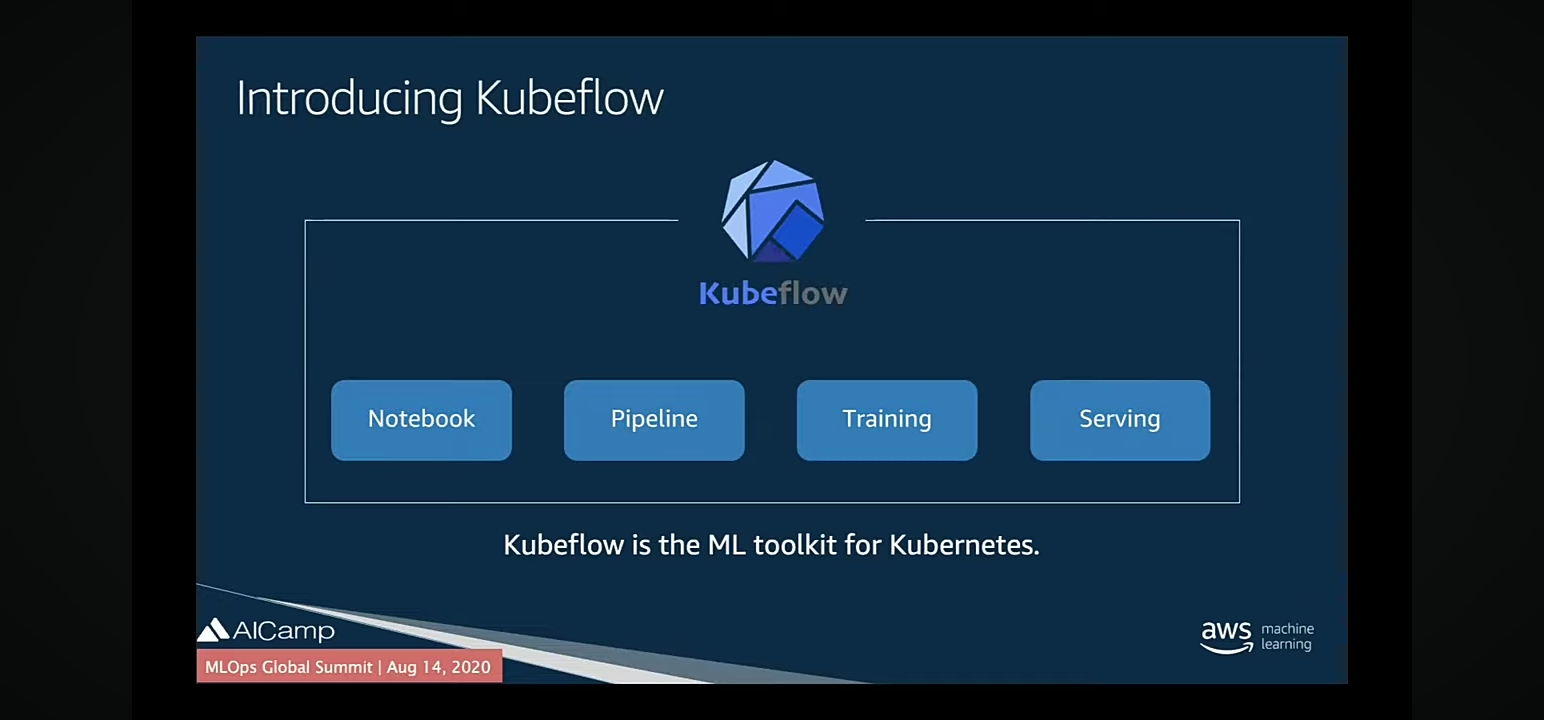
Kubeflow is the machine learning toolkit for Kubernetes.
More precisely, It's an MLops platform managed and served on Kubernetes.
In the rapidly evolving field of data science, where the complexity of ML models and the need for efficient ML model deployment continue to grow, Kubeflow emerges as a critical solution. Its ability to unify the ML workflow, ensure scalability, and provide a collaborative environment addresses the challenges faced by data scientists and organizations aiming to harness the power of machine learning for innovation and decision-making.
Kubeflow's role in optimizing resource utilization, enhancing collaboration, and streamlining ML workflows makes it an indispensable tool for the modern data science world.
Features of Kubeflow are below:
Notebooks: Collaborative workspace[jupyter lab, jupyter notebook, VS Code] for creating a Data science project.
Pipeline: Visual orchestration of end-to-end ML workflows.
Training: Tool for efficient model training and optimization. choose and register the best ML model.
Serving: Deployment and real-time inference for ML models in production.
AWS EC-2 service (Elastic Compute Cloud)
Amazon EC2 is like renting a virtual computer in the cloud.
Why use it: You can run your applications on these virtual computers, and they can grow or shrink based on how much you need.
features: You can choose different types of virtual computers, change their configurations, and easily connect them with other Amazon services.
When to use: Great for hosting websites, running software, or handling different types of computer tasks, all without having to worry about the actual hardware.
Kubernetes(Microk8s)
Kubernetes is like a smart manager for your applications in the cloud.
Why use it: It helps you deploy, scale, and manage your applications effortlessly, ensuring they run smoothly and efficiently.
features: Kubernetes automates tasks like scaling your app, managing updates, and handling failures, making your life as a developer much easier.
When to use: Perfect for orchestrating and managing containers, making sure your applications are always available, no matter how big or complex they get.
While Microk8s is a lightweight, easy-to-install Kubernetes distribution. It provides a quick and convenient way to set up and run Kubernetes on your local machine for development, testing, or small-scale deployments.
Fast deployment, single-node Kubernetes cluster, and a minimal footprint make it ideal for resource-efficient local development.
Perfect for developers who want a hassle-free and quick Kubernetes environment on their local machine without the complexity of a full-scale cluster.
Now You're familiar with the concepts, let's dig into the practical.
2. Set Up AWS EC-2 instance:
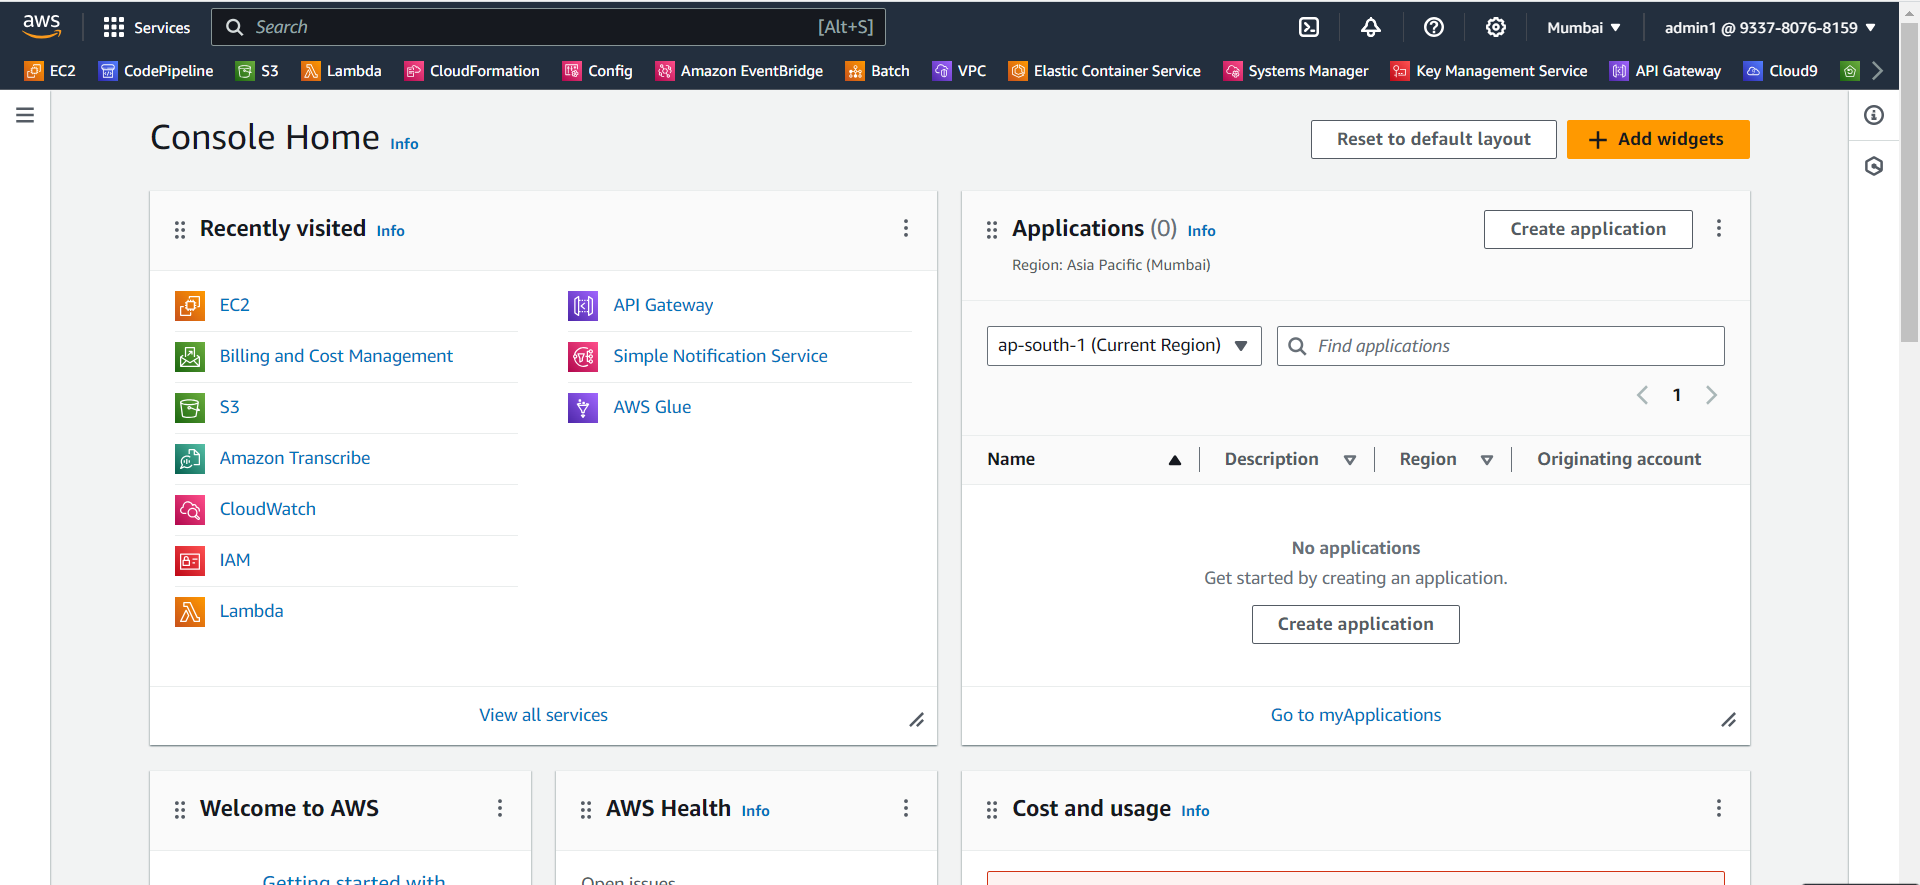
Go to aws.amazon.com and sign in to the console. If you don't have an aws account follow this guide to setup an account. Note: aws account activation takes 24-hrs.
After log-in below such Home screen will appear.
Search for EC2 and then click on launch-instance, below screen will appear. here give Unique name to your instance/machine
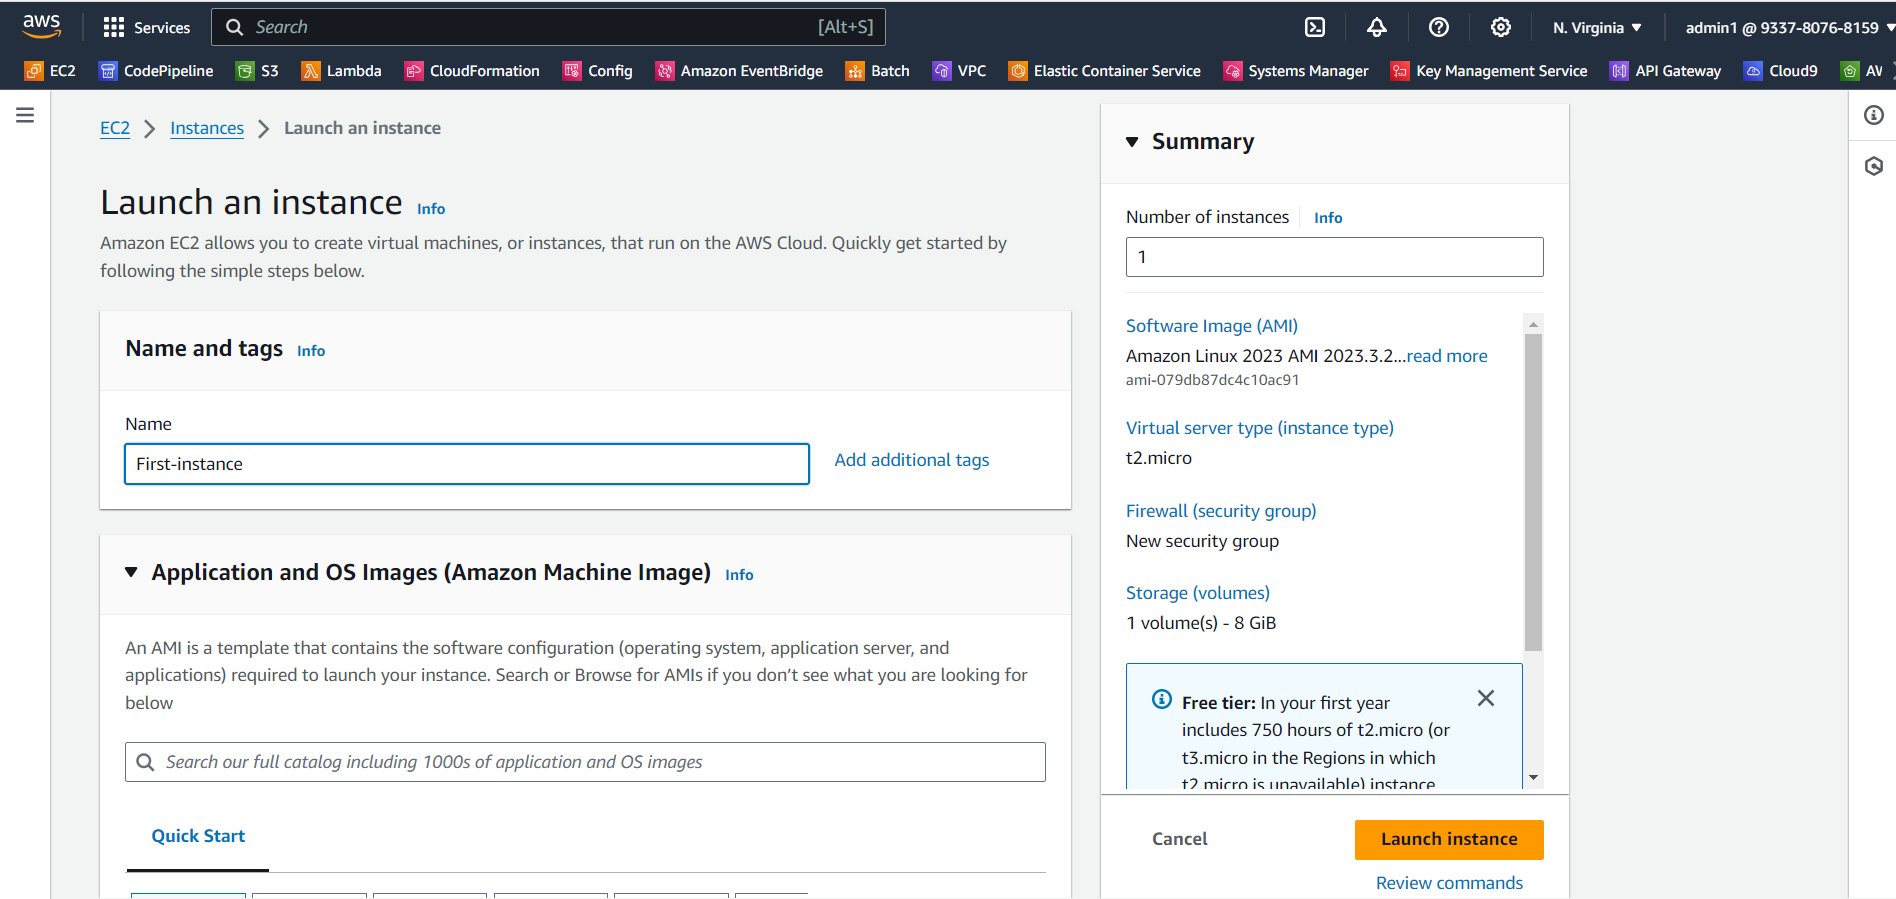
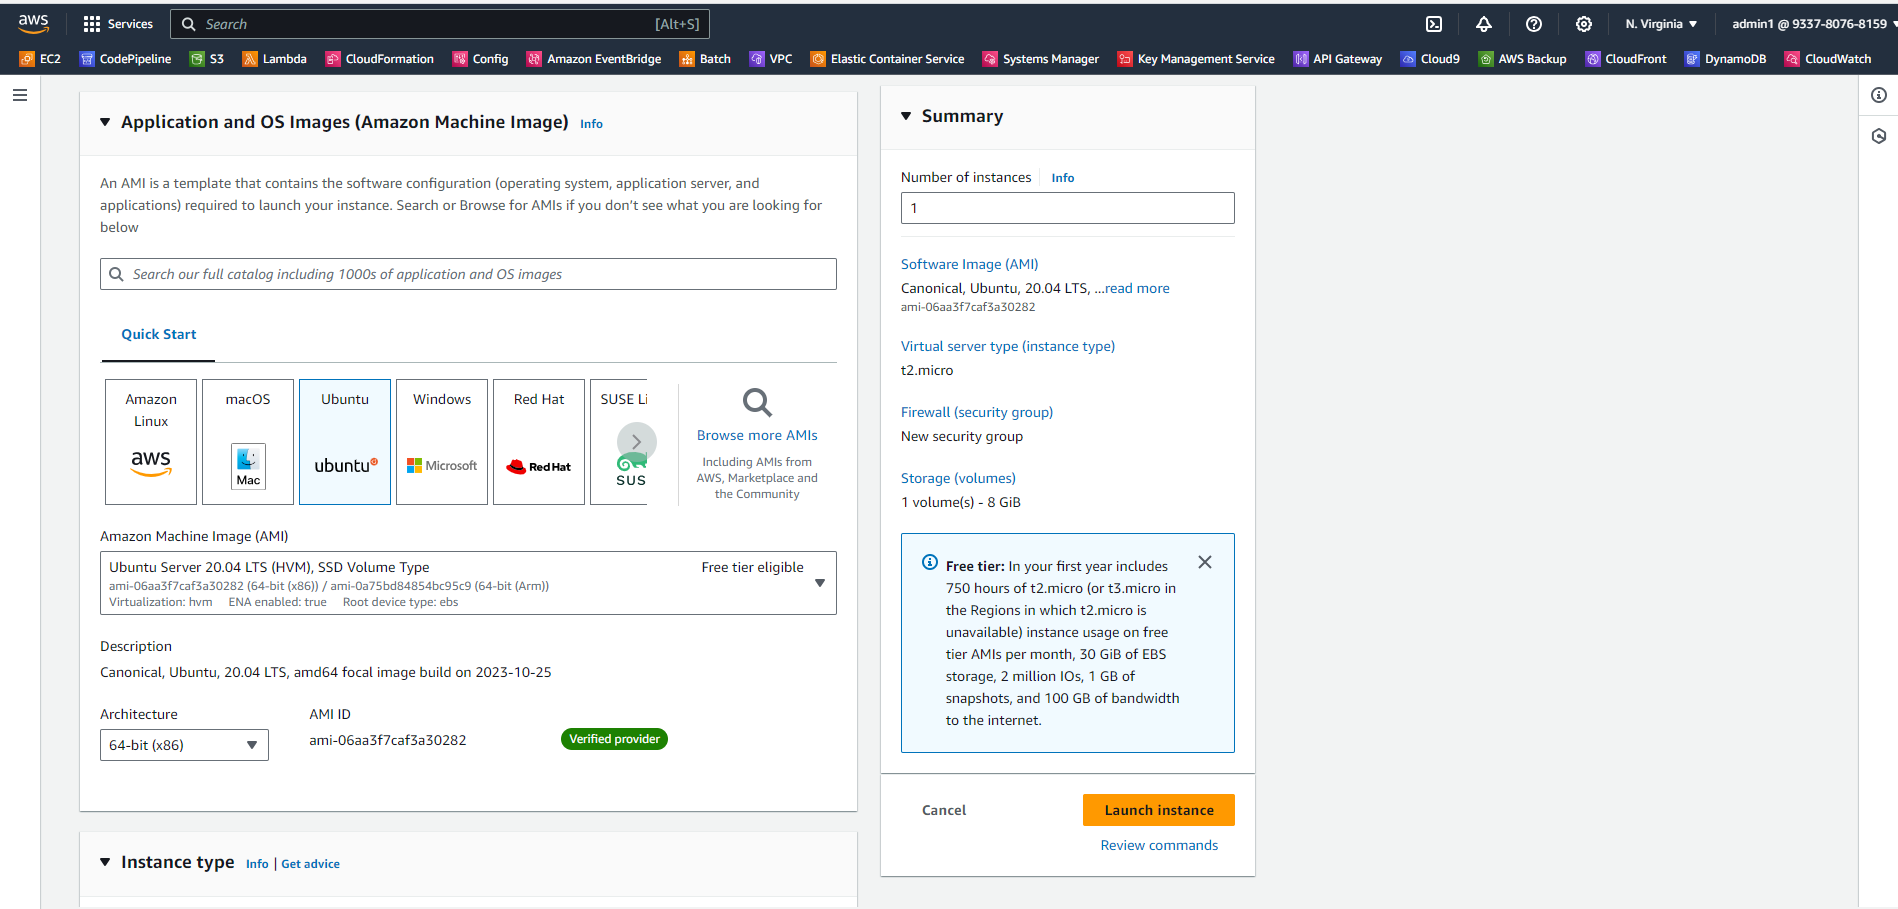
Now setup an OS for the instance e.g windows, macox, ubuntu, Redhat, Amazon Linux etc. We're using Ubuntu(suggested by canonical developers as kubeflow is created by canonical and tested on ubuntu itself).
Note: Select free-tier Ubuntu Version 20.04 only. tested on larger versions.. faced issues
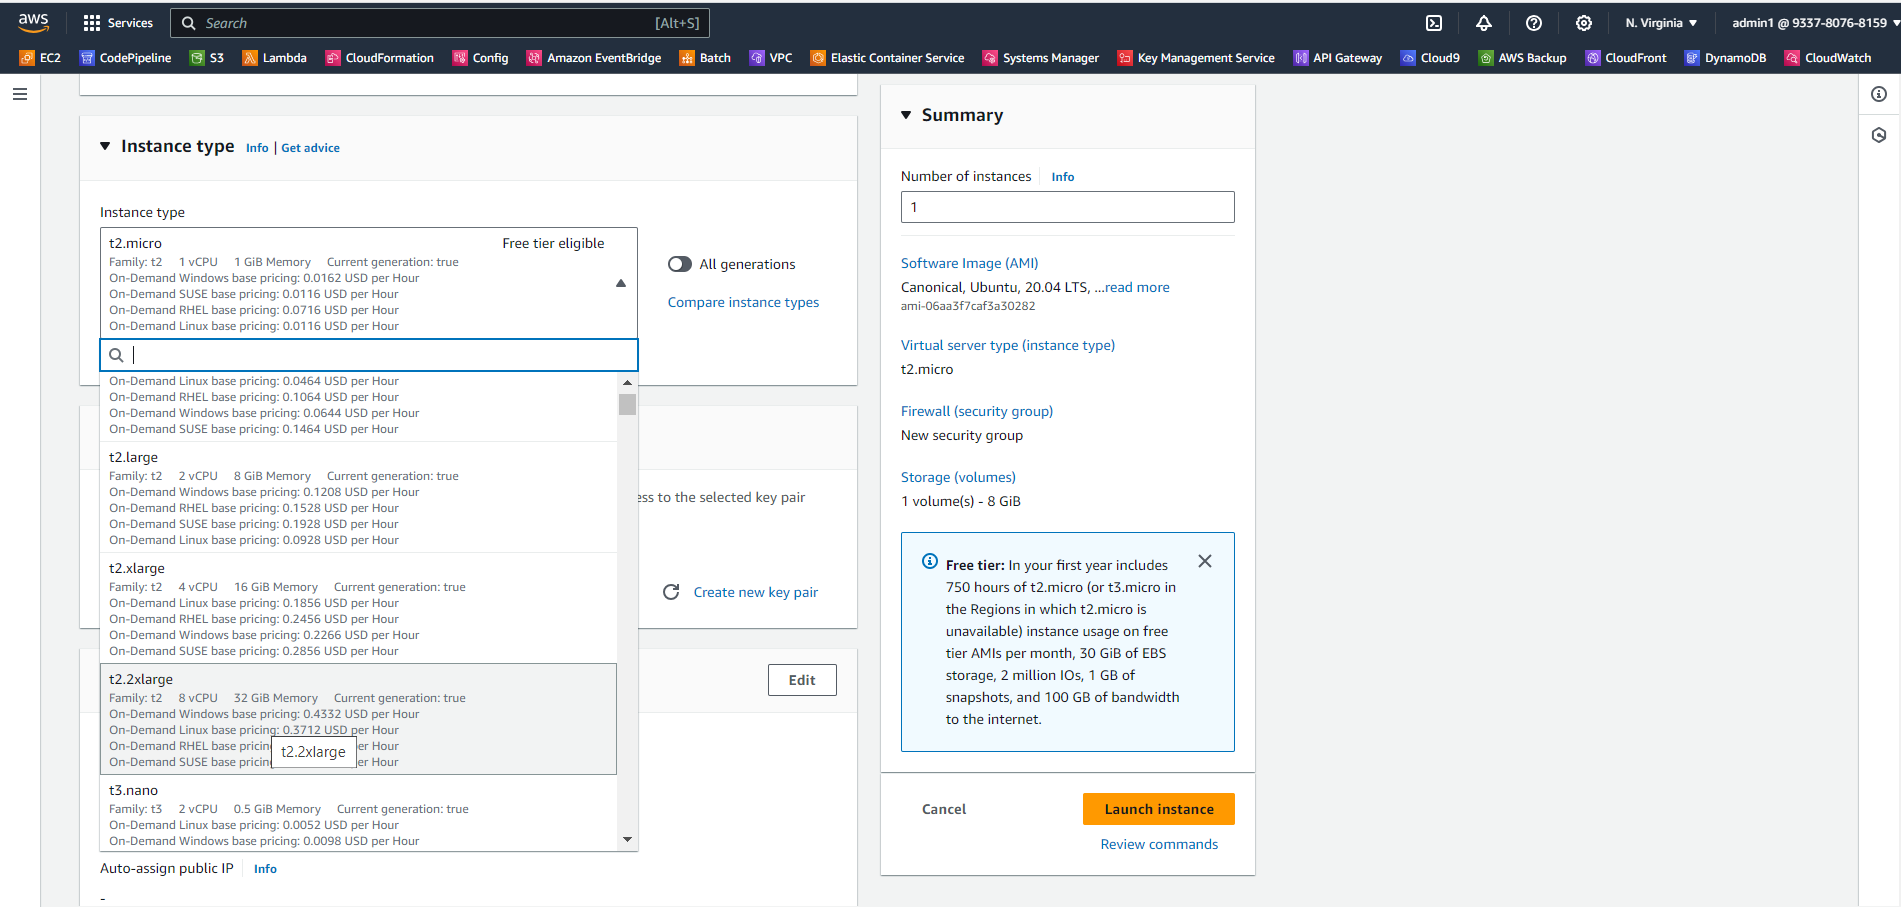
Select instance_type = t2.2xlarge , microk8s services require larger storage.
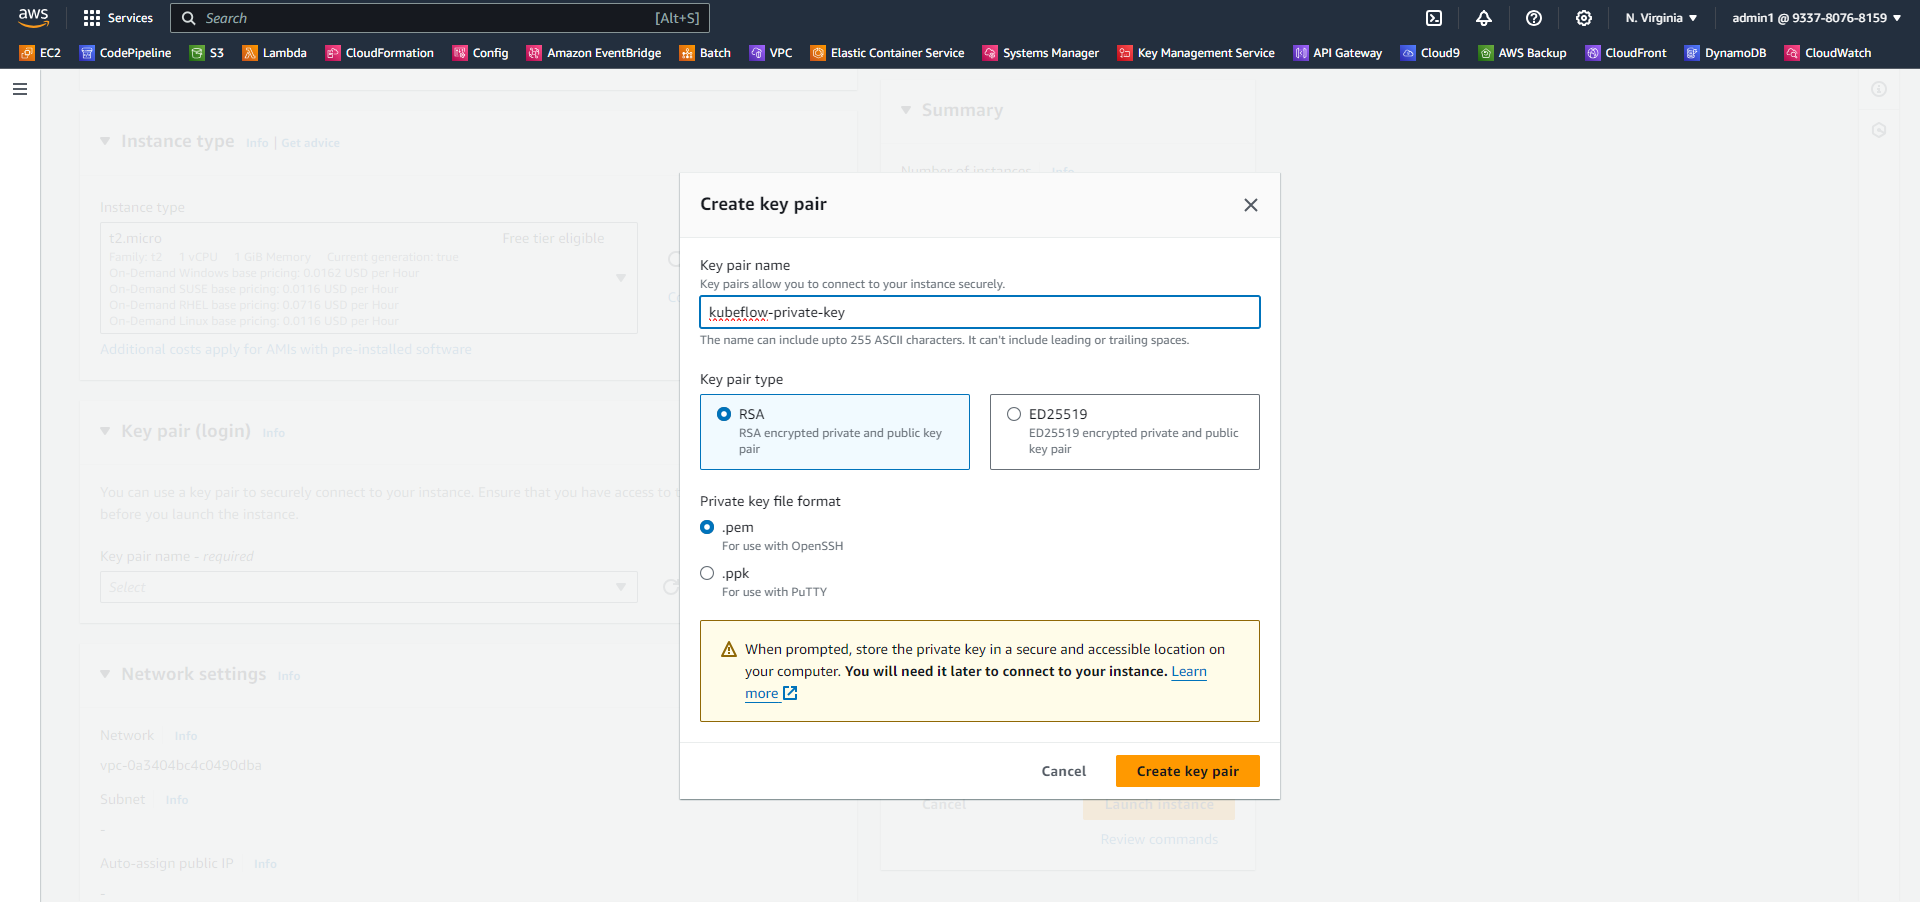
Create a key-pair for authentication and authorization of ec2 machine. using key.pem file we can connect through ssh anywhere to the cloud machine.
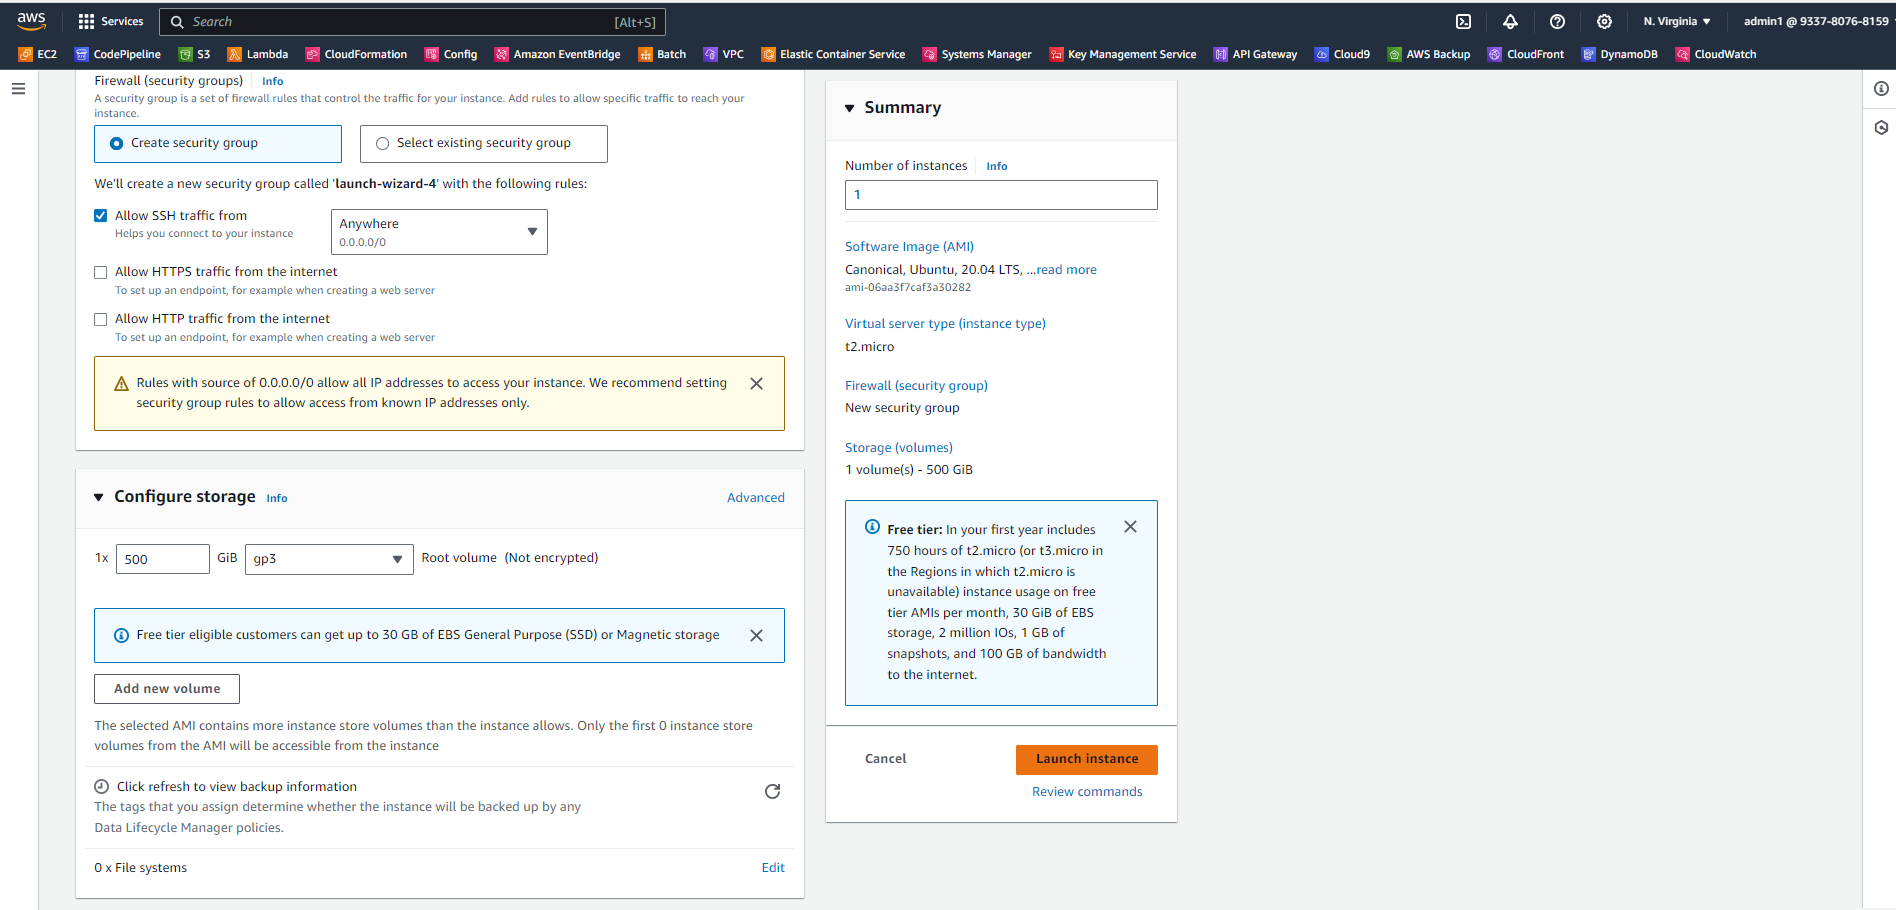
Now Configure the storage as below and click on launch instance
After launching an instance below window will appear, it contains the instance state that you just launched. when instance state=Running and status check=2/2, then our instance is ready to connect and work
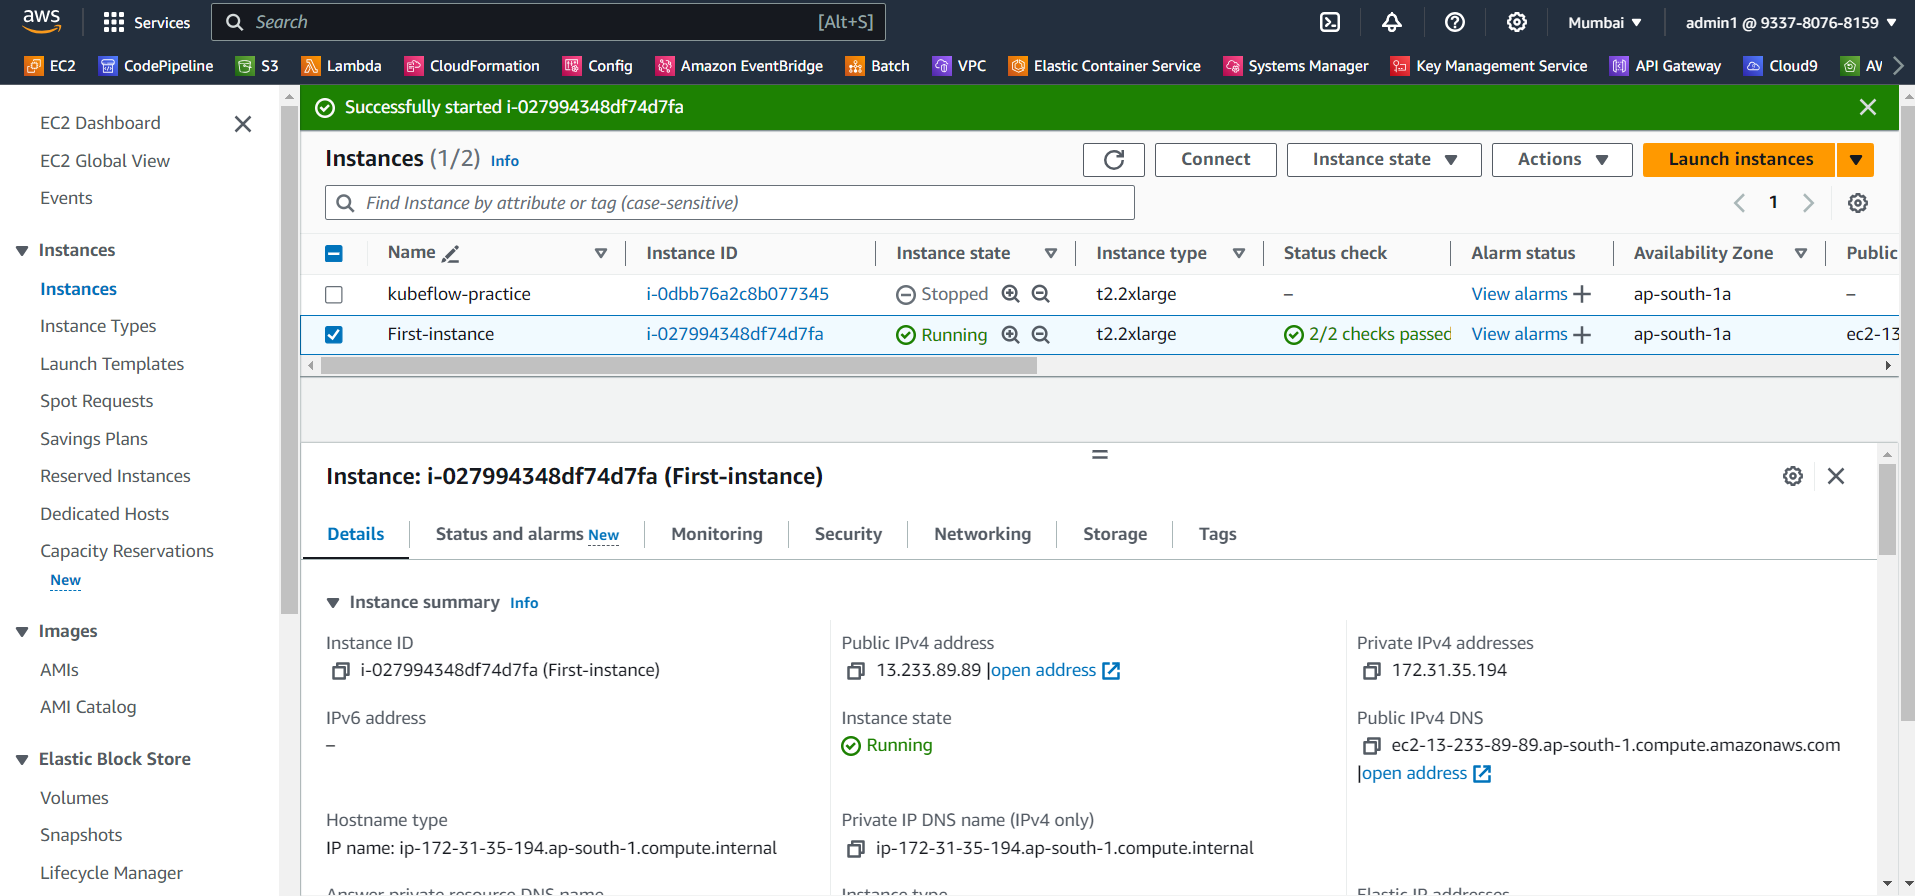
after clicking on the instance, the instance details screen will appear. copy the Public IPv4 DNS.
Now to connect the machine from the windows command prompt you need to configure aws cli. you can follow this guide to setup aws-cli.
After installing aws-cli. go to your command prompt and write
ssh -i "local_file path of key-pair.pem file you saved" ubuntu@DNS_name you copied of instance.

3. Launching Kubeflow

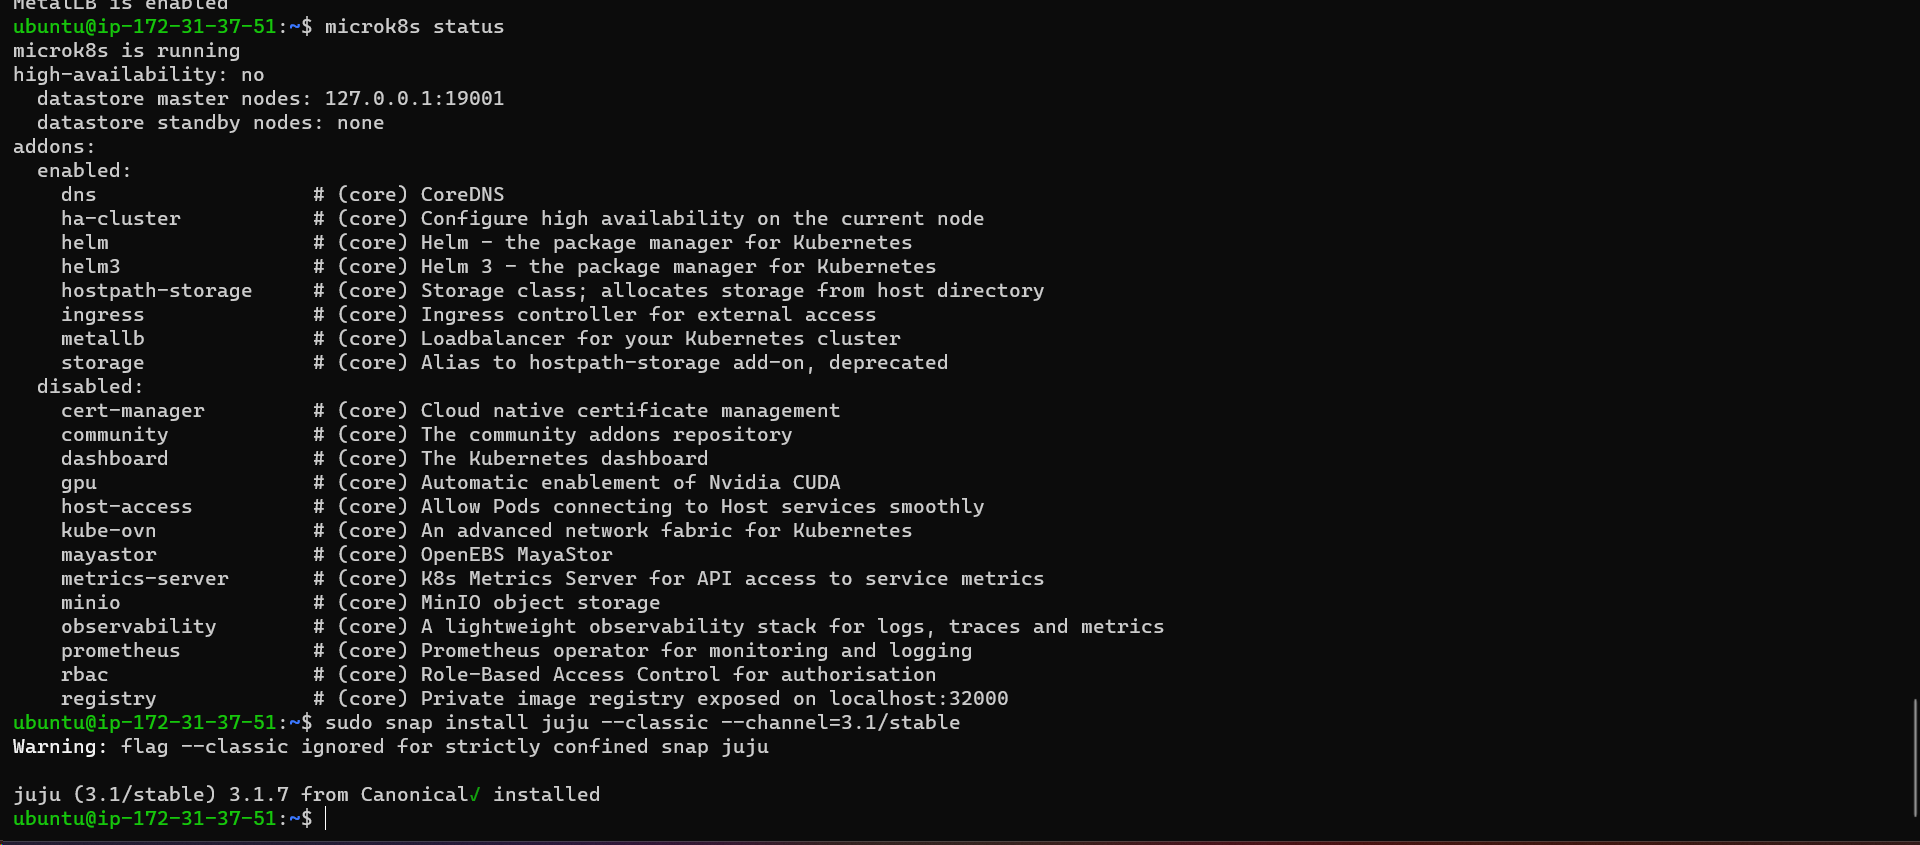
Run the below command to check the microk8s status. it requires some permissions to. hence run the suggested commands below

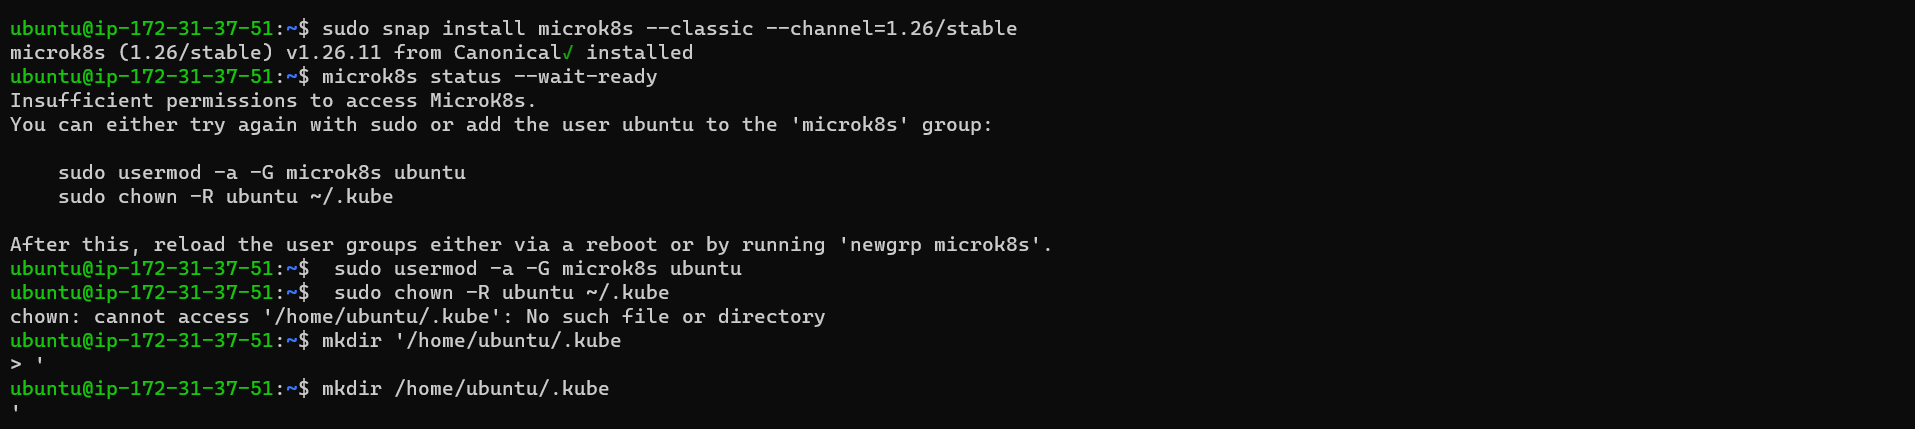
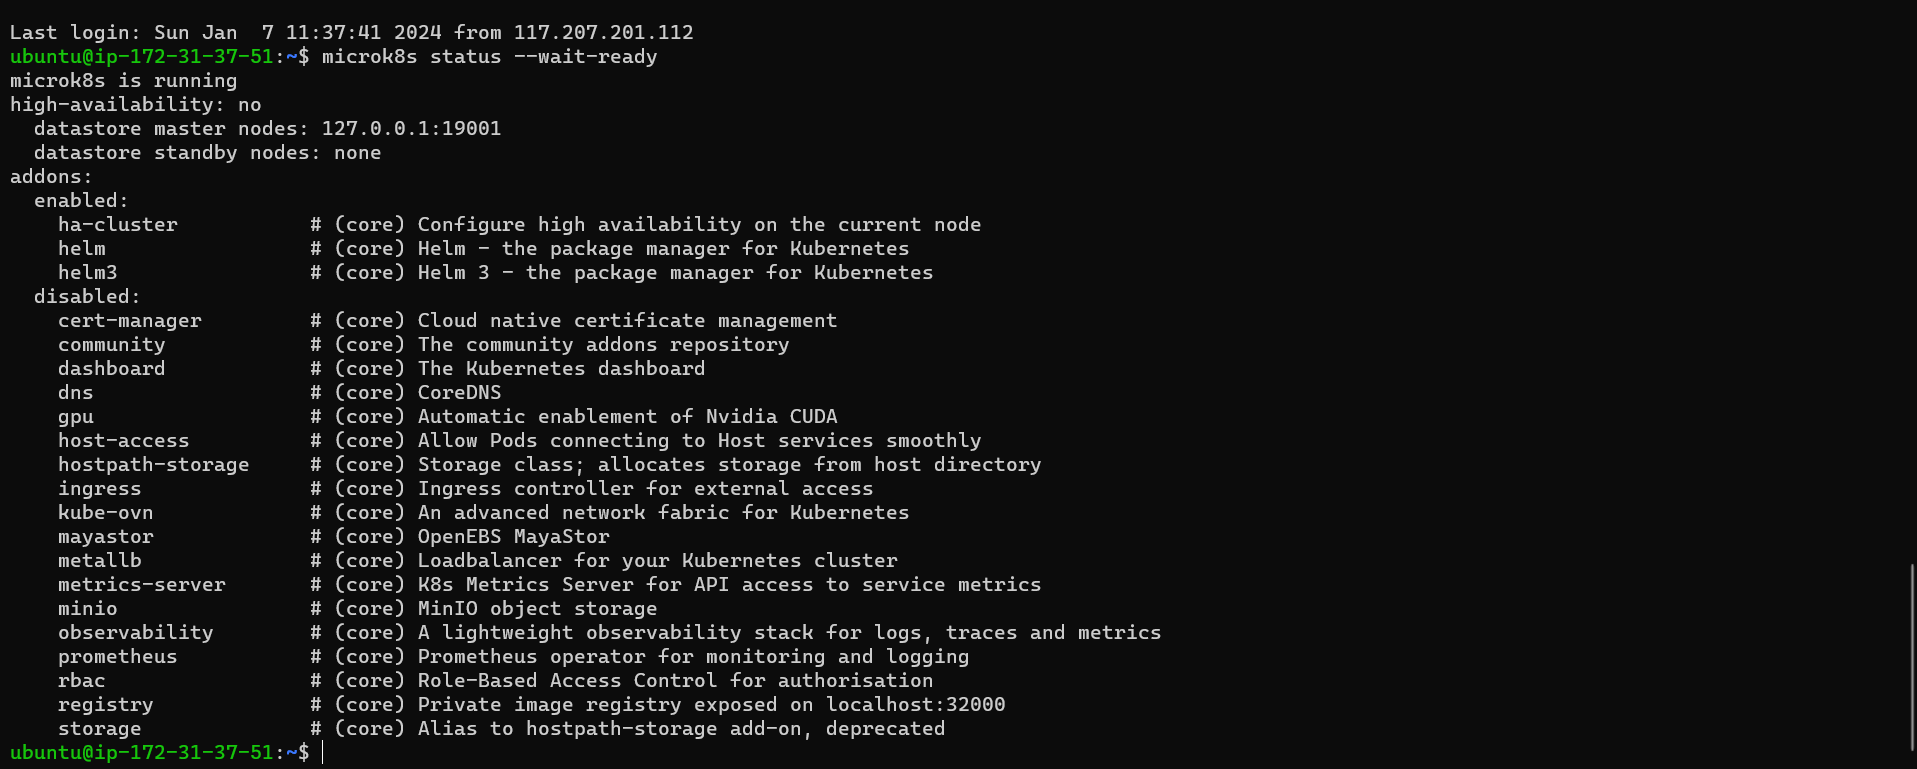
Now exit and connect again and run the microk8s status --wait-ready command

It's running on node 19001
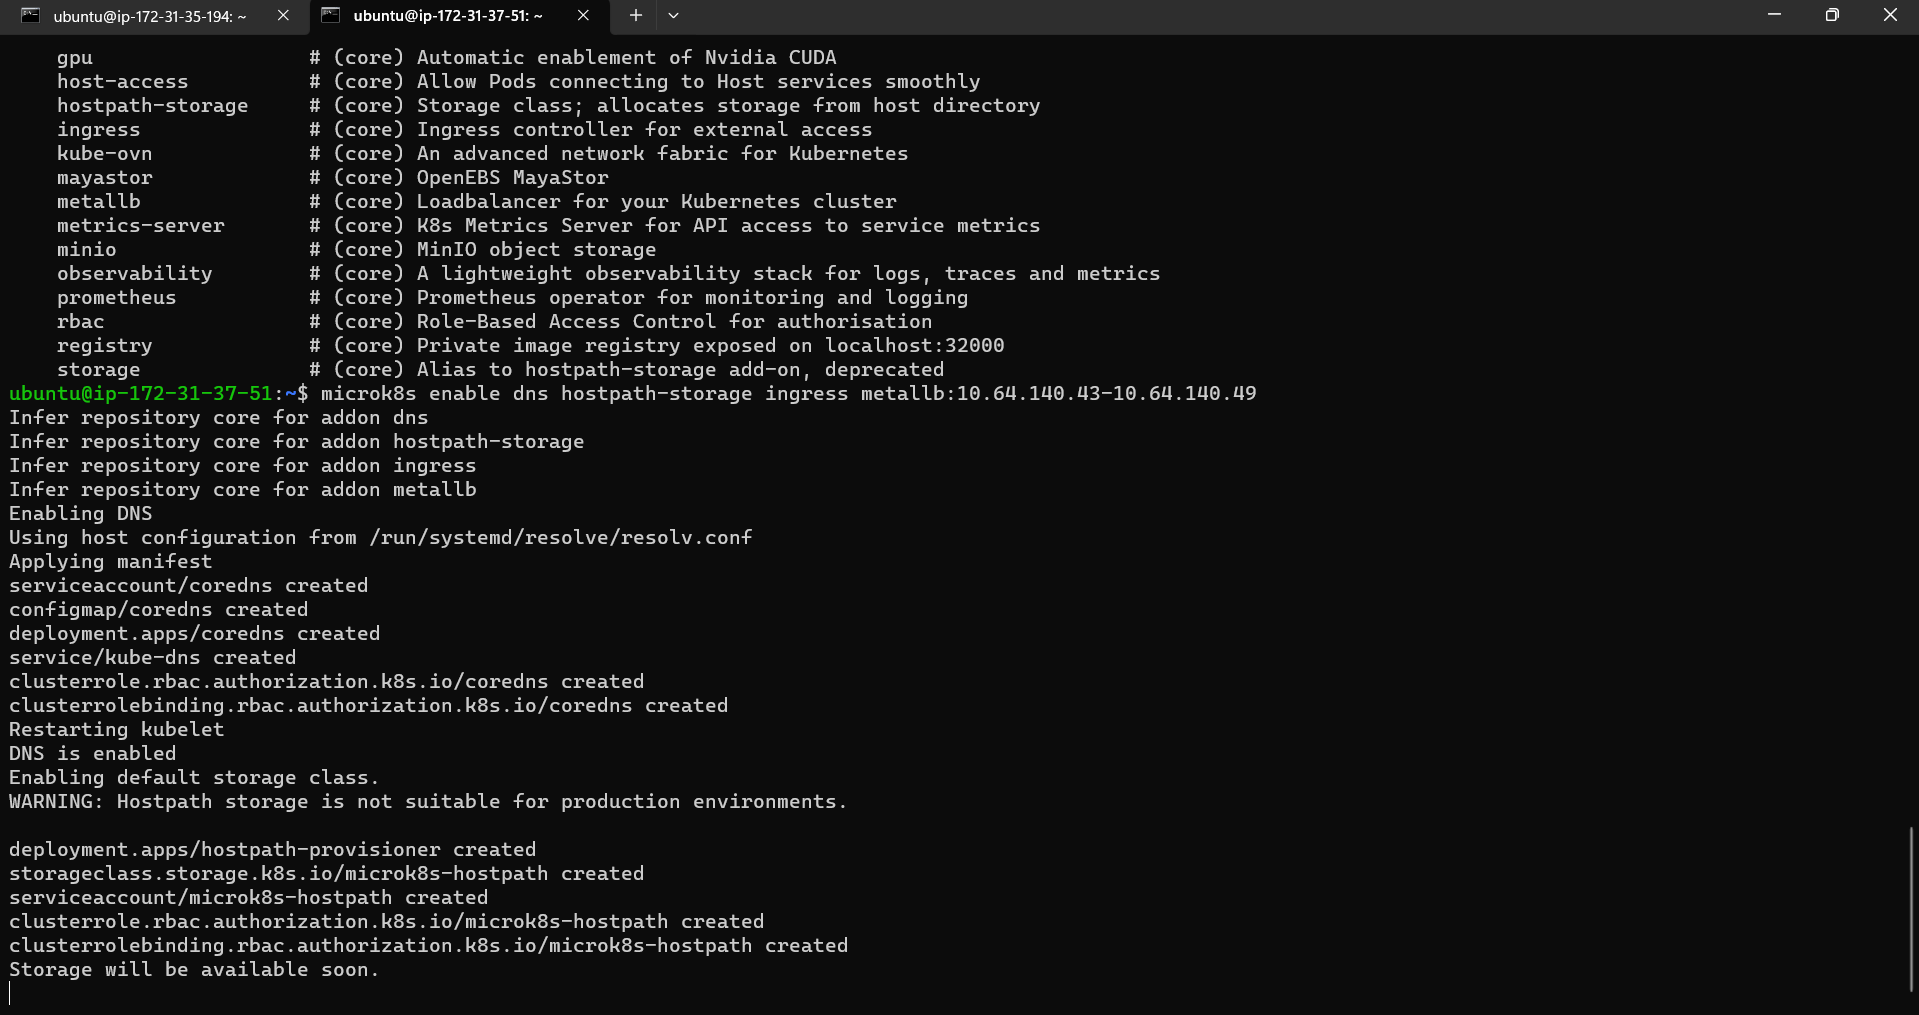
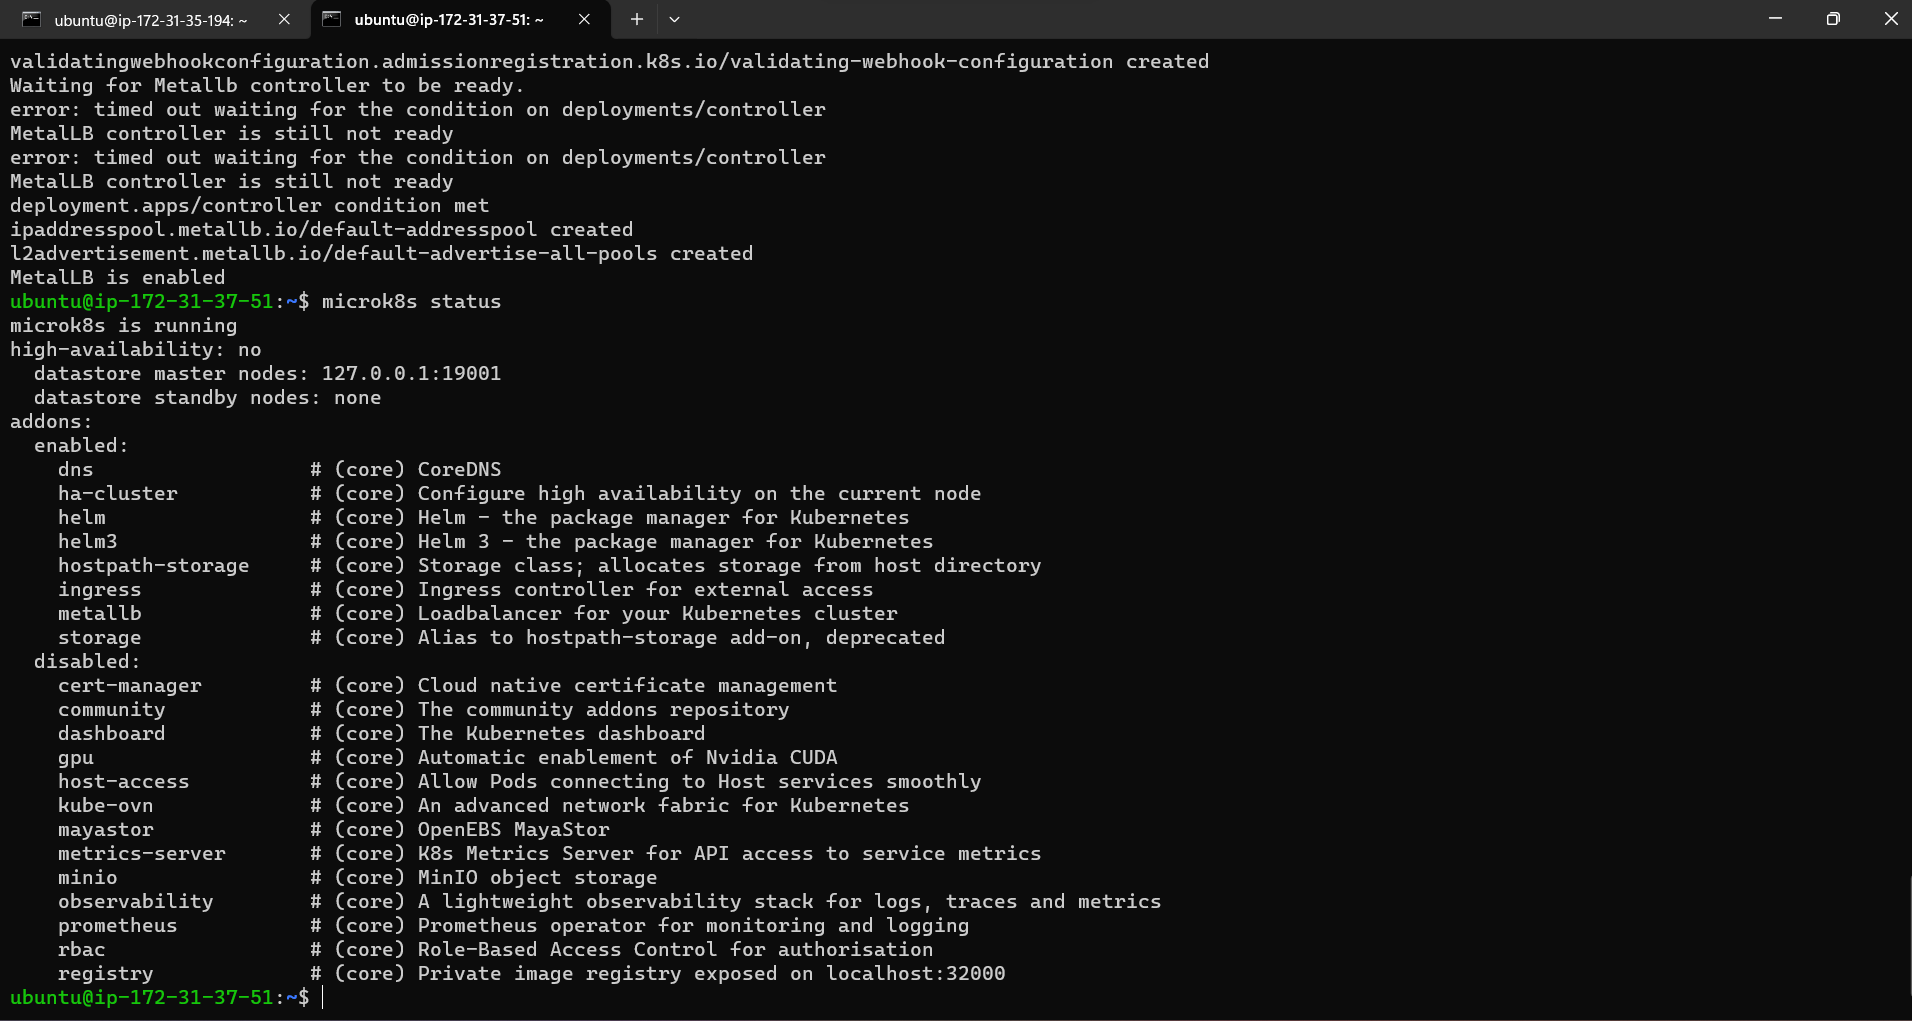
microk8s enable dns hostpath-storage ingress metallb:10.64.140.43-10.64.140.49
Now install juju on the machine: Juju is an operation Lifecycle manager (OLM) for clouds, bare metal or Kubernetes. We will be using it to deploy and manage the components which make up Kubeflow.
On some machines, there might be a missing folder which is required for juju to run correctly. Because of this please make sure to create this folder with:
mkdir -p ~/.local/share
As a next step we can configure microk8s to work properly with juju by running:
microk8s config | juju add-k8s my-k8s --client

Command microk8s config retrieves the client’s kubernetes config which is then registered to juju kubernetes endpoints.
Now, run the following command to deploy a Juju controller to the Kubernetes we set up with MicroK8s:
juju bootstrap my-k8s uk8sx
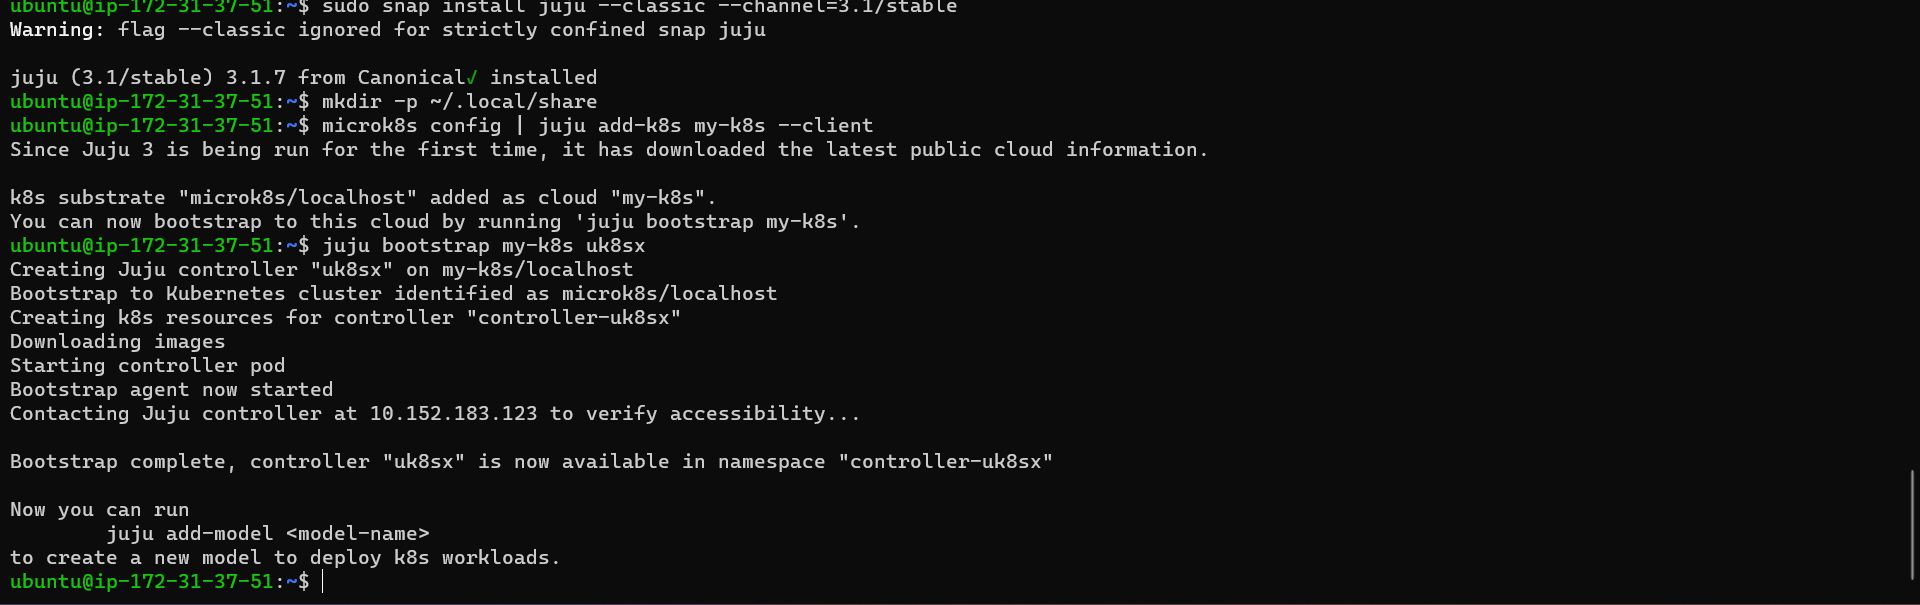
The controller is Juju’s agent, running on Kubernetes, which can be used to deploy and control the components of Kubeflow.
Next, we’ll need to add a model for Kubeflow to the controller. Run the following command to add a model called kubeflow:
juju add-model kubeflow
The controller can work with different models, which map 1:1 to namespaces in Kubernetes. In this case, the model name must be kubeflow, due to an assumption made in the upstream Kubeflow Dashboard code.

Great job: Juju has now been installed and configured for Kubeflow!
Deploy Charmed Kubeflow
Before deploying, run these commands:
sudo sysctl fs.inotify.max_user_instances=1280
sudo sysctl fs.inotify.max_user_watches=655360

Finally, we’re ready to deploy Charmed Kubeflow! Go ahead and run this code to deploy the Charmed Kubeflow bundle with Juju:
juju deploy kubeflow --trust --channel=1.8/stable

From the output you can see the bundle locates, deploys and configures all the necessary charms for us. Without the bundle, we would have had to deploy and configure all of those charms independently ourselves.
When the deploy command completes, you’ll get a message such as:
Deploy of bundle completed.
This means that all the components of the bundle have been kickstarted into action. However, this doesn’t mean Kubeflow is ready yet. After deployment, the various components of the bundle need some time to initialise and establish communication with each other. Be patient - usually this will take somewhere between 15 minutes and 1 hour.
Run the following command to keep a watch on the components which are not active yet:
watch -c juju status --color
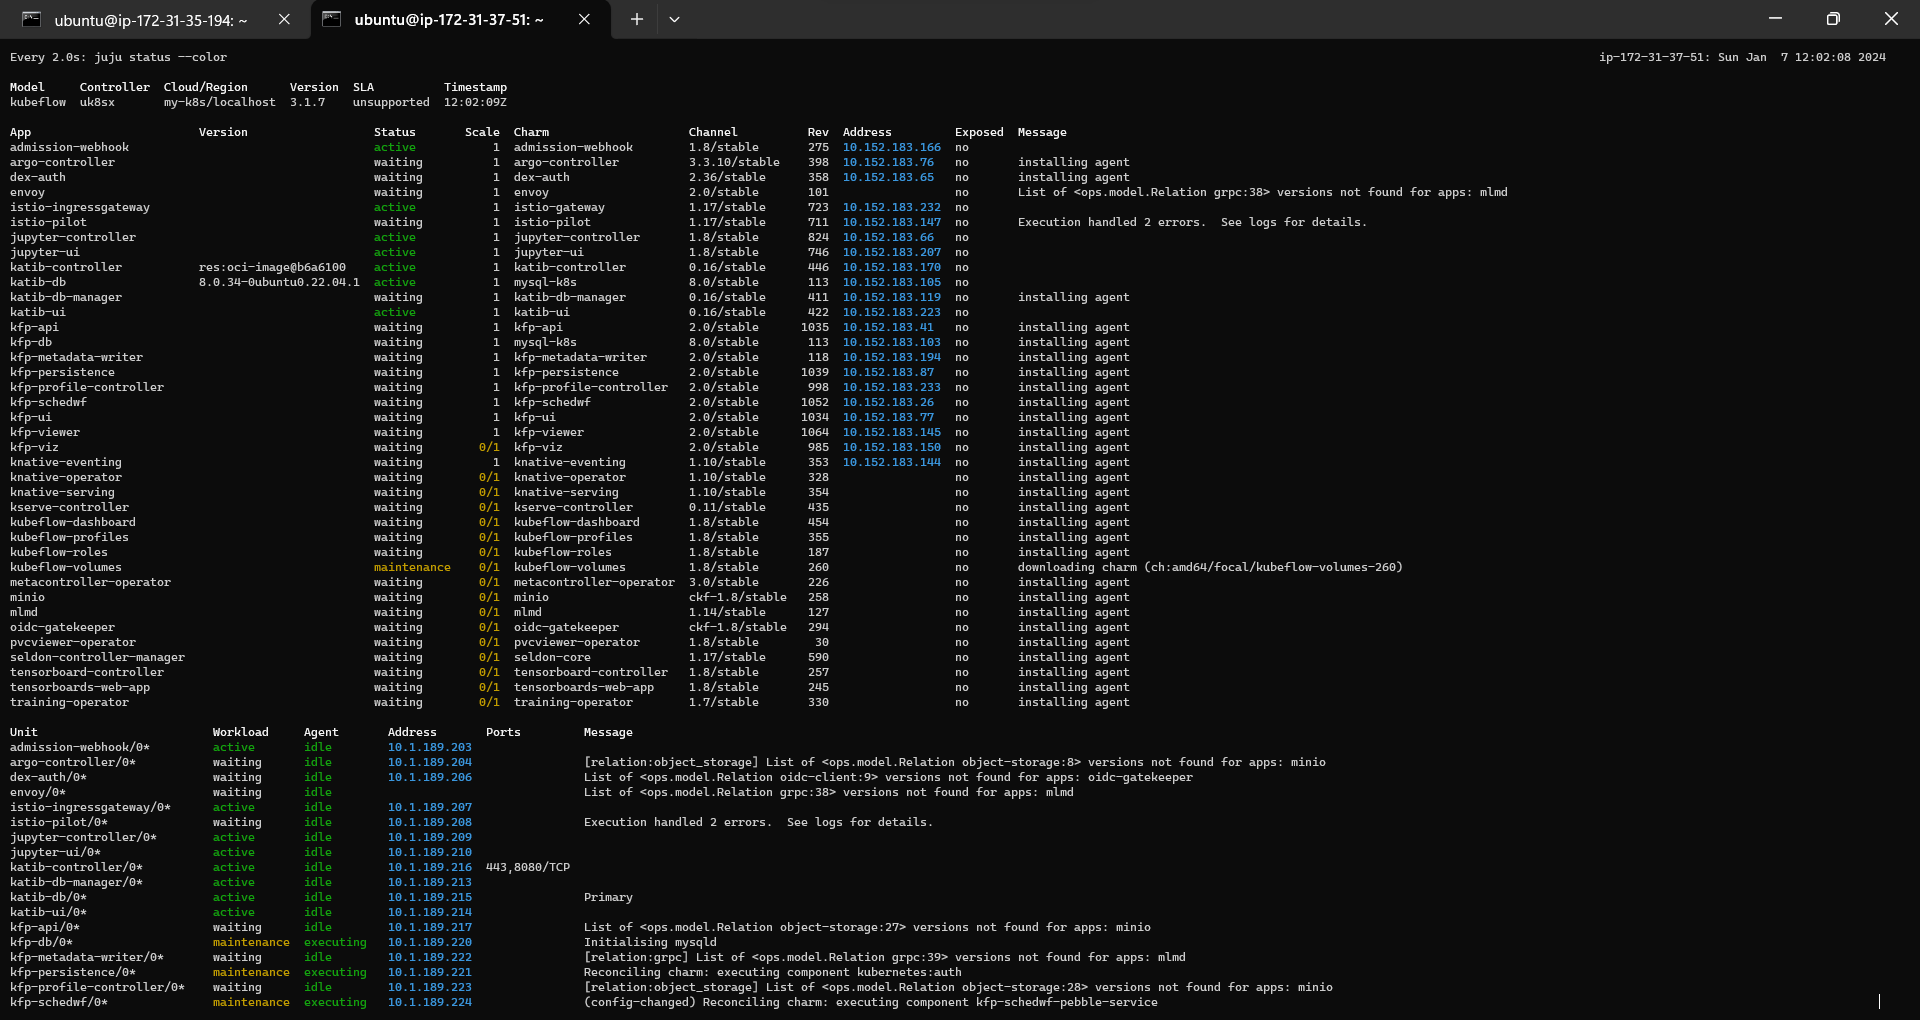
Don’t be surprised if some of the components’ statuses change to blocked or error every now and then. This is expected behavior, and these statuses should resolve by themselves as the bundle configures itself. after successfully config every service below status can be seen.

Run exit and come out of the machine. Now run the ssh command with open port 9999 to expose the kubeflow and connect with localhost:127.0.0.1

Now Configure Dashboard Access
First off, run this command to check the IP address of the Istio ingress gateway load balancer, which is the entry point for our entire bundle:
microk8s kubectl -n kubeflow get svc istio-ingressgateway-workload -o jsonpath='{.status.loadBalancer.ingress[0].ip}'
You should see an output of 10.64.140.43, which is the IP address of this component in the default microk8s configuration. If some see something else, don’t worry - just replace 10.64.140.43 with whatever IP address you see
In order to access kubeflow through its dashboard service, we’ll need to configure the bundle a bit so that it supports authentication and authorization. To do so, run these commands:
juju config dex-auth public-url=http://10.64.140.43.nip.io
juju config oidc-gatekeeper public-url=http://10.64.140.43.nip.io
This tells the authentication and authorization components of the bundle that users who access the bundle will be doing so via the URL http://10.64.140.43.nip.io. In turn, this allows those components to construct appropriate responses to incoming traffic.
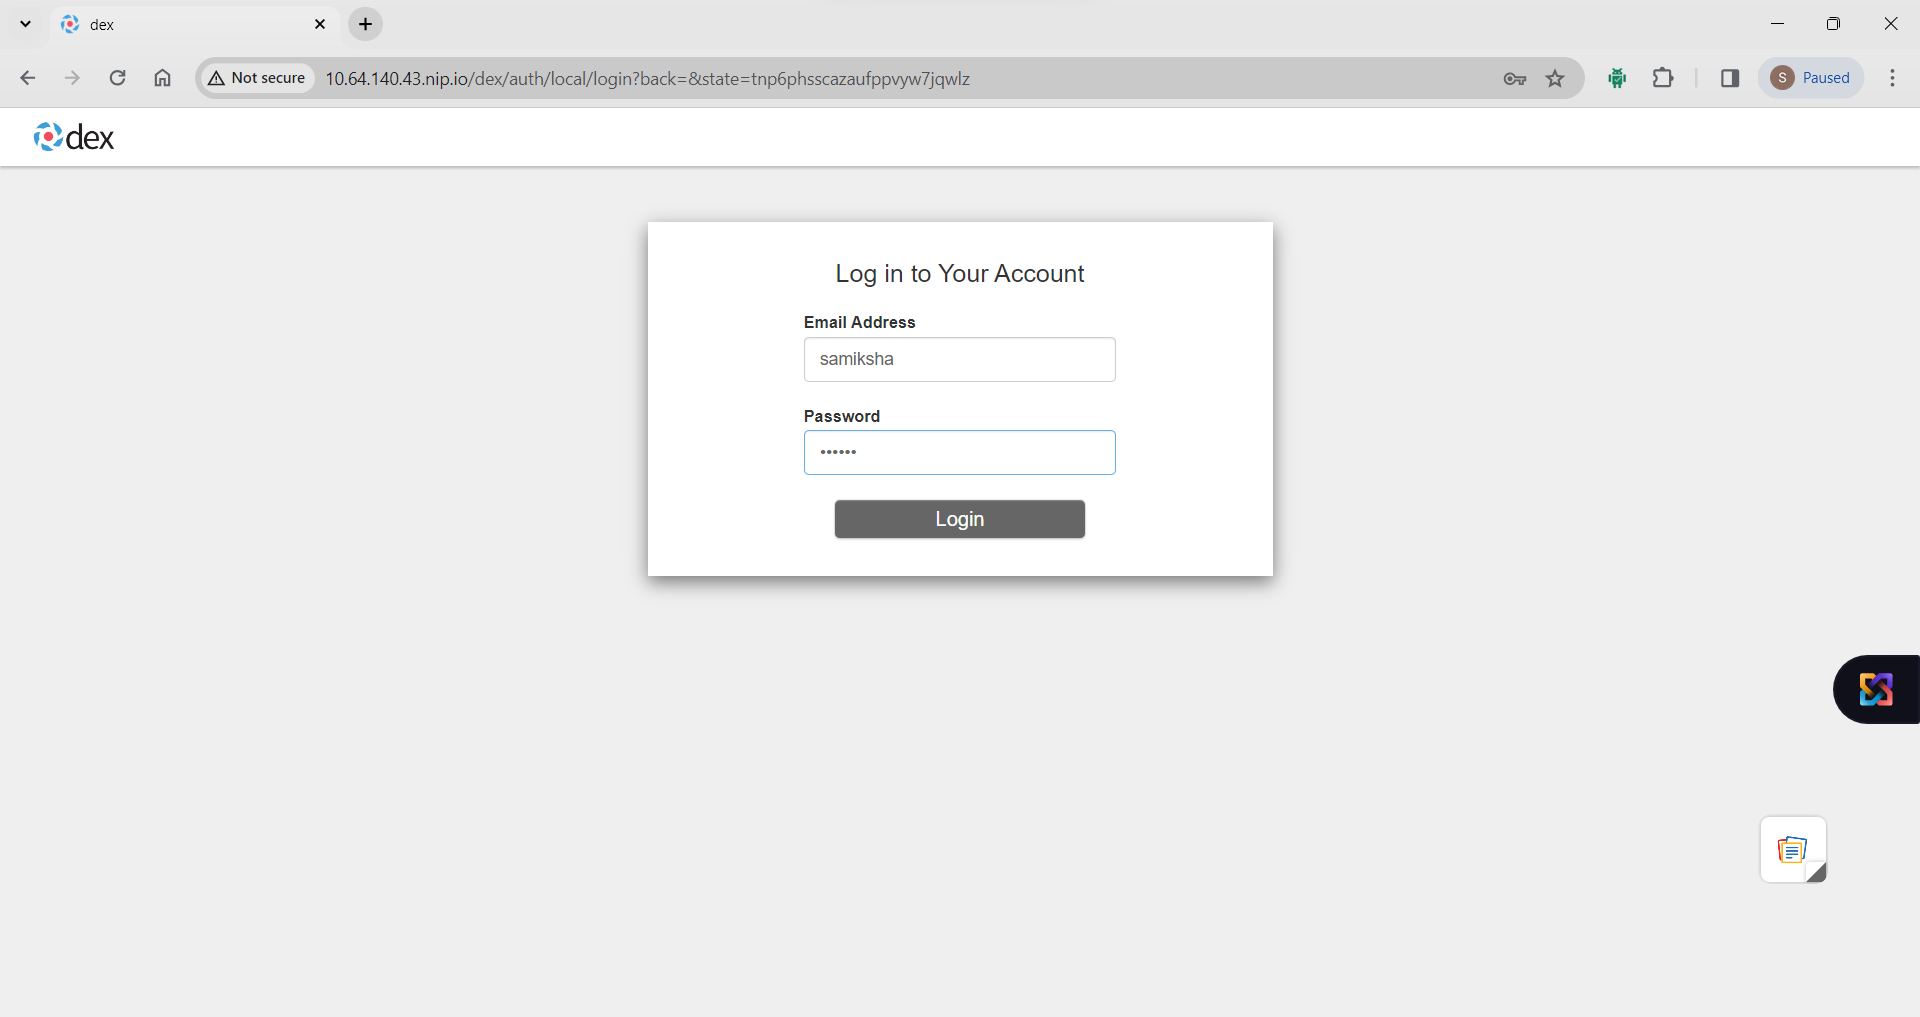
To enable simple authentication, and set a username and password for your Kubeflow deployment, run the following commands:
juju config dex-auth static-username=samiksha
juju config dex-auth static-password=sam@13
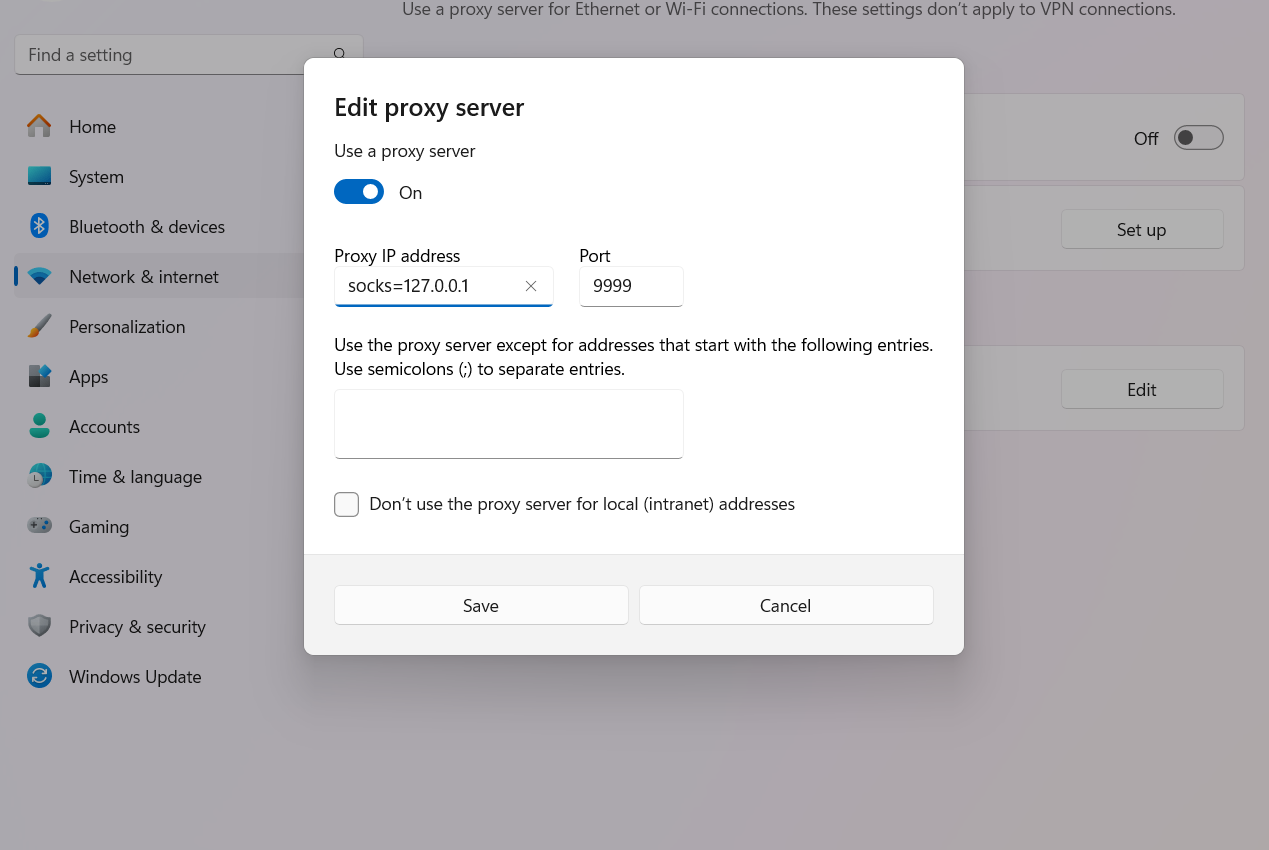
In order to access the kubeflow we need to setup the socks proxy and allow it for a particular port. let's open 9999 port.
Go to settings > Network and Internet > Proxy > manual proxy setup and set below
Finally open chrome/edge and open http://10.64.140.43.nip.io. it'll allow for login to kubeflow dashboard
After login, final Dashboard will appear. where you can access the notebooks/experiments/pipelines/Runs/Recurring Runs features of kubeflow.
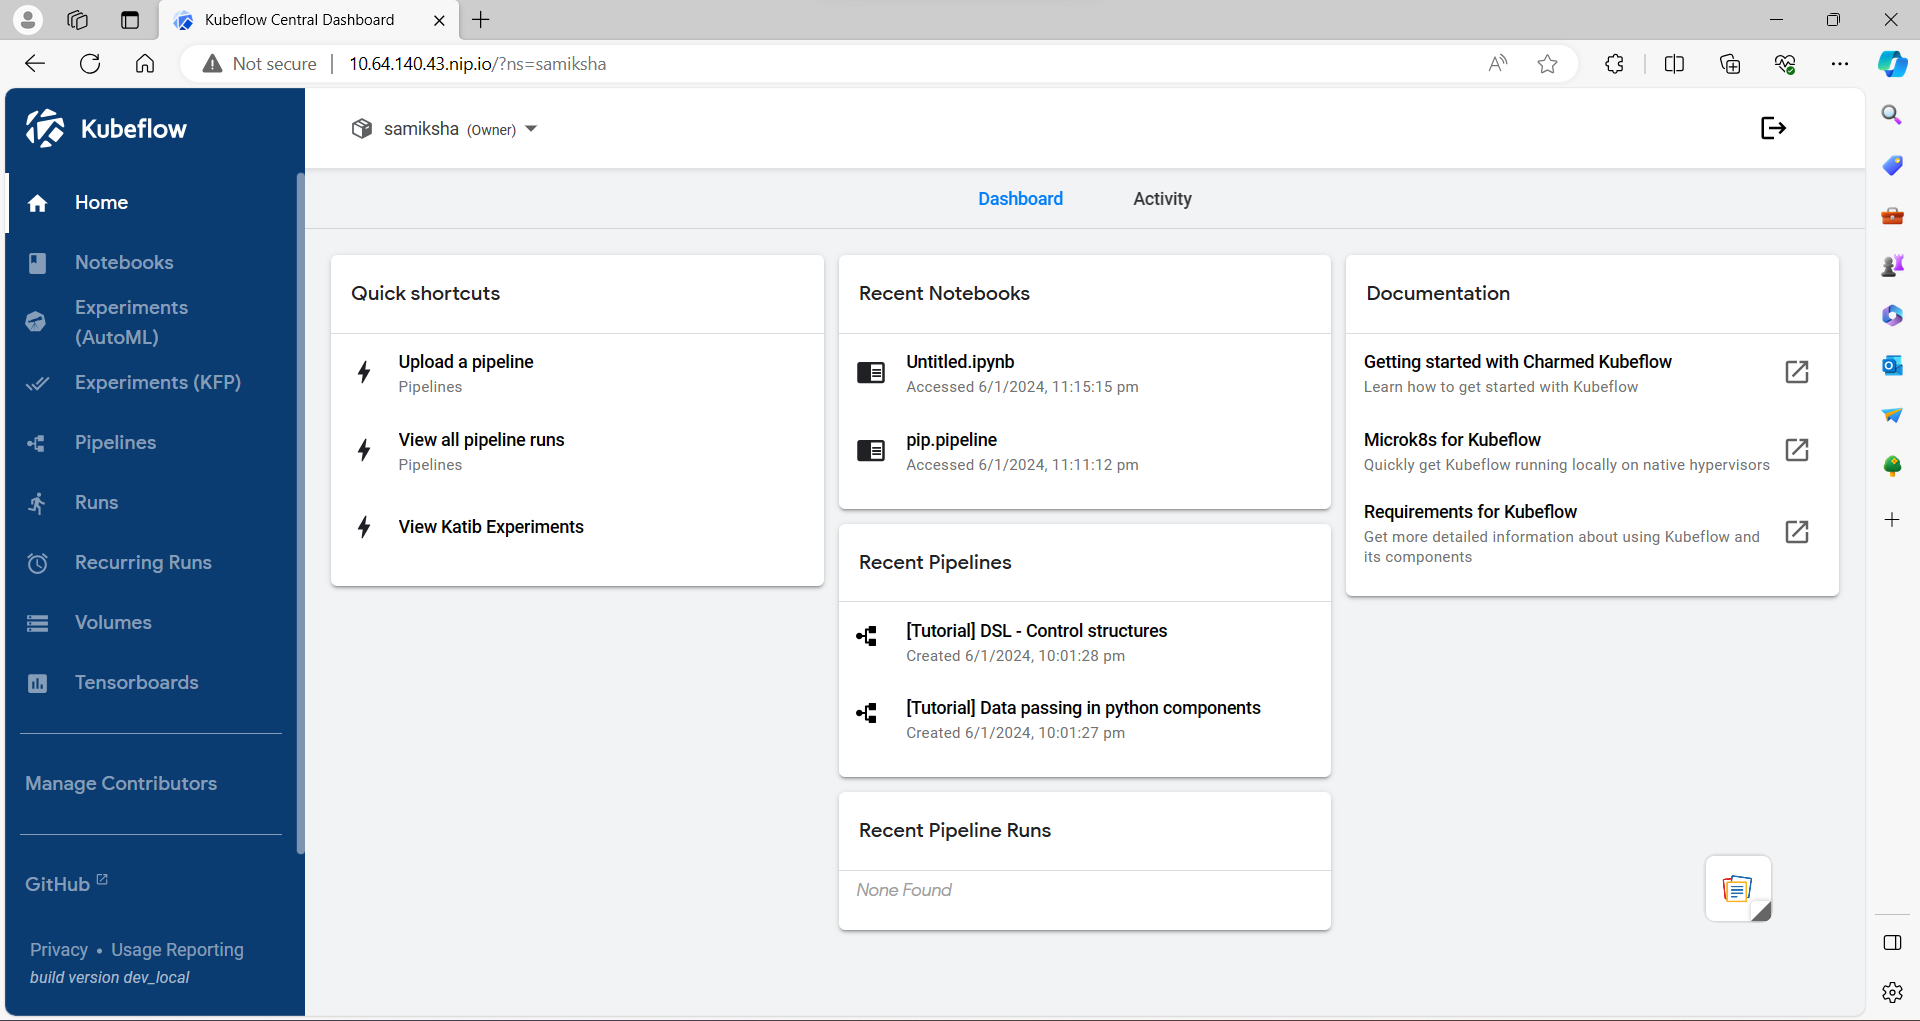
Yeah!! You setup you own managed mlops-platform.
4. Next Steps:
Now in the next-article, we will see how to create and run simple pipelines with in-depth intuition about kfp from scratch.
That's a wrap for now✨, tech enthusiasts! Until our next exploration into the realms of MLOPS, keep exploring, stay curious!!!
Happy learning! See you in the next article.🚀💻


