


Challenges in the Container environment
In the real world, using containerized applications for businesses often means launching hundreds of containers and associated services. One of the main challenges is identifying and monitoring any containers or services that are down. Manual monitoring can introduce multiple errors, slow down the process, and increase application downtime. Therefore, it's crucial to have an automated monitoring system in place to identify and troubleshoot issues quickly. This will save time and reduce errors and help ensure that your applications are always up and running.
Multiple times there are situations where scaling is often necessary to optimize resource usage or meet customer demand when hosting applications. However, manually scaling up and down can be a time-consuming process and increase management complexity. Automated scaling is a better option as it can automatically adjust resources based on the current demand, ensuring that applications are always running efficiently. This not only saves time and effort but also helps to ensure a seamless user experience. With automated scaling, businesses can focus on delivering value to their customers while the system takes care of the infrastructure.
Kubernetes plays a crucial role in this space. By leveraging the resources and services they offer.
Labels in k8s
In a single Kubernetes cluster, an organization can launch multiple applications, each associated with a number of containers. Kubernetes needs a way to identify containers uniquely, and filtering is sometimes necessary. Labels play a crucial role in this regard, as they can be associated with almost all the services and resources that Kubernetes offers. Labels are heavily used and make it easy to filter and manage resources. With labels, Kubernetes makes it easier for organizations to launch and manage complex applications in a scalable and efficient manner. Associating labels with resources and services in k8s is nothing but associating key-value pairs with them.
Let's look at an example of labels associated with a pod:
apiVersion: v1
kind: Pod
metadata:
    name: "mywebpod1"
    labels:
      environment: "test"
spec:
    containers:
    - name: "mycontainer1"
      image: "httpd"
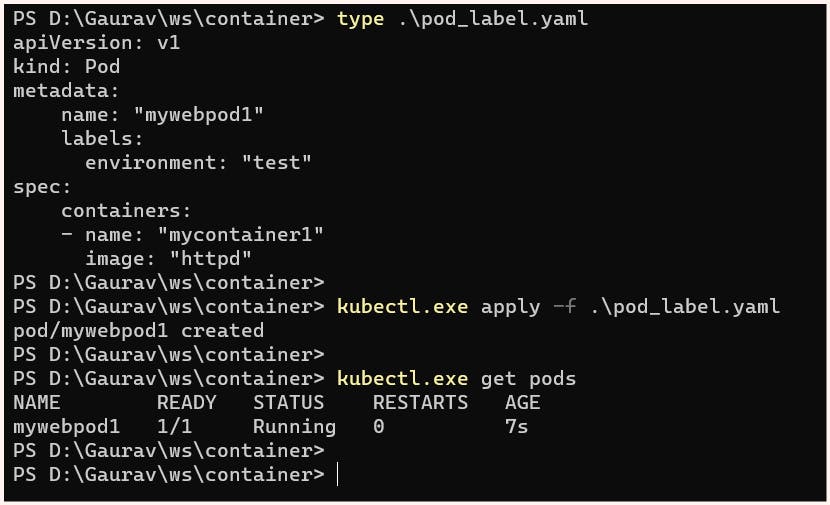
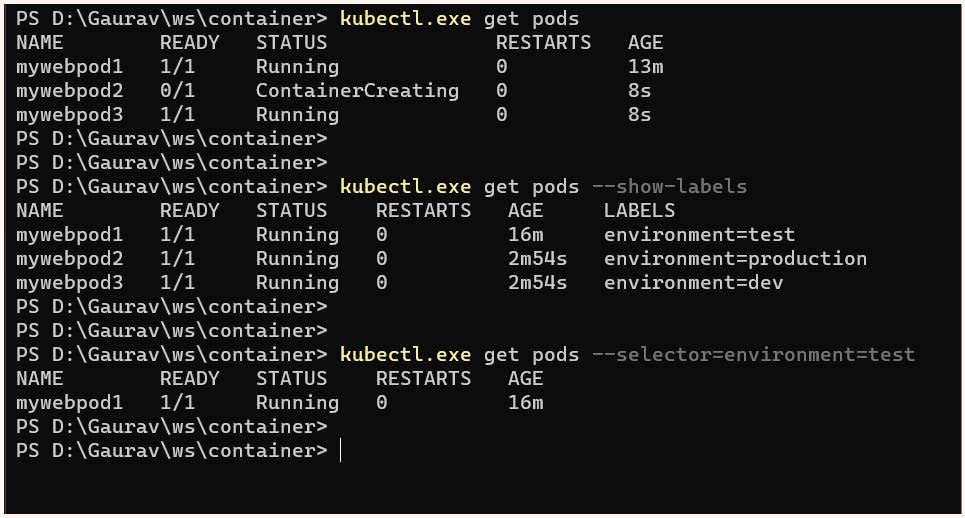
To better understand this thing, we can launch additional pods with different labels and use the "show-labels" option to display them.
Label Selectors
To select a specific pod using a label, we can use a selector.
the syntax for label selector:
$ kubectl get <resource_name> --selector=<key>=<value>
instead of --selector we can also use -l flag
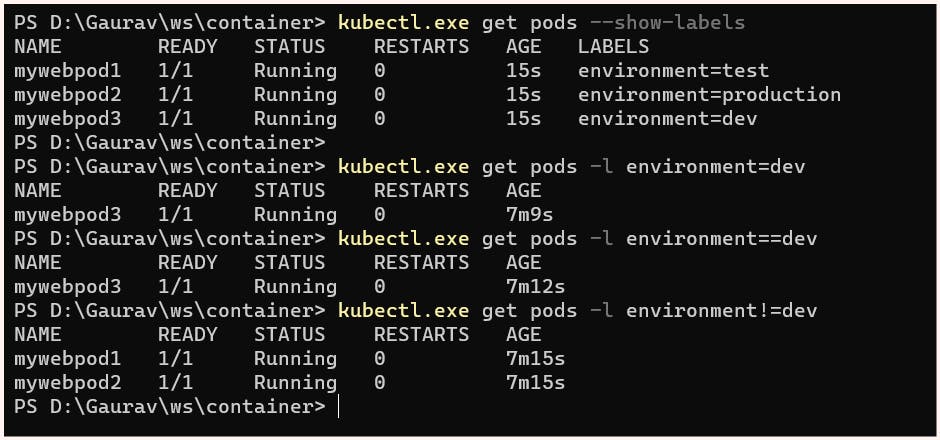
Equality Based Selectors
In Kubernetes, equality-based selectors allow filtering based on labels, which include key-value pairs that match all specified constraints. However, these labels may have additional labels as well. Three types of operations are allowed in equality-based selectors, which are '=', '==', and '!='. The first two represent equality and are synonyms, while the last one represents inequality.
Set Based Selectors
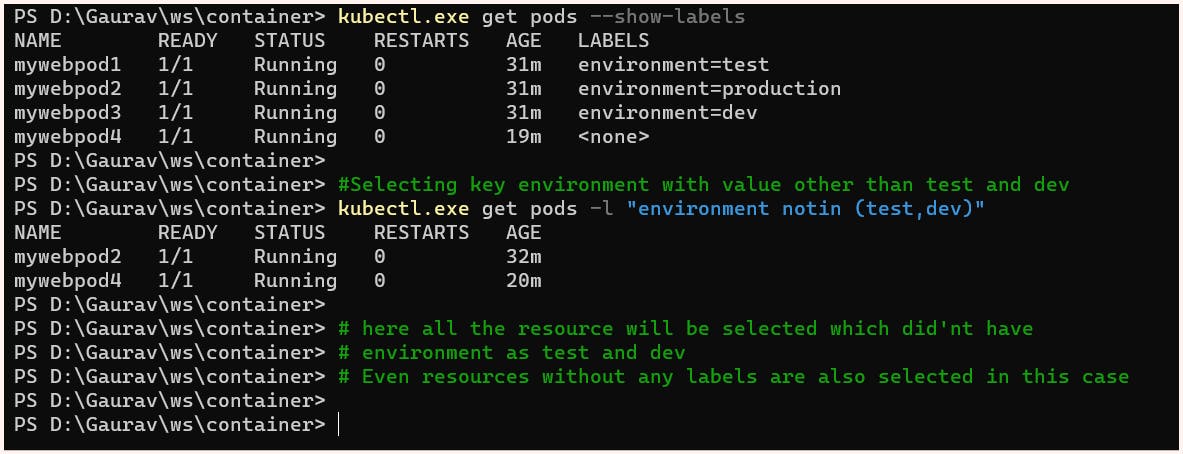
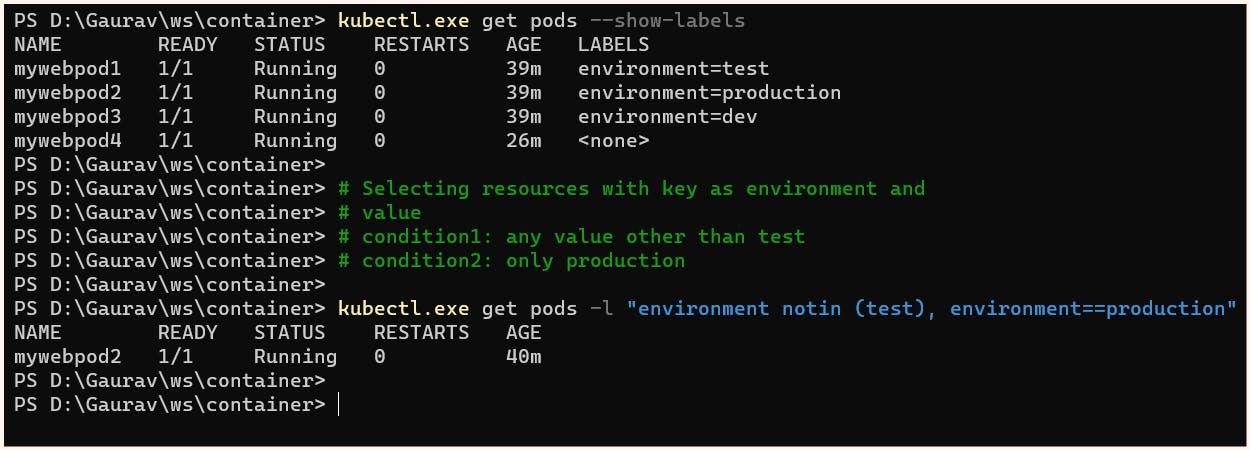
Set-based selectors in Kubernetes allow filtering based on the set of values associated with a label key. Here 3 kinds of operations are supported:
IN : operator used for matching any of the specified value
NOTIN: operator used to exclude any of the specified values
EXISTS: to match any pod with the specified key regardless of its value
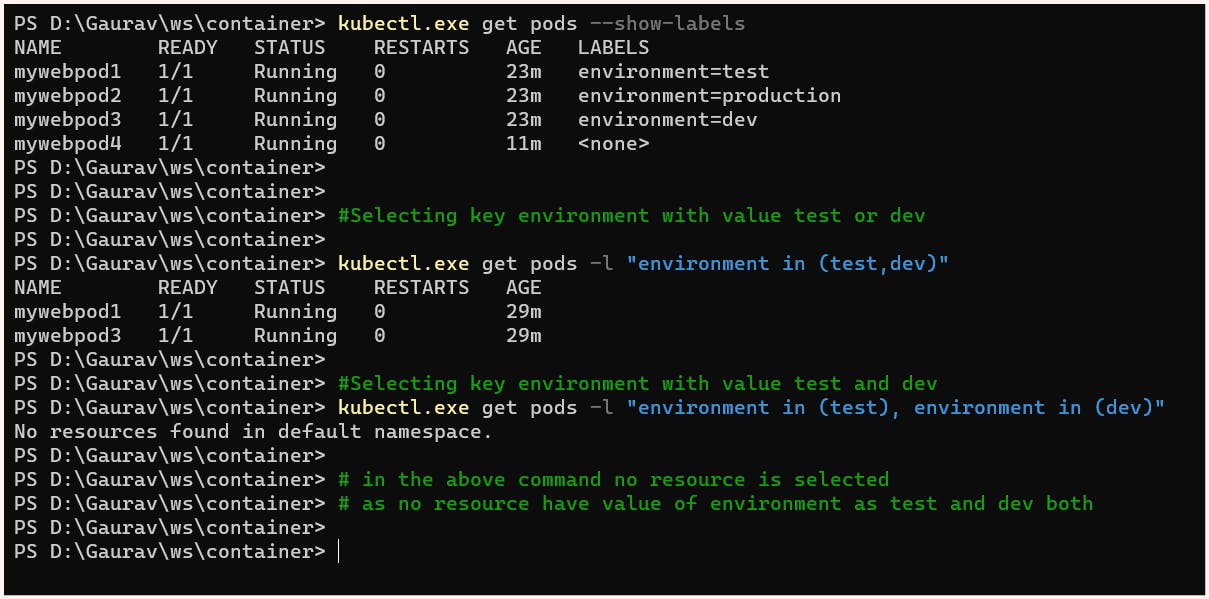
NOTE:
Set-based selectors can be mixed with equality-based selectors.
Example:
Replication Controller and Replica Set
To maintain a specific number of pods for an application, Kubernetes offers two solutions: Replication Controller (RC) and Replica Set (RS). Both use labels to check if the desired number of pods is present. In the latest version of Kubernetes, RS is preferred and is used in deployment resources as well. The key difference between RS and RC is that RC only supports equality-based selectors, while RS supports new set-based selectors. This means that RS offers more advanced filtering options, making it a more flexible and powerful solution for managing pods in a Kubernetes cluster.
Now whether it is RS or RC there are 3 main components involved in their manifest file
Replicas:
With the help of replicas, we can specify the desired number of pods for the ReplicaSet or ReplicationController. If the current number of pods doesn't match the desired number, the ReplicaSet or ReplicationController will either add or delete pods to ensure the desired capacity is met.
Selector
ReplicaSet or ReplicationController continuously monitors the pods through labels. In order to filter and find the desired pods with labels, selectors are used.
Templates
In order to ensure the correct image and labels are assigned to the pods, a pod template is created when using ReplicaSet or ReplicationController. This template specifies the necessary details that need to be included when launching the pods, such as the image to be used and the labels to be assigned.
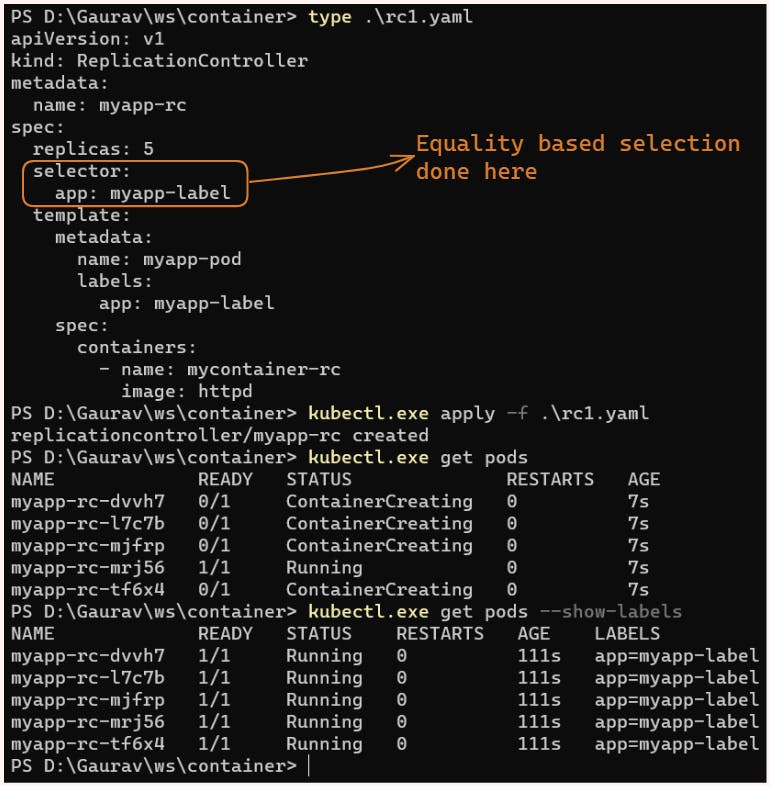
Replication Controller
In the below manifest file, we have asked for 5 replicas of the pod with the label app=app-label and pod image is httpd we have also created a selector selecting pods with label app=app-label
apiVersion: v1
kind: ReplicationController
metadata:
  name: myapp-rc
spec:
  replicas: 5
  selector:
    app: myapp-label
  template:
    metadata:
      name: myapp-pod
      labels:
        app: myapp-label
    spec:
      containers:
        - name: mycontainer-rc
          image: httpd
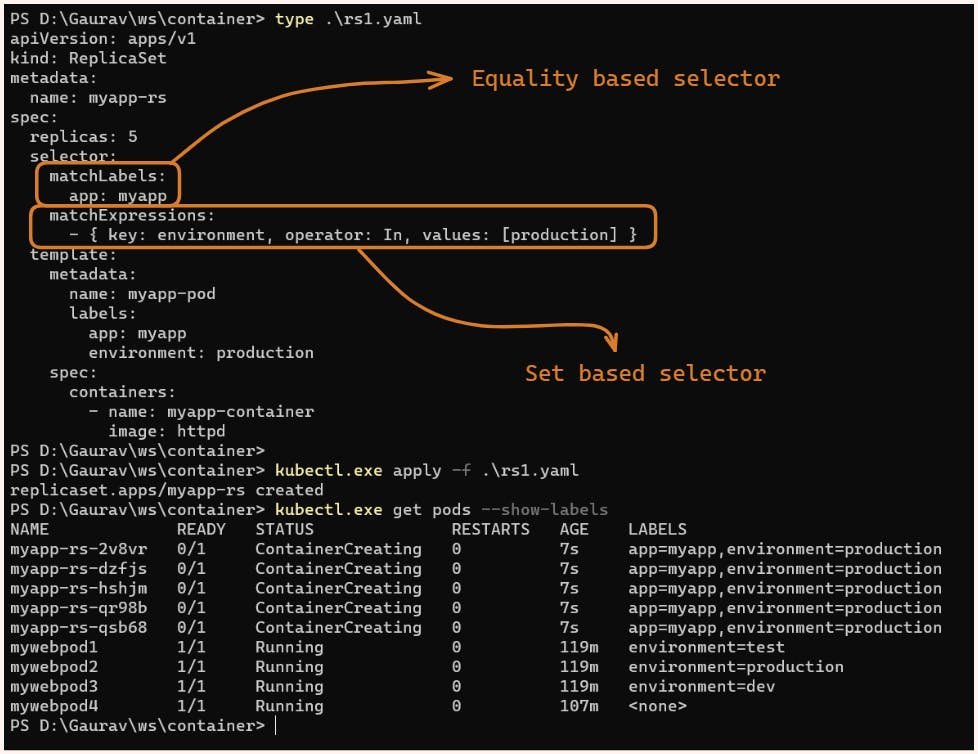
Replica-Set
In the below manifest file, we have asked for 5 replicas of the pod with labels app=myapp and environment=production we have made use of 2 kinds of selectors here as ReplicaSet supports both equality-based and set-based selectors.
apiVersion: apps/v1
kind: ReplicaSet
metadata:
  name: myapp-rs
spec:
  replicas: 5
  selector:
    matchLabels:
      app: myapp
    matchExpressions:
      - { key: environment, operator: In, values: [production] }
  template:
    metadata:
      name: myapp-pod
      labels:
        app: myapp
        environment: production
    spec:
      containers:
        - name: myapp-container
          image: httpd
Scaling of RC and RS
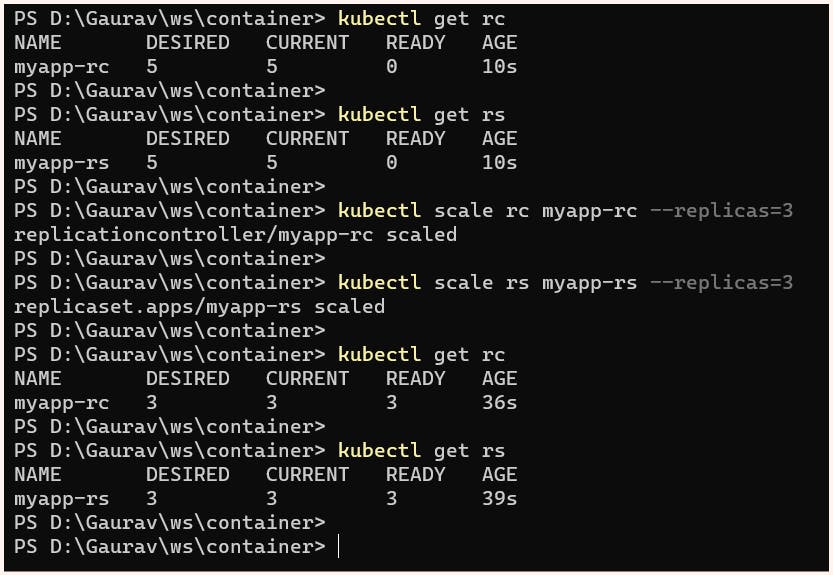
Wheather it is RC or RS scaling can be done very easily with the help of kubectl scale command:
$ kubectl scale <resource> <resource_name> --replicas=<number_of_replicas>Example:
Deployment
After launching an application in Kubernetes using pods, scaling can be done using ReplicaSets or ReplicationControllers. However, upgrading pods requires proper strategies such as rolling updates, recreating, or canary. Kubernetes offers the Deployment resource, which is built on top of pods and replica sets and provides a higher level of abstraction for managing the application lifecycle. Essentially, it sits as a top layer over replica sets and allows for more advanced deployment strategies such as rolling updates, recreating pods, and canary deployments.
To understand the importance of deployment strategies, let's consider an example: Suppose we have a web application that is already publicly available. Our developers have added some new features to the code and want to release the updated version (v2) to the public. This process is known as a rollout. However, if an error is identified in the updated version, a decision must be made to shift back to the previous version (v1), which is known as a rollback. During these rollouts and rollbacks, we cannot afford to have our servers down as it would result in a business loss. Therefore, it is essential to plan a proper deployment strategy to reduce downtime.
Practicals
For this practical, we will be using a container image publically available over dockerhub (here) created by us. The image has 2 versions v1 and v2.
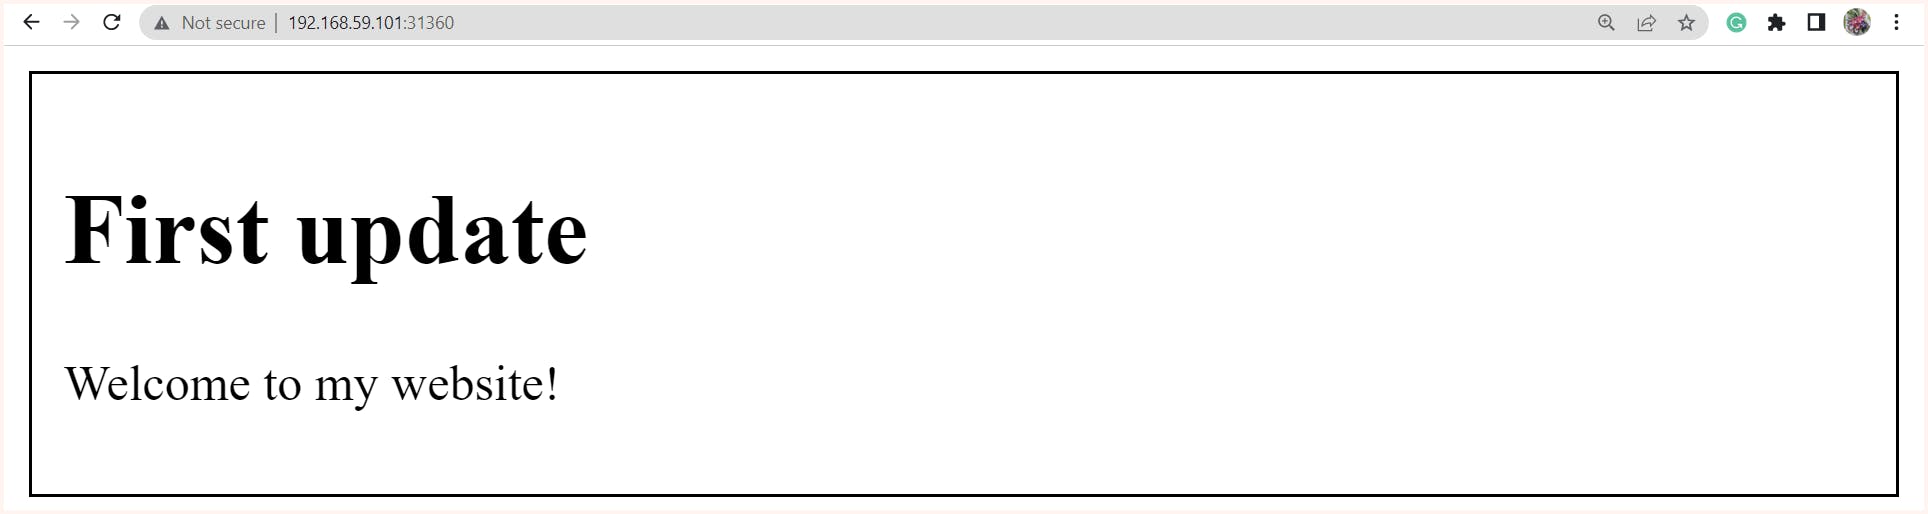
v1 of the container image contains a web server that displays the message "First Update" kept inside the index.html file.
v2 of the container image contains a web server that displays the message "Second Update" kept inside the index.html file.
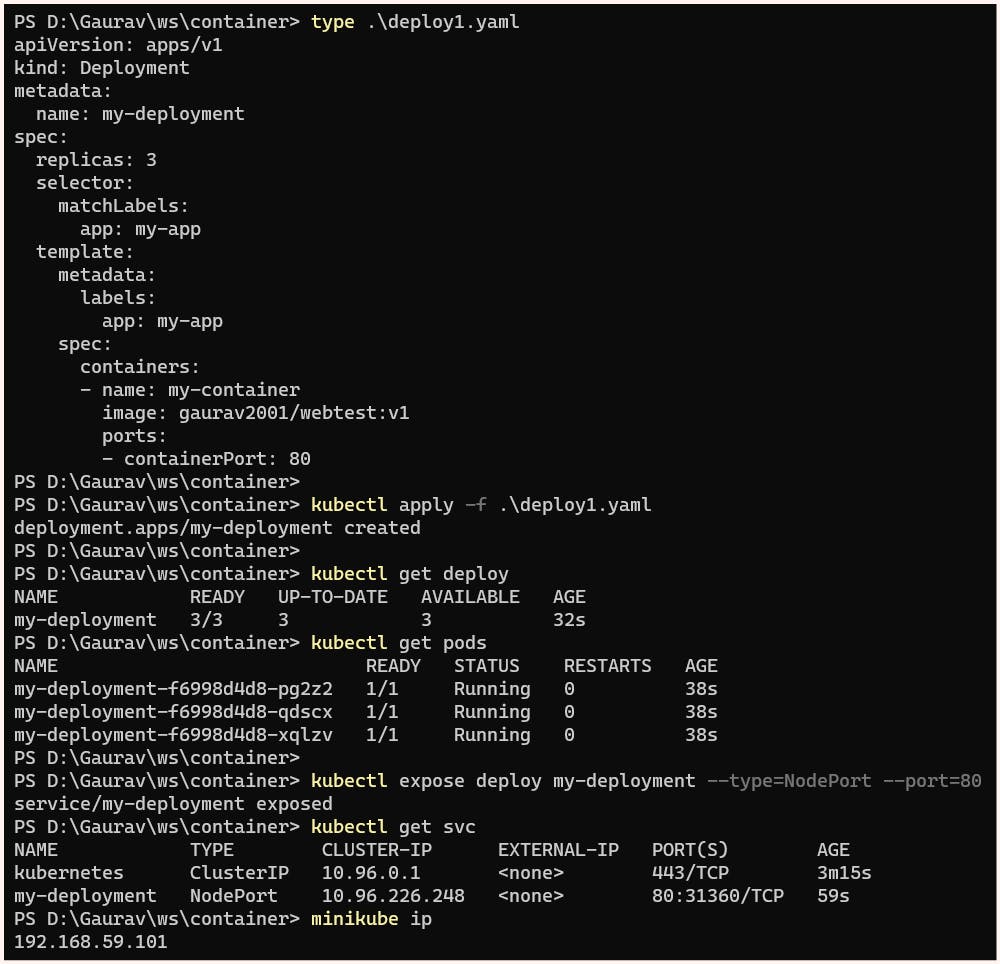
Next, we will be creating a Kubernetes deployment with 3 replicas and exposing it to the outside world, enabling everyone in our network to access the web server inside the deployment.
apiVersion: apps/v1
kind: Deployment
metadata:
  name: my-deployment
spec:
  replicas: 3
  selector:
    matchLabels:
      app: my-app
  template:
    metadata:
      labels:
        app: my-app
    spec:
      containers:
      - name: my-container
        image: gaurav2001/webtest:v1
        ports:
        - containerPort: 80
NOTE:
The
kubectl exposecommand creates a Kubernetes service, which acts as a load balancer for our deployment. To make this load balancer publicly accessible, we need to set its type to NodePort. This binds the service port 80 to a random port available in Minikube, which in this case is 31360.So hence now if we hit to http://192.168.59.101:31360 content will be displayed

We can also see the rollout status success after this using the command:
$ kubectl.exe rollout status deploy/my-deploymentand similarly, the history of this deployment can also be checked:
$ kubectl.exe rollout history deploy/my-deploymentIf the requirement is to shift to a newer version we can rollout using:
$ kubectl set image deploy/<deployment_name> <container_name>=<image_name>$ kubectl.exe set image deploy/my-deployment my-container=gaurav2001/webtest:v2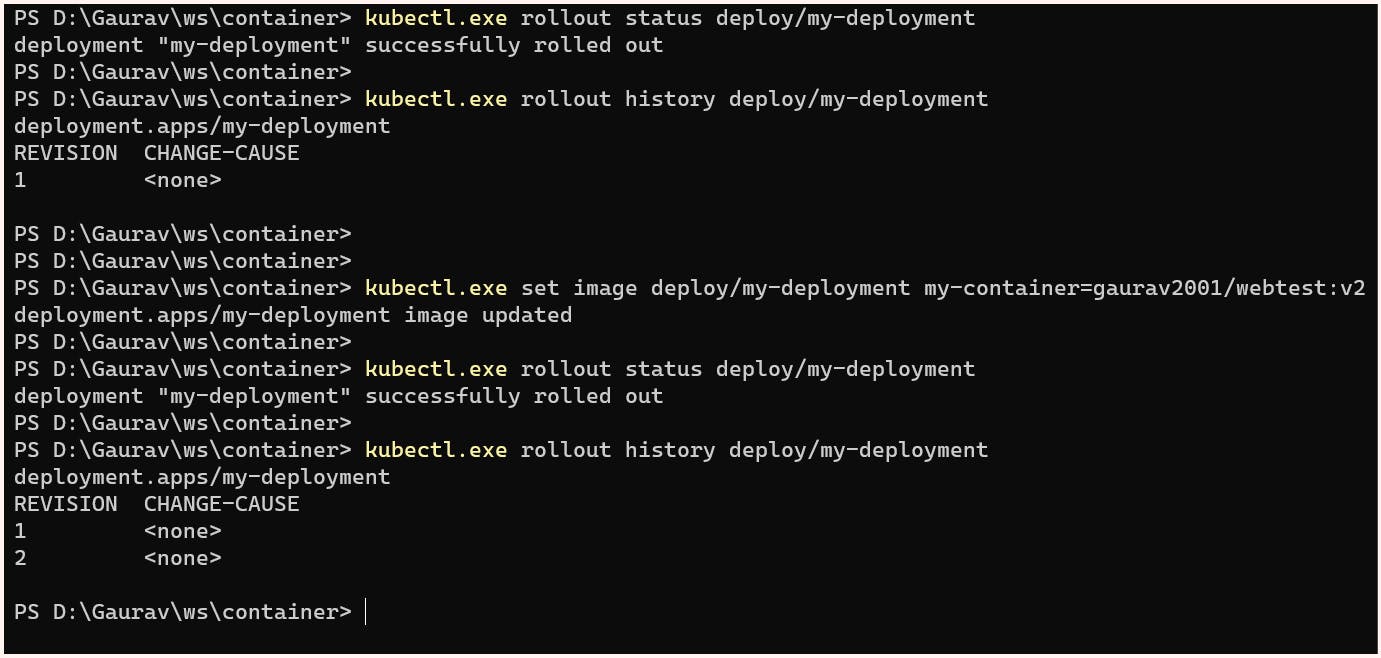
And now if we refresh the page
http://192.168.59.101:31360we get updated content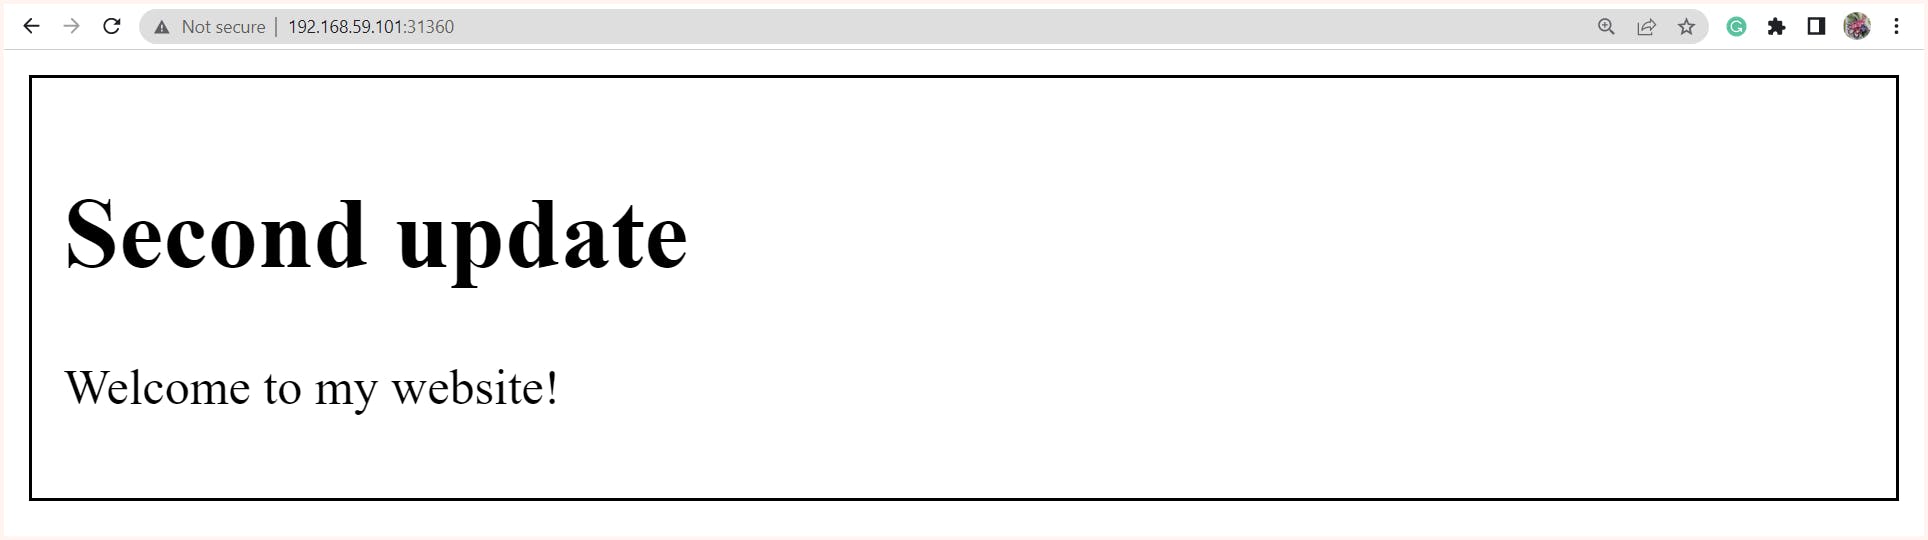
Now let's consider a case for some reason decision is made to again move to the previous version this can be done using:
$ kubectl.exe rollout undo deploy/my-deployment --to-revision=1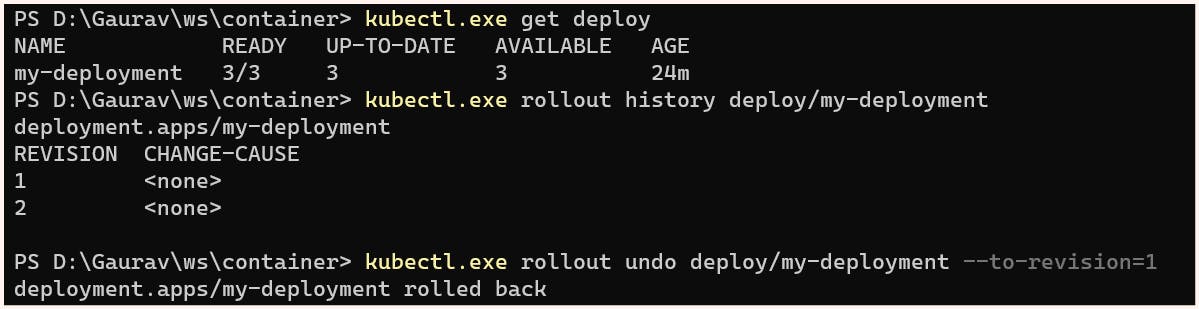
NOTE:
If needed we can also do all these changes like setting image, changing configuration and all directly by using kubectl edit command
Also in the above image if we observe carefully in the edit file bydefault strategy is Rolling Update here if we want we can also customise these configurations.

Overview of Common Deployment Strategies in Kubernetes
Rolling Updates/ Ramped
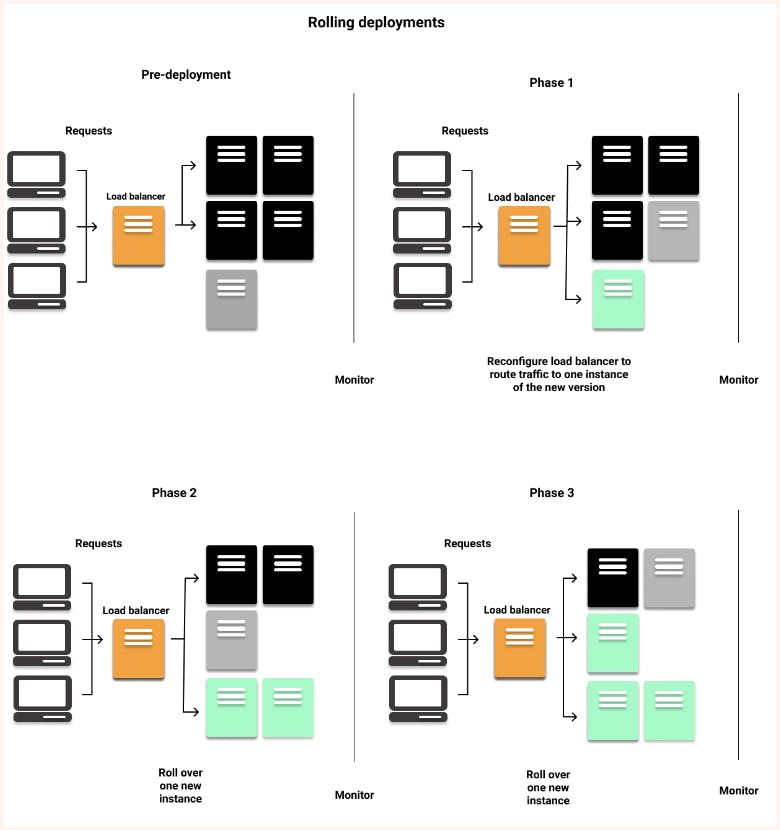
This is one of the most commonly used deployment strategies as it ensures almost 100% uptime. Known as rolling updates, this strategy involves incrementally replacing old pods with newer versioned ones, as long as there are no live sessions going on. Rolling updates do not update all pods immediately and therefore, can take some time to complete.
Recreate
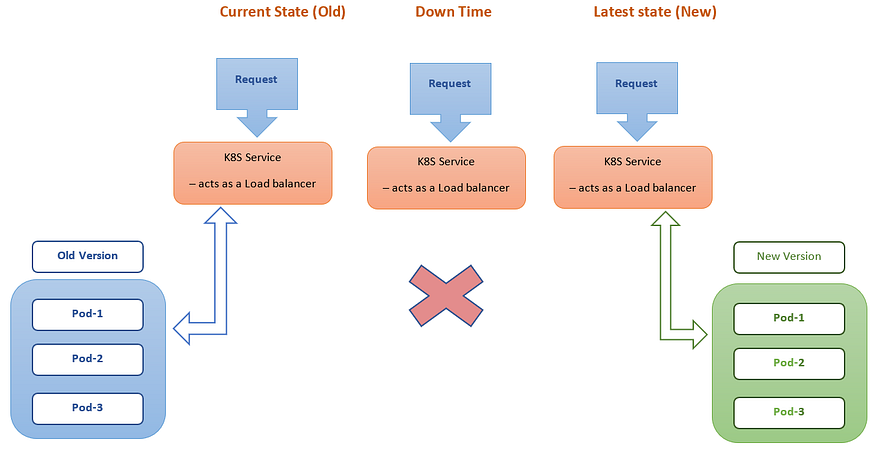
The recreate strategy is used when a critical update needs to be pushed immediately, as it terminates all the pods with the older version and deploys newer version pods. However, this can lead to downtime during the update process.
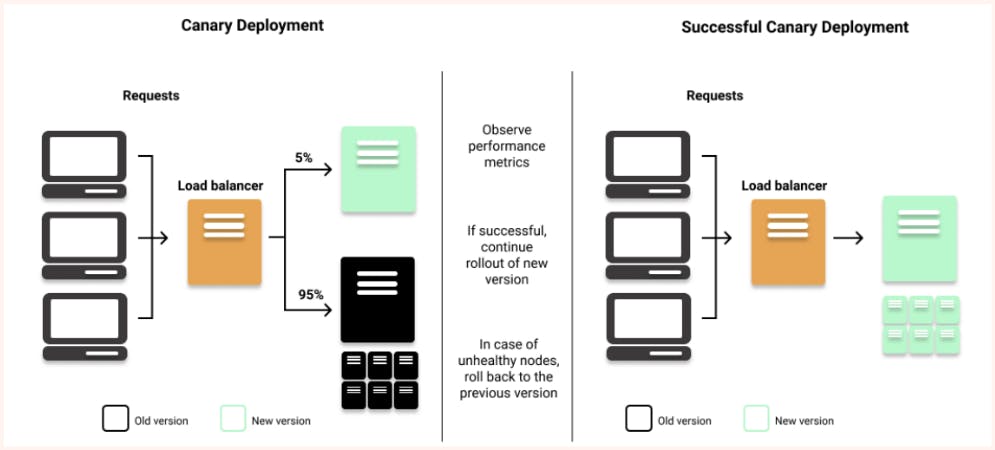
Canary Deployment
A canary deployment is a deployment strategy that allows you to test a new deployment in production with a small subset of users before releasing it to the entire user base. By releasing the change to a small group of users first, you can mitigate the risks associated with new releases and ensure that the new version is stable and reliable before releasing it to everyone.
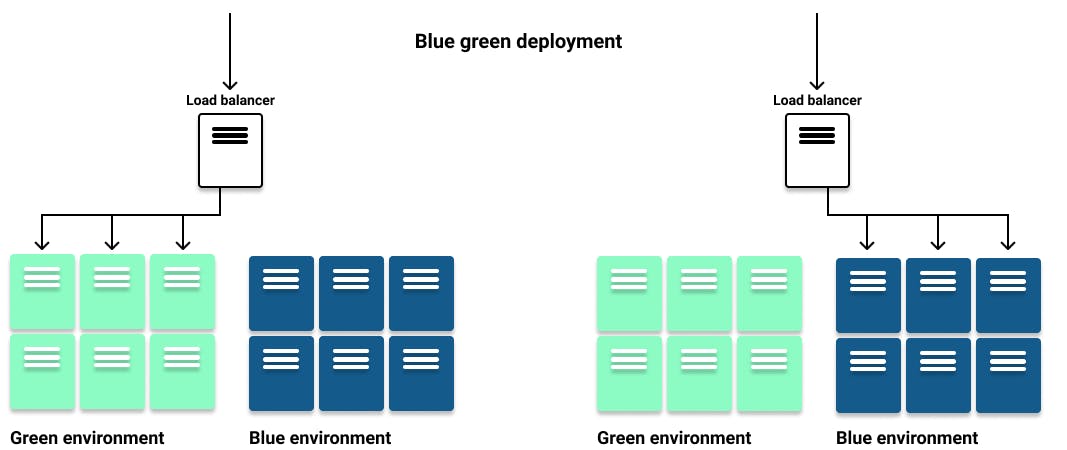
Blue-Green Deployment
Blue-green deployment is a deployment strategy used when the requirement is to expose the new version of the application to users only after it is fully deployed. In this strategy, separate deployments are created for the old "blue" version and the new "green" version. Once the green version is fully deployed, the routes pointing to the blue version are switched to point to the new green version, thereby exposing the updated version to the users.
NOTE: Blue-green deployments require at least twice the resources in your cluster to host both versions of the application simultaneously, which can be a significant downside. It is crucial to ensure that your cluster has enough resources before performing a blue-green deployment.
Extra Resources:
K8S documentation - labels and selectors
Koyeb - Deployment Strategy
K8S documentation - Deployment
That's all for this blog, folks 🙌 Stay tuned for more amazing stuff on Kubernetes and more such tech. Make sure to subscribe to our newsletter. 📫
Thank you For Reading :) #HappyLearning
Any query and suggestion are always welcome- Gaurav Pagare