

Diagnose a virtual machine network traffic filter problem using the Azure portal

My name is Gayatri Barhate, and I am an IT professional with a focus on Azure. I enjoy exploring cloud computing concepts and sharing my insights through blogging. My writing covers various Azure topics, from basic principles to advanced features, aiming to help readers understand and leverage Azure technologies effectively. I am passionate about continuous learning and strive to create content that is both informative and accessible to all skill levels.
We will deploy a virtual machine (VM) and check communications to an IP address and URL and from an IP address. You will determine the cause of a communication failure and learn how you can resolve it.
Log in to Azure
Log in to the Azure portal at https://portal.azure.com.
Create a VM
Select + Create a resource found in the upper-left corner of the Azure portal.
Select Compute, and then select Windows Server 2019 Datacenter or a version of Ubuntu Server.
Enter, or select, the following information, accept the defaults for the remaining settings, and then select OK:
| Setting | Value | | --- | --- | | Subscription | Select your subscription. | | Resource group | Select Create New and enter myResourceGroup. | | Virtual machine name | myVm | | Region | Select East US | | User name | Enter a user name of your choosing. | | Password | Enter a password of your choosing. The password must be at least 12 characters long and meet the defined complexity requirements. |
Select Review + Create to start VM deployment. The VM takes a few minutes to deploy. Wait for the VM to finish deploying before continuing with the remaining steps.
Test network communication
To test network communication with Network Watcher, first, enable a network watcher in at least one Azure region, and then use Network Watcher's IP flow verify capability.
Enable network watcher
If you already have a network watcher enabled in at least one region, skip to the Use IP flow verify.
In the Home portal, select More Services. In the Filter box, enter Network Watcher. When Network Watcher appears in the results, select it.
Enable a network watcher in the East US region, because that's the region the VM was deployed to in a previous step. Select Add, to expand it, and then select Region under Subscription, as shown in the following picture:

Select your region then select Add.
Use IP flow verify
When you create a VM, Azure allows and denies network traffic to and from the VM, by default. You might later override Azure's defaults, allowing or denying additional types of traffic.
In the Home portal, select More Services. In the All Services Filter box, enter Network Watcher. When Network Watcher appears in the results, select it.
Select IP flow to verify, under Network diagnostic tools.
Select your subscription, enter or select the following values, and then select Check, as shown in the picture that follows:
| Setting | Value | | --- | --- | | Subscription | Select your subscription | | Resource group | Select myResourceGroup | | Virtual machine | Select myVm | | Network interface | myvm - The name of the network interface the portal created when you created the VM is different. | | Protocol | TCP | | Direction | Outbound | | Local IP address | 10.0.0.4 | | Local port | 60000 | | Remote IP address | 13.107.21.200 - One of the addresses for <www.bing.com\>. | | Remote port | 80 |
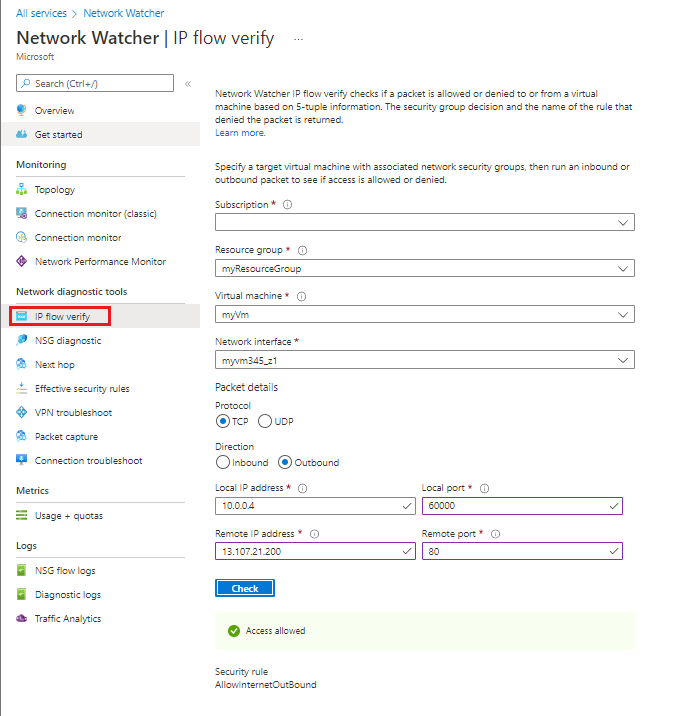
After a few seconds, the result returned informs you that access is allowed because of a security rule named AllowInternetOutbound. When you ran the check, Network Watcher automatically created a network watcher in the East US region, if you had an existing network watcher in a region other than the East US region before you ran the check.
Complete step 3 again, but change the Remote IP address to 172.31.0.100. The result returned informs you that access is denied because of a security rule named DenyAllOutBound.
Complete step 3 again, but change the Direction to Inbound, the Local port to 80, and the Remote port to 60000. The Remote IP address remains 172.31.0.100. The result returned informs you that access is denied because of a security rule named DenyAllInBound.
Now that you know which security rules are allowing or denying traffic to or from a VM, you can determine how to resolve the problems.
View details of a security rule
To determine why the rules in steps 3-5 of Use IP flow verify allow or deny communication, review the effective security rules for the network interface in the VM.
In the search box at the top of the portal, enter myvm. When the myvm Regular Network Interface appears in the search results, select it.
Select Effective security rules under Support + troubleshooting, as shown in the following picture:
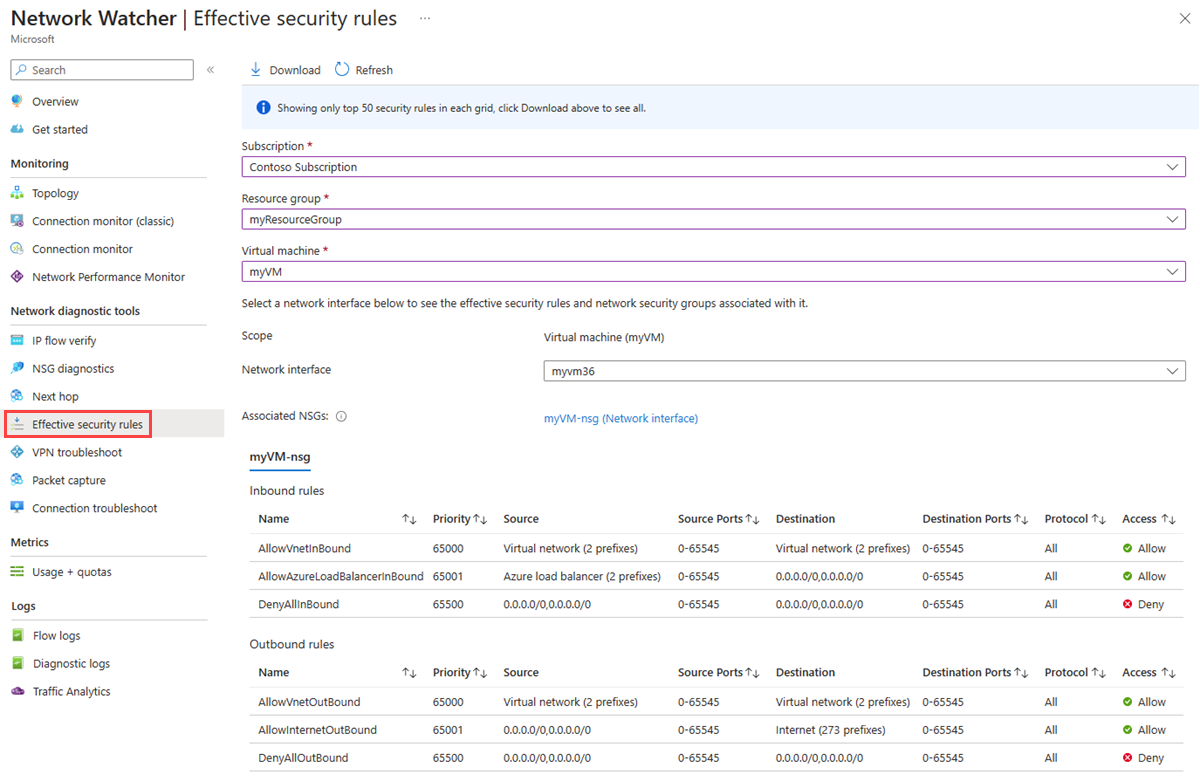
In step 3 of Use IP flow verify, you learned that the reason the communication was allowed is because of the AllowInternetOutbound rule. You can see in the previous picture that the Destination for the rule is the Internet. It's not clear how 13.107.21.200, the address you tested in step 3 of Use IP flow verify, relates to the Internet though.
Select the AllowInternetOutBound rule, and then scroll down to Destination.
One of the prefixes in the list is 13.0.0.0/8, which encompasses the 13.0.0.1-13.255.255.254 range of IP addresses. Since 13.107.21.200 is within that address range, the AllowInternetOutBound rule allows the outbound traffic. Additionally, there is no higher priority (lower number) rules shown in the picture in Step 2 that override this rule. Close the Address prefixes box. To deny outbound communication to 13.107.21.200, you could add a security rule with a higher priority, that denies port 80 outbound to the IP address.
When you ran the outbound check to 172.131.0.100 in step 4 of Use IP flow verify, you learned that the DenyAllOutBound rule denied communication. That rule equates to the DenyAllOutBound rule shown in the picture in step 2 which specifies 0.0.0.0/0 as the Destination. This rule denies the outbound communication to 172.131.0.100 because the address is not within the Destination of any of the other Outbound rules shown in the picture. To allow the outbound communication, you can add a security rule with a higher priority, that allows outbound traffic to port 80 for the 172.131.0.100 address.
When you ran the inbound check from 172.131.0.100 in step 5 of Use IP flow verify, you learned that the DenyAllInBound rule denied communication. That rule equates to the DenyAllInBound rule shown in the picture in Step 2. The DenyAllInBound rule is enforced because no other higher priority rule exists that allows port 80 inbounds to the VM from 172.31.0.100. To allow the inbound communication, you could add a security rule with a higher priority, that allows port 80 inbound from 172.31.0.100.

The checks in this quickstart tested Azure configuration. If the checks return the expected results and you still have network problems, ensure that you don't have a firewall between your VM and the endpoint you're communicating with and that the operating system in your VM doesn't have a firewall that is allowing or denying communication.
Clean up resources
When no longer needed, delete the resource group and all of the resources it contains:
Enter myResourceGroup in the Search box at the top of the portal. When you see myResourceGroup in the search results, select it.
Select Delete resource group.
Enter myResourceGroup for TYPE THE RESOURCE GROUP NAME: and select Delete.
In this hands-on, you created a VM and diagnosed inbound and outbound network traffic filters. You learned that network security group rules allow or deny traffic to and from a VM.
Thanks for Reading!
Follow me here Gayatri Barhate


