

Terraform with Spotify
Adding the playlist with the help of Spotify

Terraform
HashiCorp Terraform is an infrastructure as a code tool that lets you define both cloud and on-prem resources in human-readable configuration files that you can version, reuse, and share. You can then use a consistent workflow to provision and manage all of your infrastructure throughout its lifecycle. Terraform can manage low-level components like compute, storage, and networking resources, as well as high-level components like DNS entries and Saa
How does Terraform work?
Terraform creates and manages resources on cloud platforms and other services through its application programming interfaces (APIs). Providers enable Terraform to work with virtually any platform or service with an accessible API.
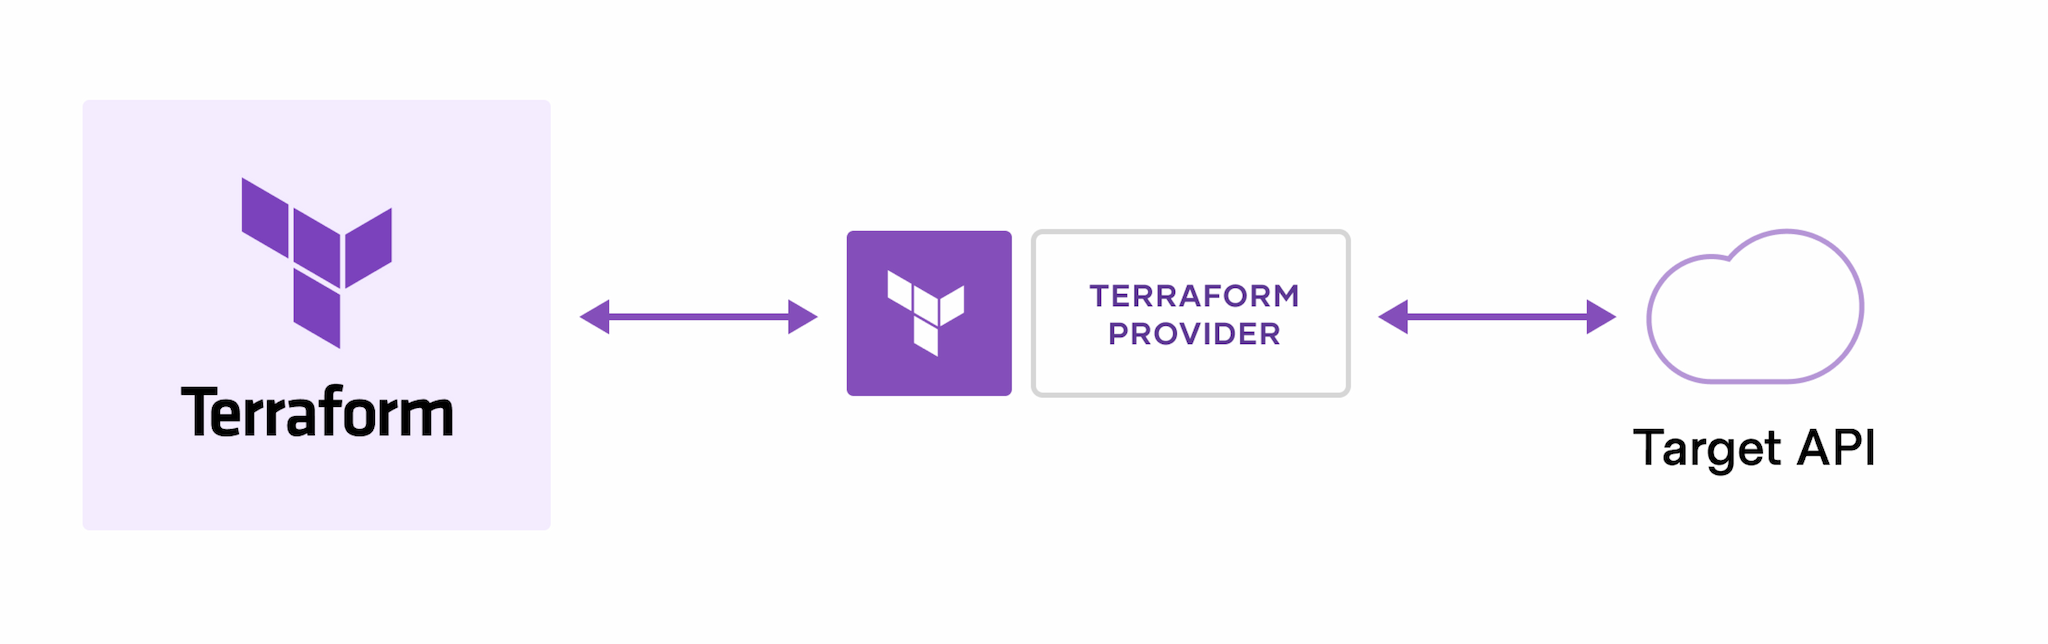
HashiCorp and the Terraform community have already written more than 1700 providers to manage thousands of different types of resources and services, and this number continues to grow. You can find all publicly available providers on the Terraform Registry, including Amazon Web Services (AWS), Azure, Google Cloud Platform (GCP), Kubernetes, Helm, GitHub, Splunk, DataDog, and many more.
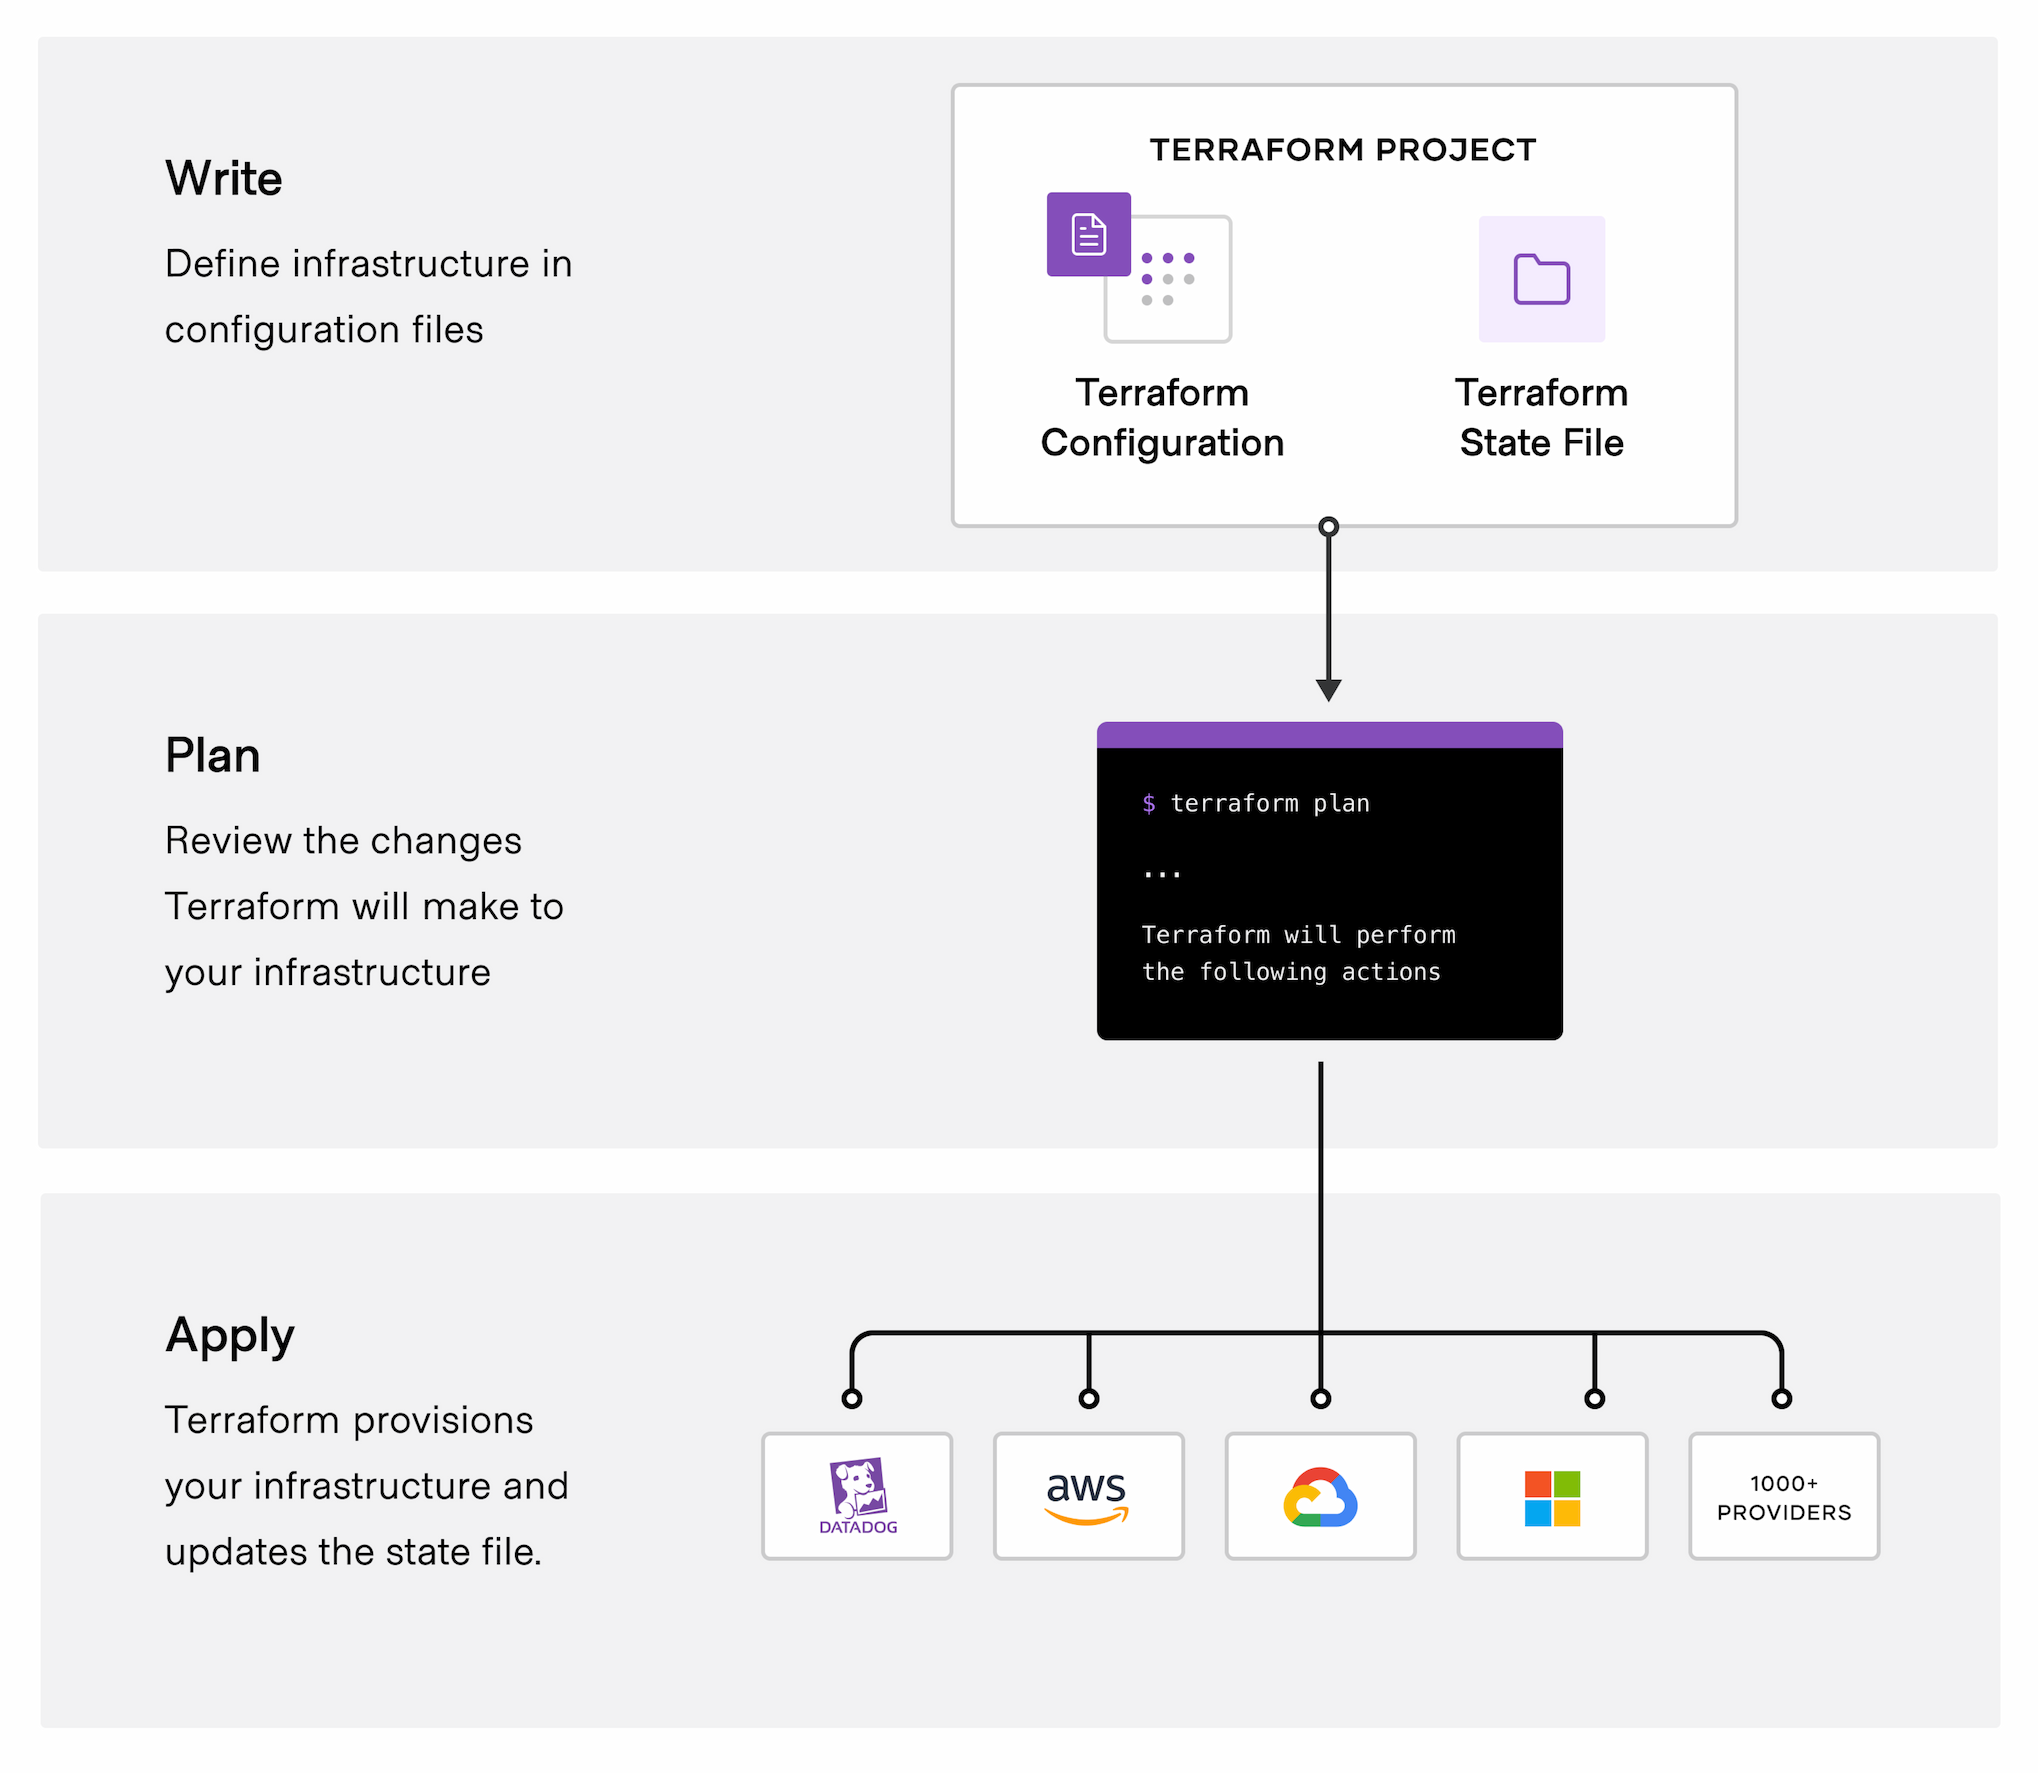
The core Terraform workflow consists of three stages:
Write: You define resources, which may be across multiple cloud providers and services. For example, you might create a configuration to deploy an application on virtual machines in a Virtual Private Cloud (VPC) network with security groups and a load balancer.
Plan: Terraform creates an execution plan describing the infrastructure it will create, update, or destroy based on the existing infrastructure and your configuration.
Apply: On approval, Terraform performs the proposed operations in the correct order, respecting any resource dependencies. For example, if you update the properties of a VPC and change the number of virtual machines in that VPC, Terraform will recreate the VPC before scaling the virtual machines.
Installation
terraform is infrastructure as a code tool. With terraform scripts we can automate the configuration of our infrastructure. in this tutorial, I will show you how to install Terraform on Windows 10 or 8, or 7. To install Terraform on Windows 10 or 8 or 7 follow the below steps.
download Terraform zip package from the official Terraform website
unzip the Terraform package
configure the environment variable for Terraform
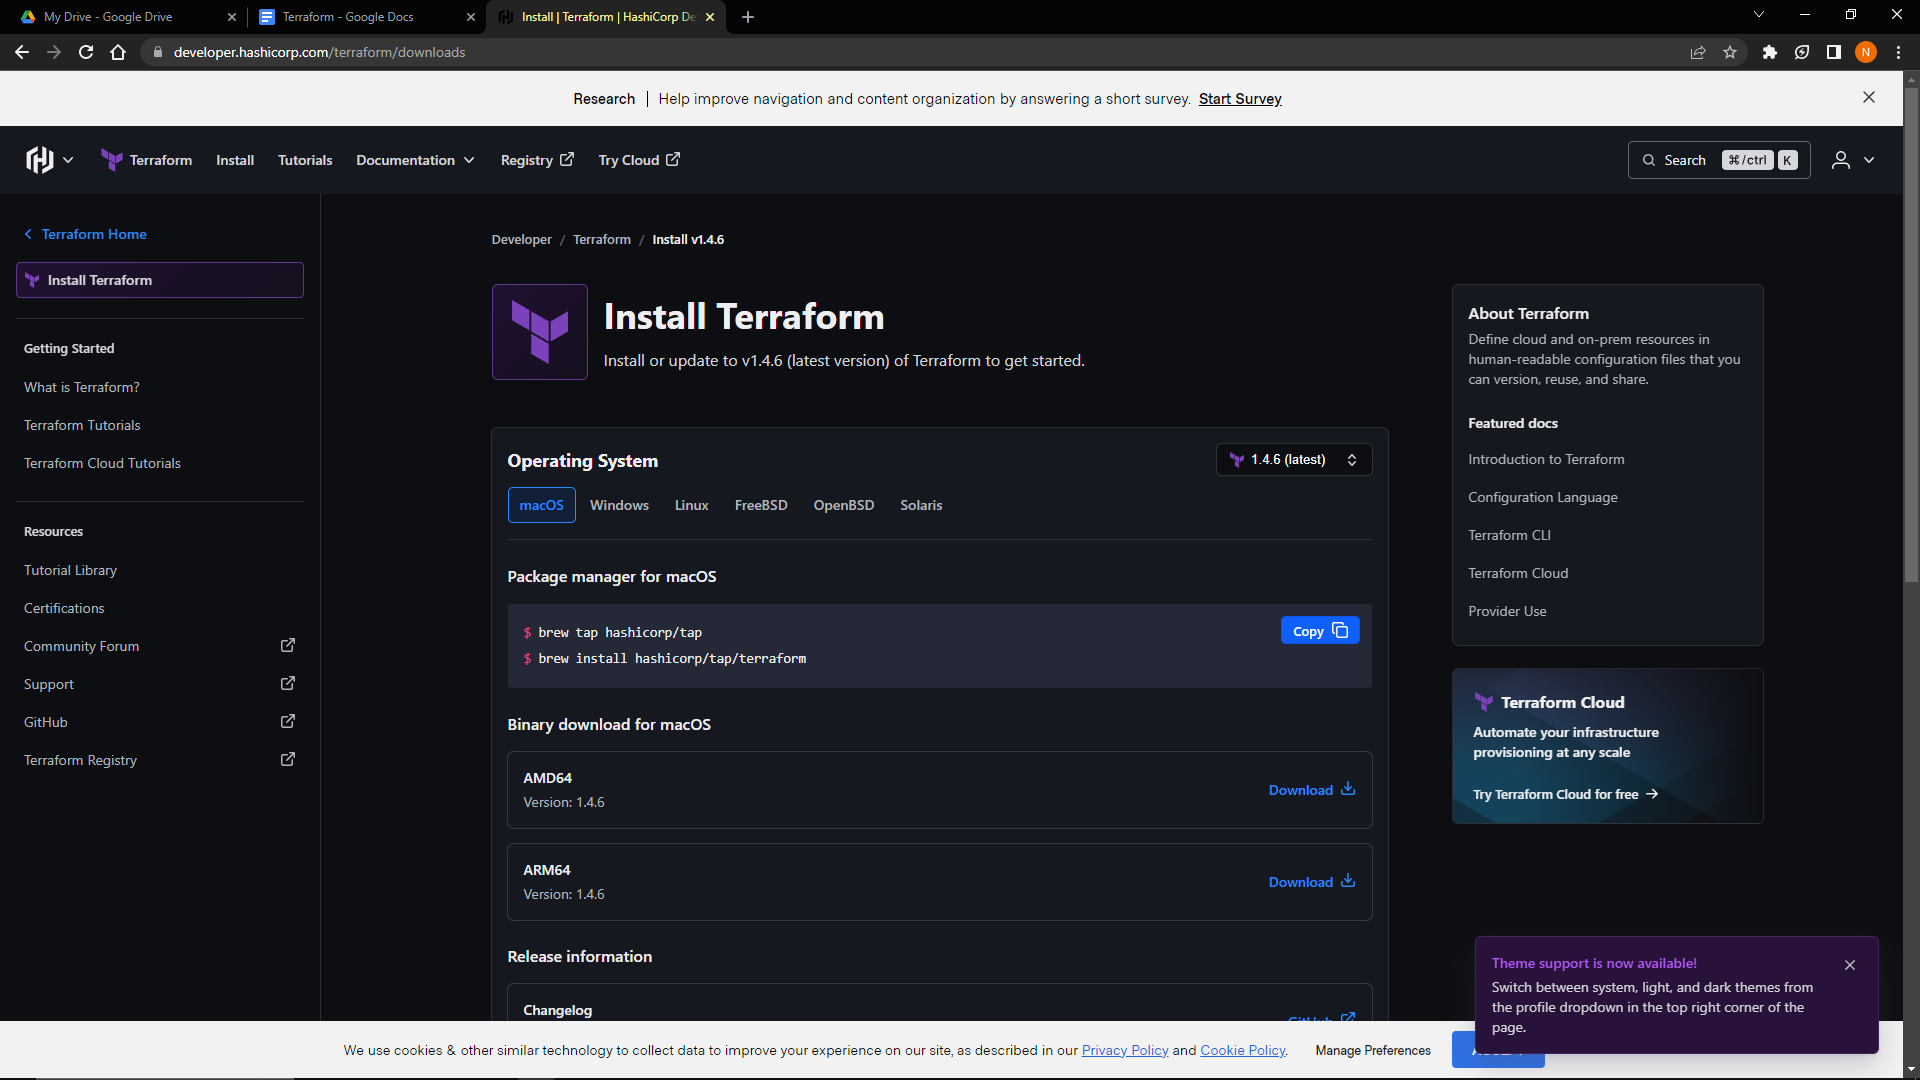
Download Terraform
download the Terraform from the official Terraform website https://www.terraform.io/downloads.html
you can see the Windows 32-bit and 64-bit source files. the download depends on your system here I am downloading 64-bit Terraform. it will be downloaded as a zip file.
Unzip the Terraform package
extract the downloaded zip file. Here I downloaded the terraform zip file in C:\Users\devops\Downloads\. I extracted the zip file, after extracting the zip file you can see the terraform.exe file in C:\Users\devops\Downloads\terraform_0.12.23_windows_amd64
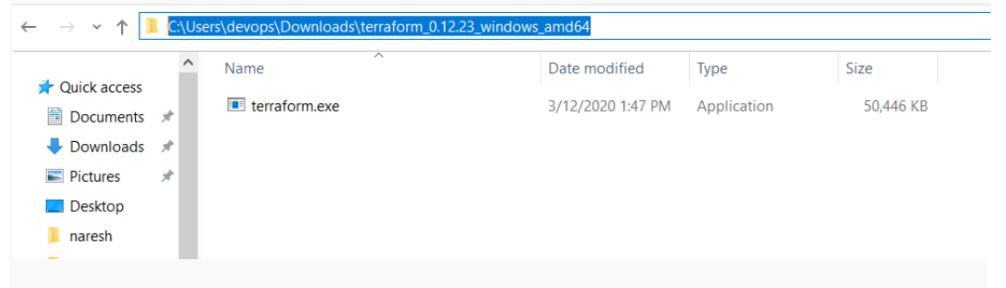
This is the workspace path of your terraform in your system or you can say the path of terraform.exe.
Configure environment variables for terraform
This PC(MyComputer)—>properties —>advanced system settings–>environment variables—>system variables—>path–edit–>new
in your Windows 10 or 8 or 7 right-click on This PC(MyComputer)—>properties —>advanced system settings. Here you can see environment variables click on it here you can see user variables and system variables. In system variables, you can see “path” Select path and click on edit and add the path of terraform i.e C:\Users\devops\Downloads\terraform_0.12.23_windows_amd64
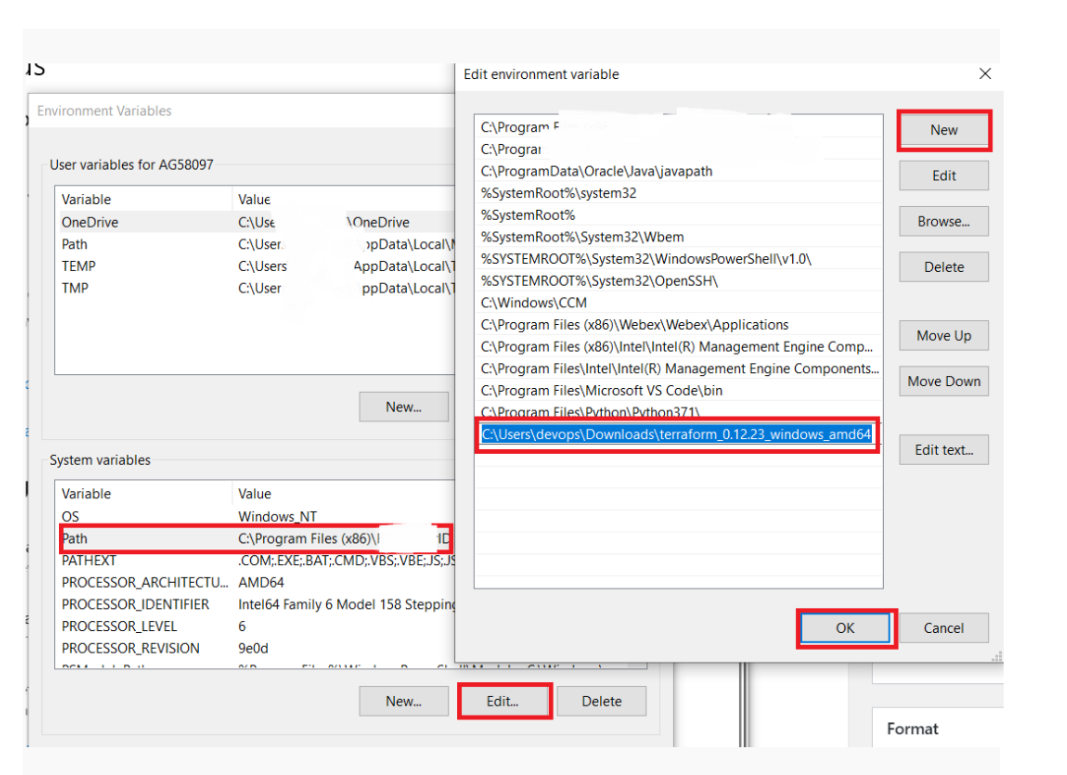
That’s it we have successfully configured Terraform on Windows 10 or 8 or 7.
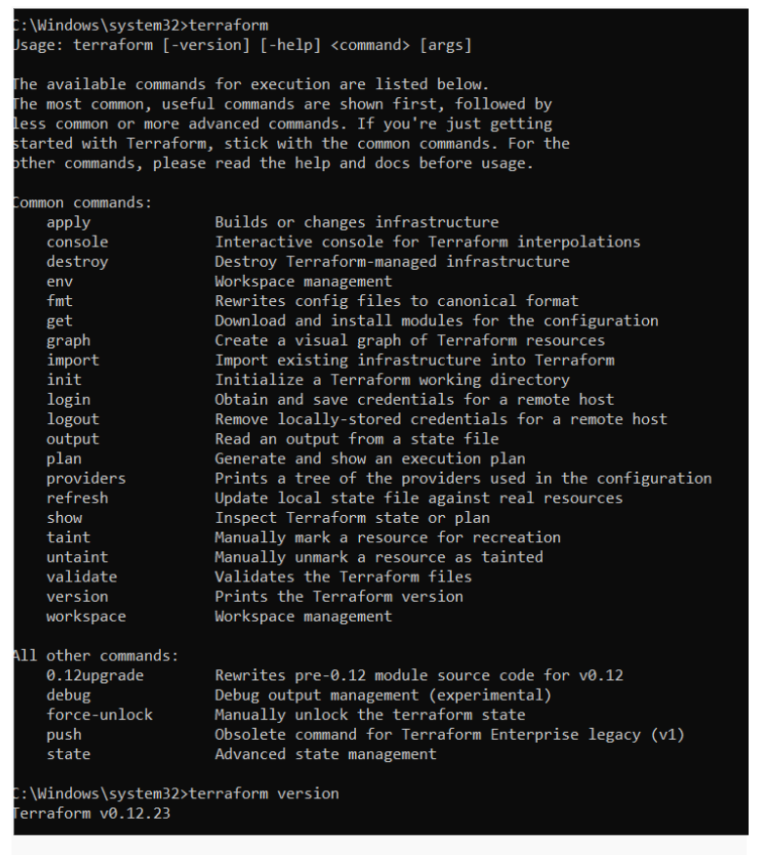
Verify terraform version
using terraform version command you can see the terraform version. open the command prompt in your system and enter terraform version command. it will give you the terraform version.
C:\Windows\system32>terraform version
Terraform v0.12.23
List Terraform Commands
To list the terraform commands open the command prompt and enter terraform and hit enter. it will list all terraform commands.
Create an AWS instance using Terraform
Code to run a single instance in the AWS
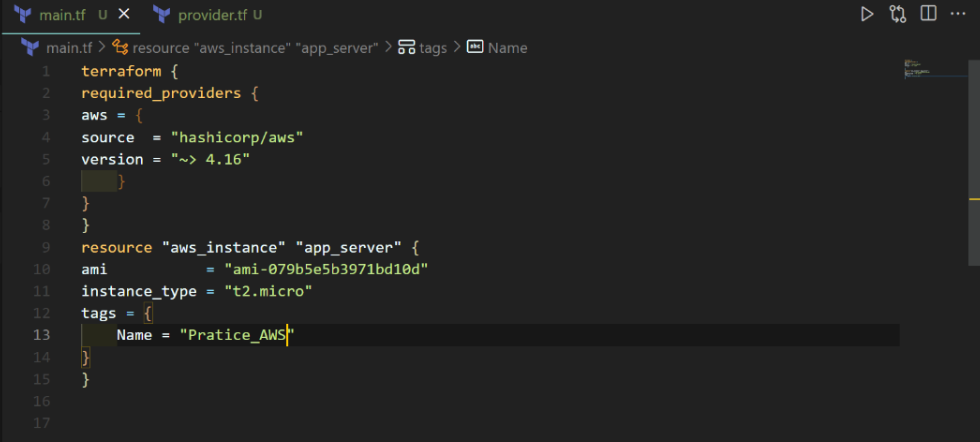
The AWS Provider supports assuming an IAM role, either in the provider configuration block parameter assume_role or in a named profile.
The AWS Provider supports assuming an IAM role using web identity federation and OpenID Connect (OIDC). This can be configured either using environment variables or in a named profile.
You can add other things also like tag, subnet, and VPC with the help of the Terraform documentation.
How to Run a Terraform code in the terminal
Just open the terminal and the run command on the terminal

The terraform init command is used to initialize a working directory containing Terraform configuration files. This is the first command that should be run after writing a new Terraform configuration or cloning an existing one from version control. It is safe to run this command multiple times.
Terraform plan

The Terraform plan command creates an execution plan, which lets you preview the changes that Terraform plans to make to your infrastructure. By default, when Terraform creates a plan it:
Reads the current state of any already-existing remote objects to make sure that the Terraform state is up-to-date.
Compares the current configuration to the prior state and notes any differences.
Proposes a set of change actions that should, if applied, make the remote objects match the configuration.
Terraform apply

The Terraform apply command executes the actions proposed in a Terraform plan.
The most straightforward way to use Terraform Apply is to run it without any arguments at all, in which case it will automatically create a new execution plan (as if you had run Terraform plan) and then prompt you to approve that plan, before taking the indicated actions.
Create Spotify developer app
In this case, we are going to use AWS account for doing this practical
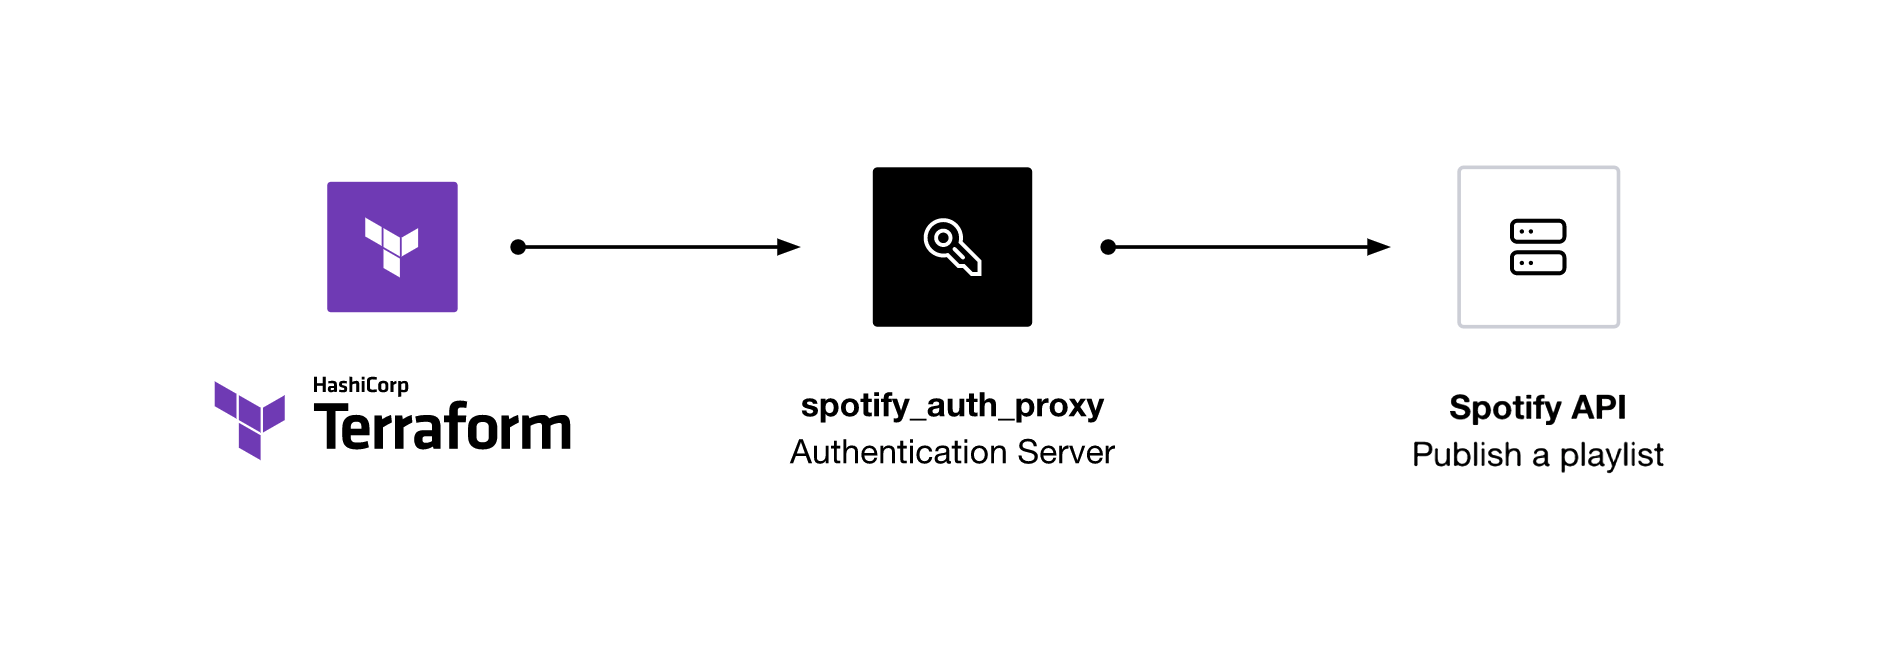
Before you can use Terraform with Spotify, you need to create a Spotify developer app and run Spotify's authorization proxy server.
Log in to the Spotify developer dashboard.
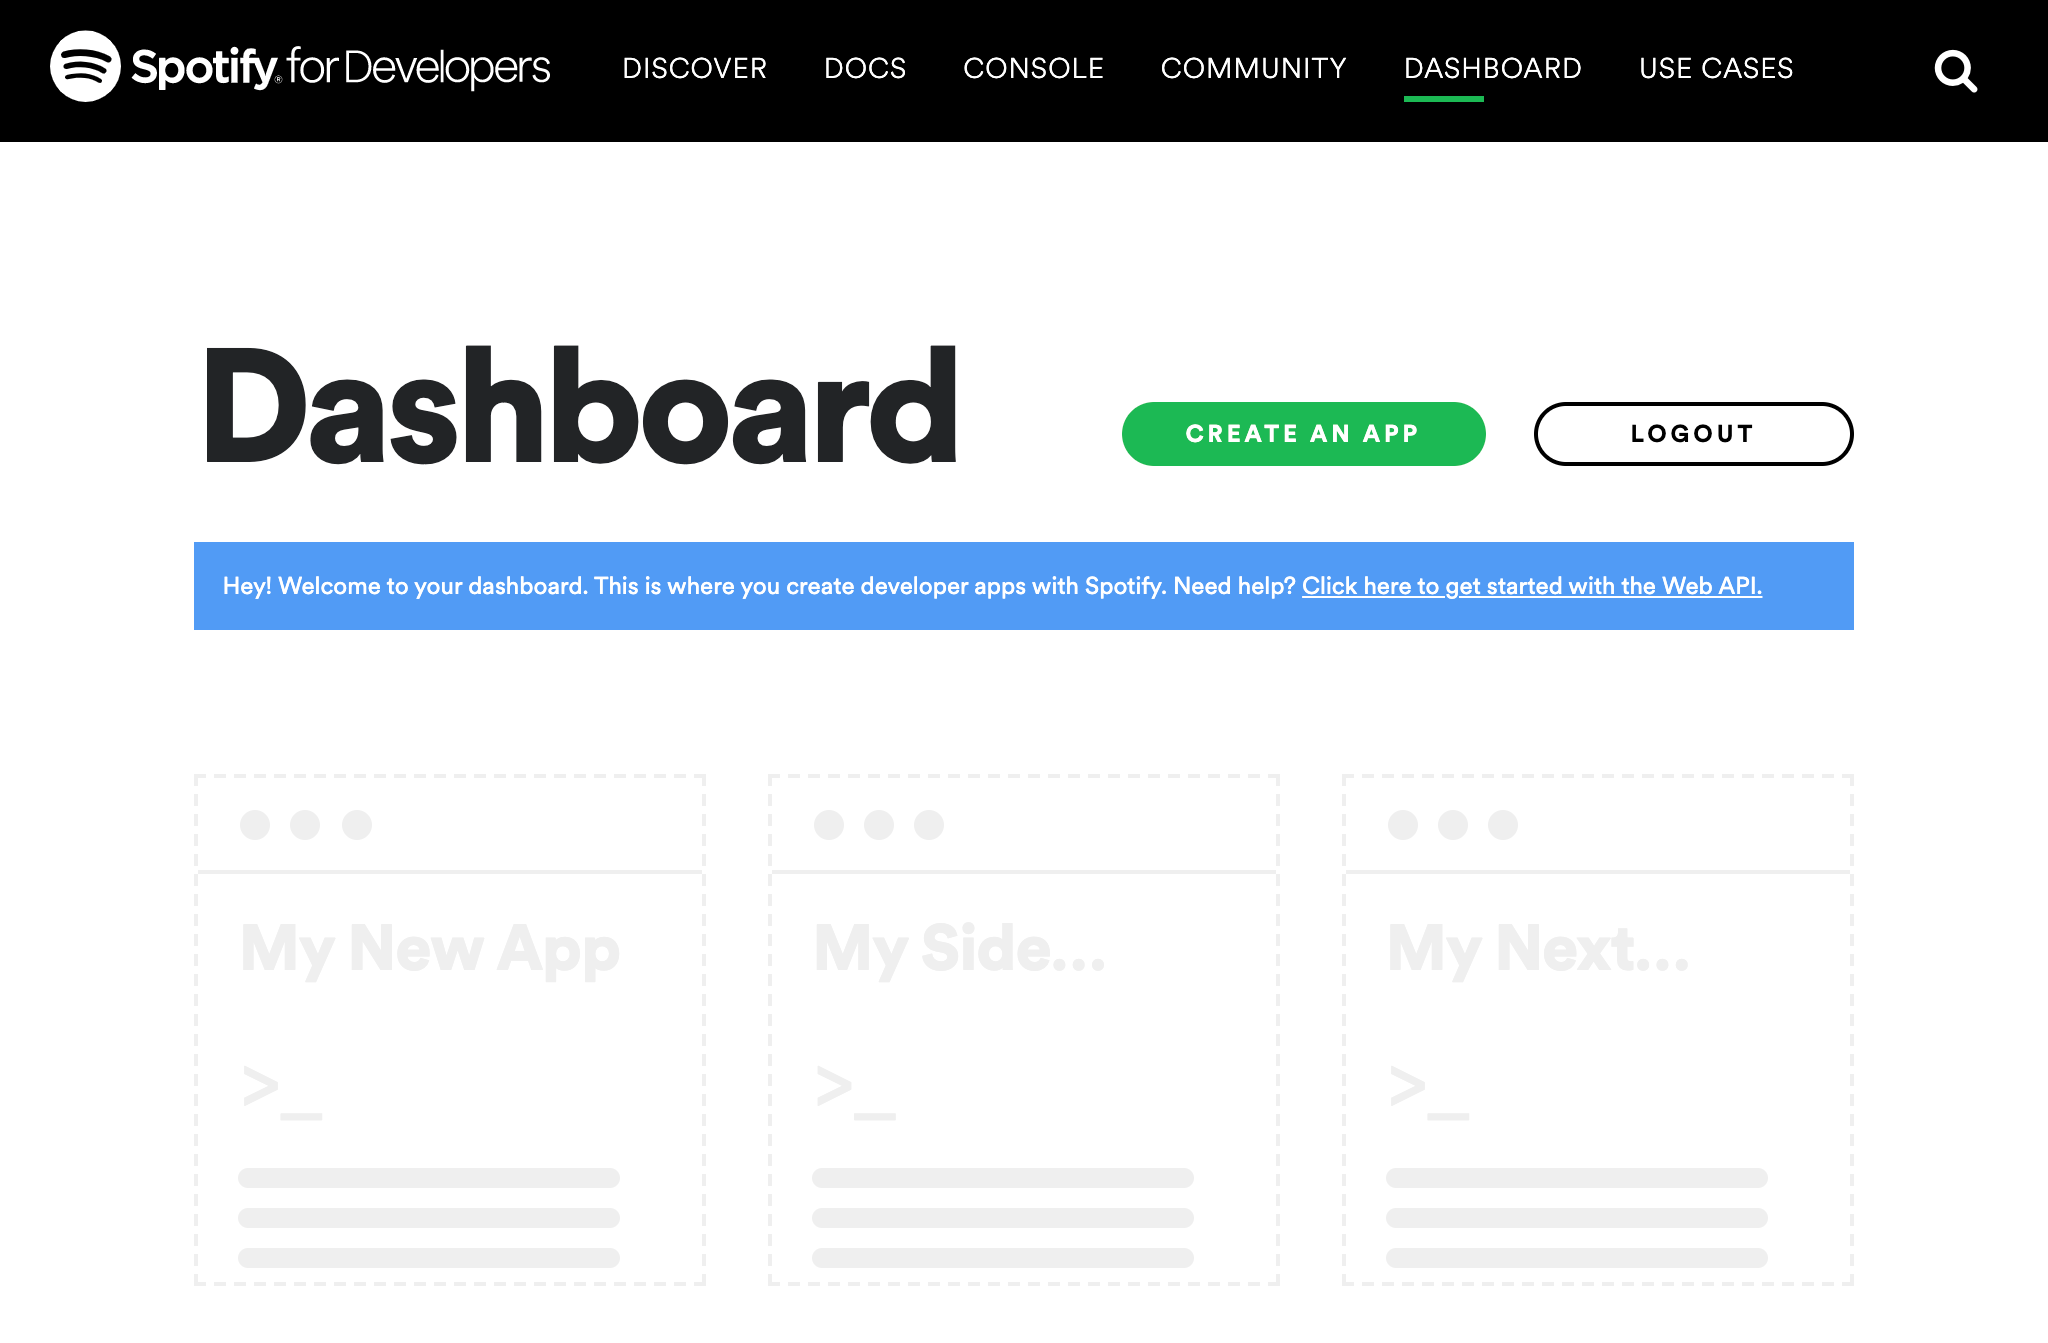
Click the green Create an App button.
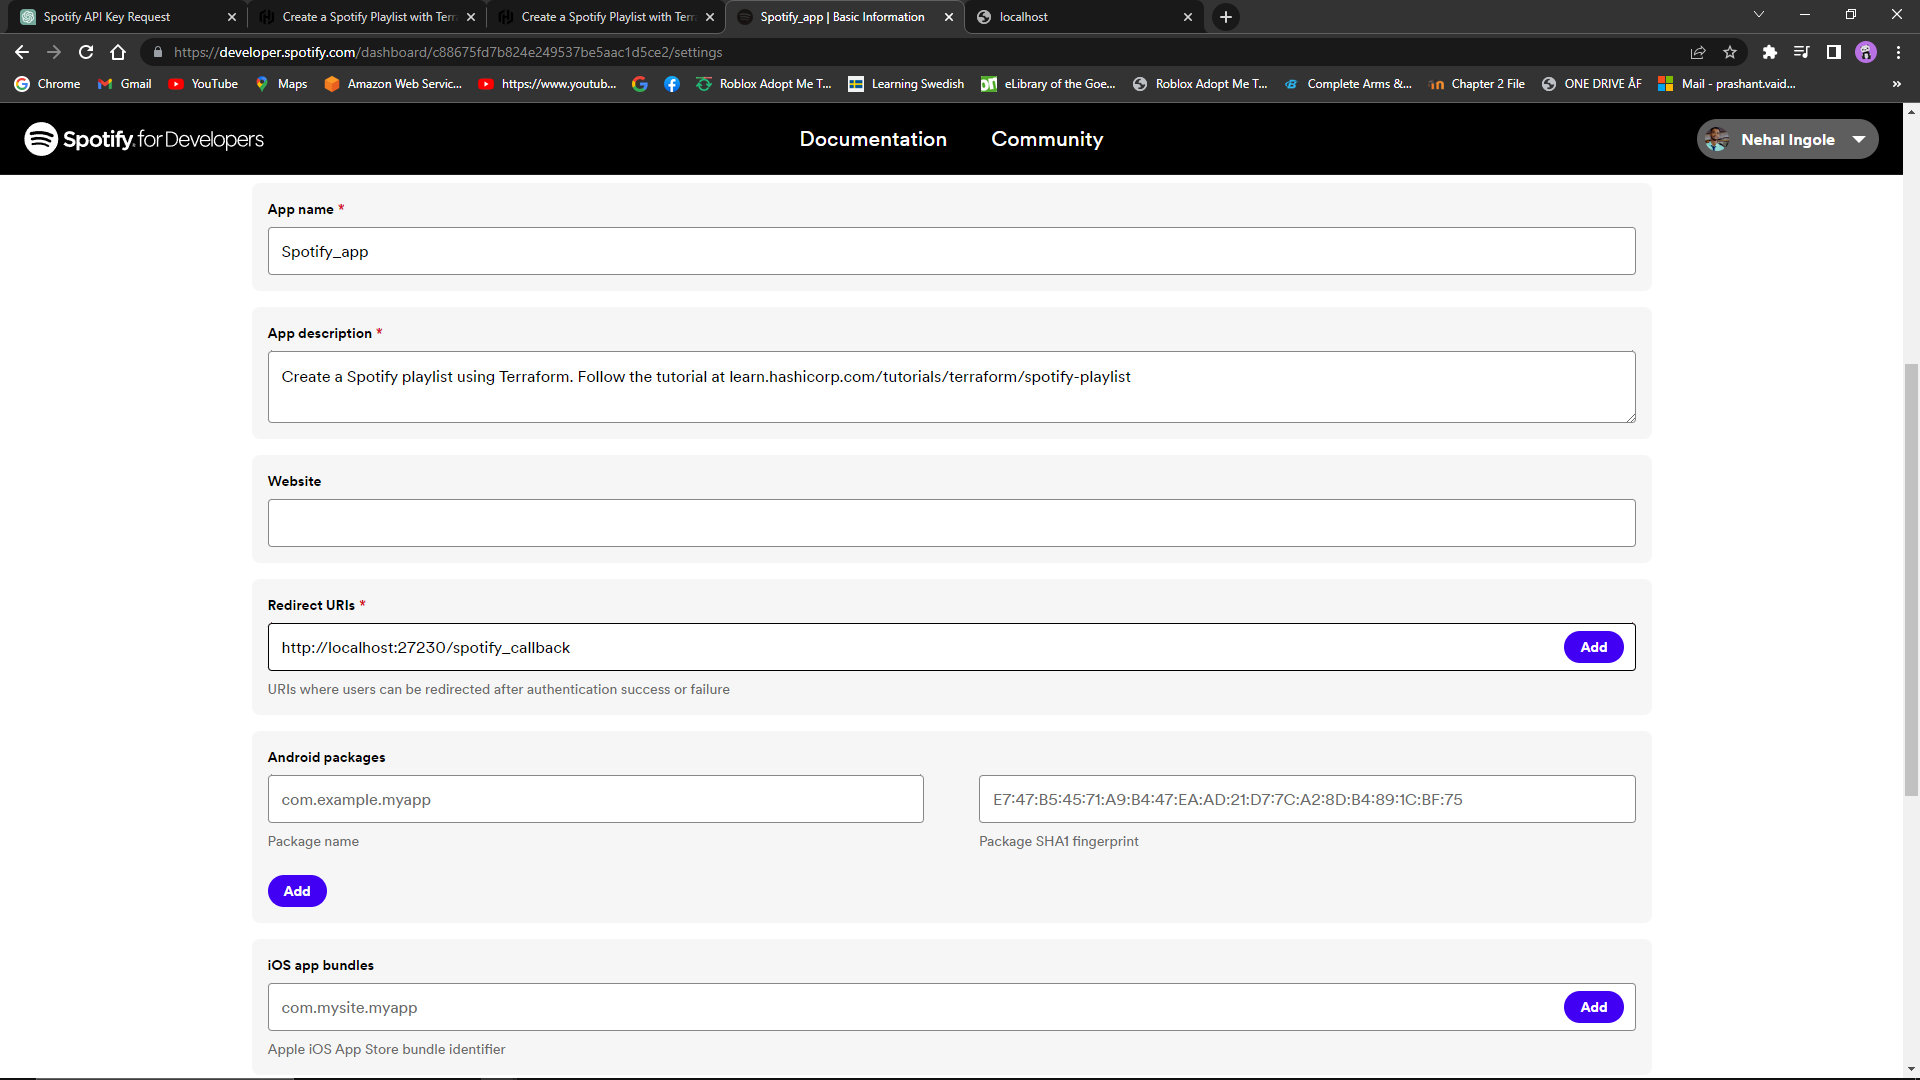
Fill out the name and description according to the table below, check the box to agree to the terms of services, then click Create.
| Name | Description |
| Terraform Playlist Demo | Create a Spotify playlist using Terraform. Follow the tutorial at learn.hashicorp.com/tutorials/terraform/spotify-playlist |

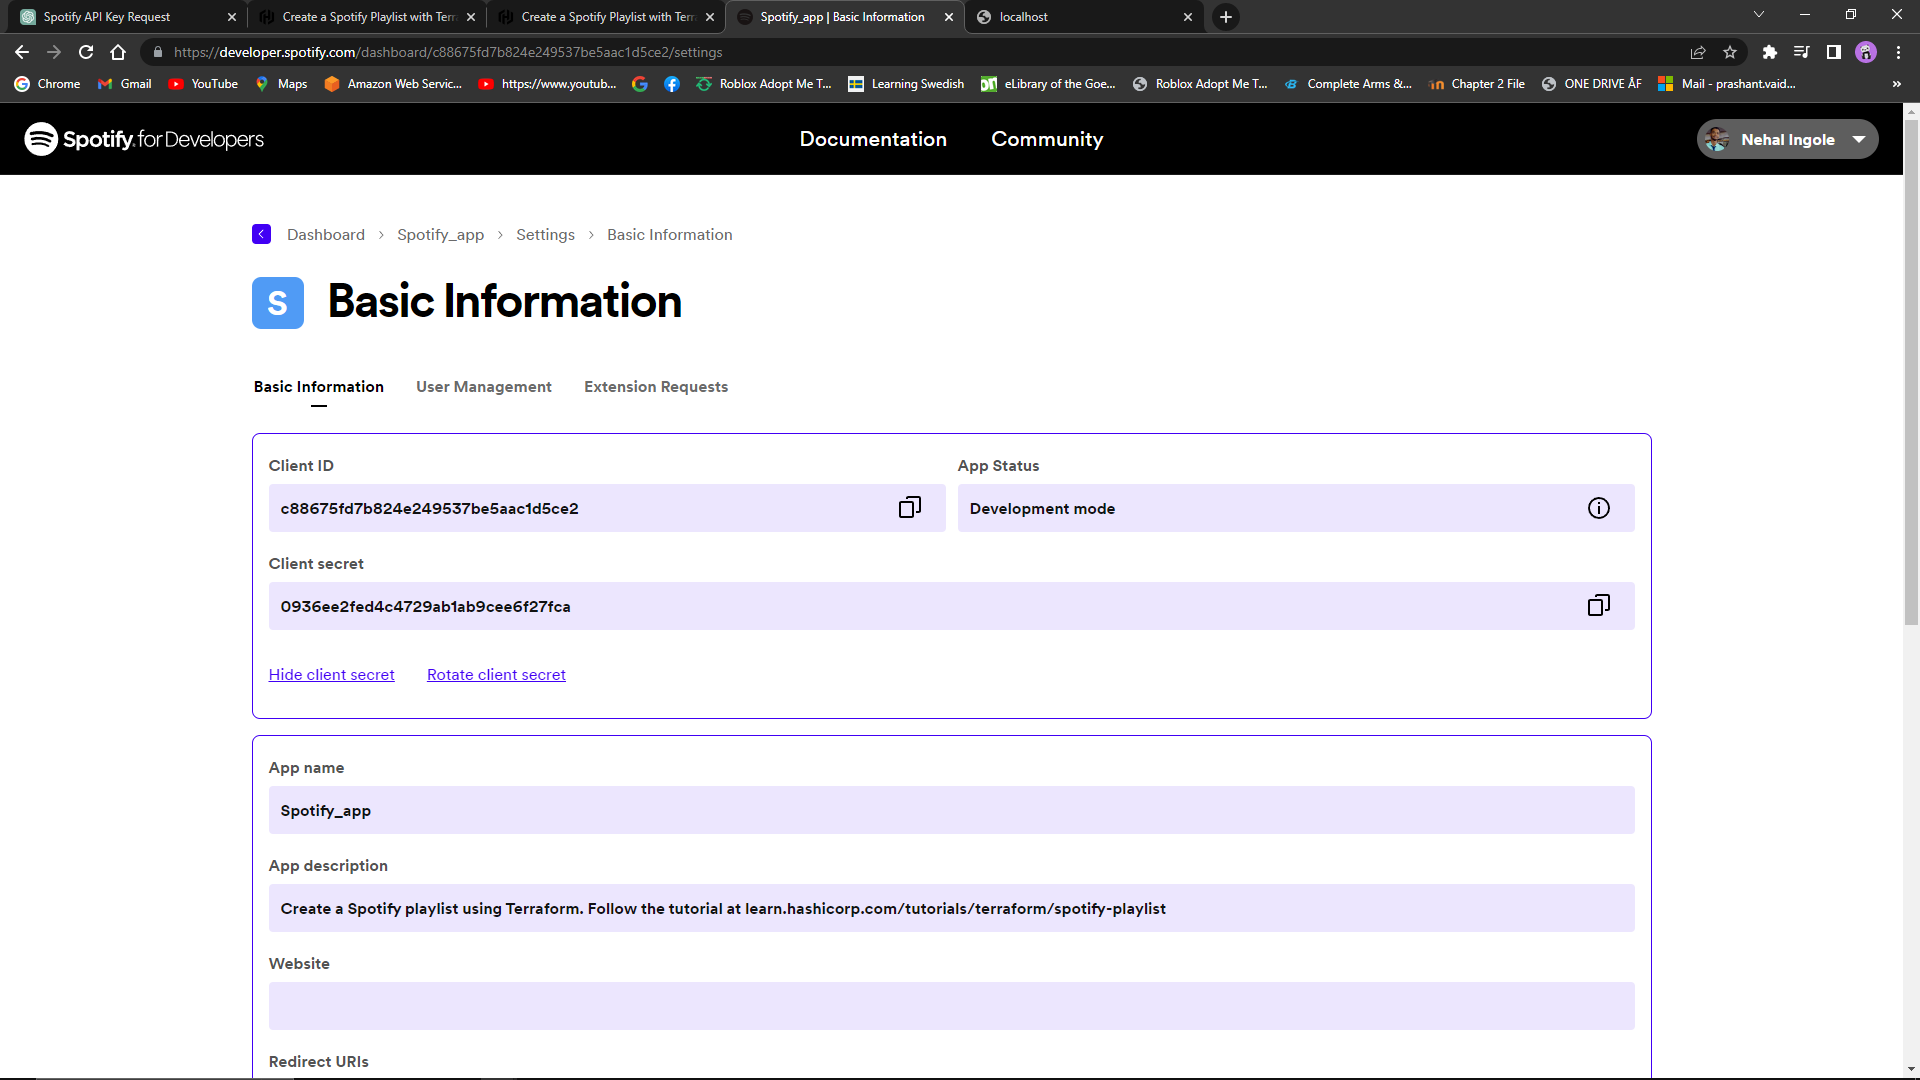
Once Spotify creates the application, find and click the green Edit Settings button on the top right side.
Copy the URI below into the Redirect URI field and click Add so that Spotify can find its authorization application locally on port 27230 at the correct path. Scroll to the bottom of the form and click Save.
http://localhost:27230/spotify_callback
Run authorization server
Now that you created the Spotify app, you are ready to configure and start the authorization proxy server, which allows Terraform to interact with Spotify.
Return to your terminal and set the redirect URI as an environment variable, instructing the authorization proxy server to serve your Spotify access tokens on port 27230.
$ export SPOTIFY_CLIENT_REDIRECT_URI=http://localhost:27230/spotify_callback
Next, create a file called .env with the following contents to store your Spotify application's client ID and secret.
SPOTIFY_CLIENT_ID=
SPOTIFY_CLIENT_SECRET=
Copy the Client ID from the Spotify app page underneath your app's title and description, and paste it into .env your SPOTIFY_CLIENT_ID.
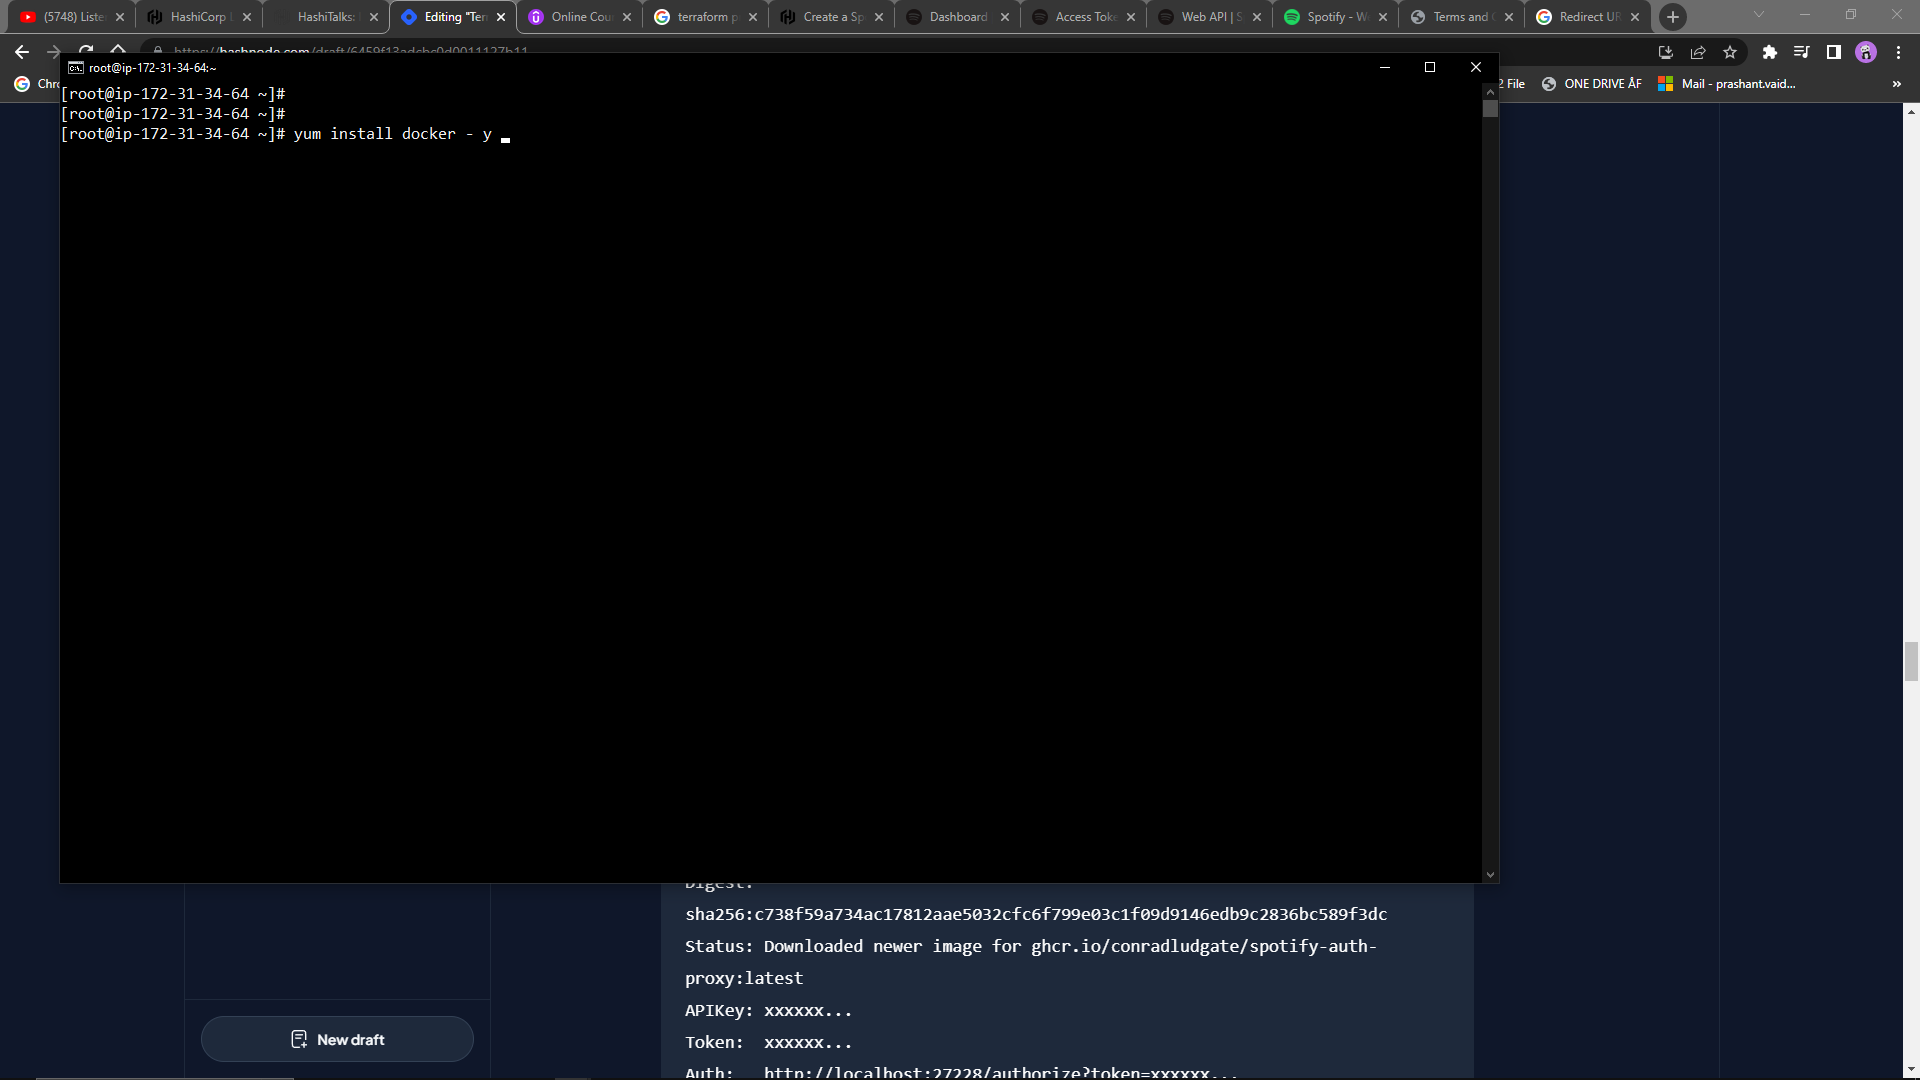
we need to install docker in OS and create a file that contains all the secret keys.
Click Show client secret and copy the value displayed into .env as your SPOTIFY_CLIENT_SECRET.
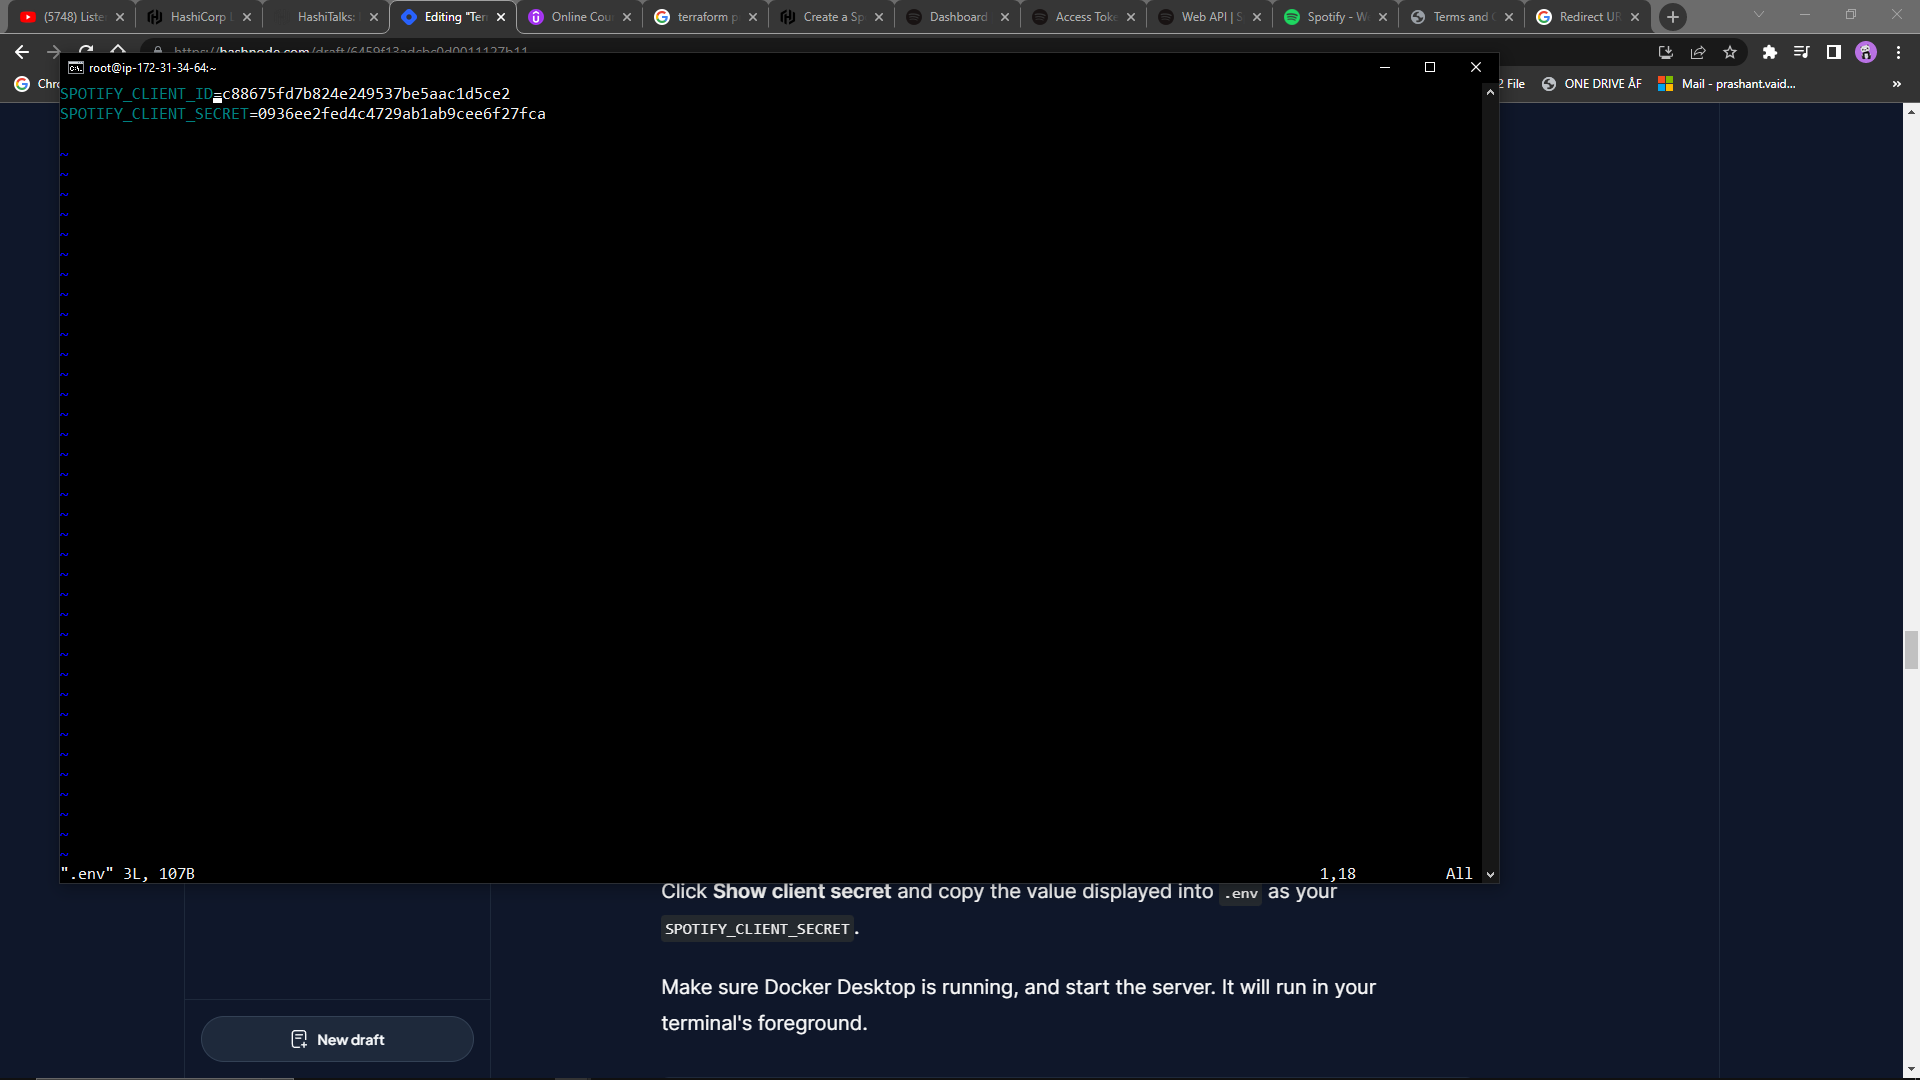
Note: After 60 min the Secret ID is disabled
Make sure Docker Desktop is running, and start the server. It will run in your terminal's foreground.
$ docker run --rm -it -p 27230:27230 --env-file ./.env ghcr.io/conradludgate/spotify-auth-proxy

Visit the authorization server's URL by visiting the link that your terminal output lists after Auth:.
The server will redirect you to Spotify to authenticate. After authenticating, the server will display Authorization successful, indicating that the Terraform provider can use the server to retrieve access tokens.
Leave the server running.
Clone repository
Install git in OS
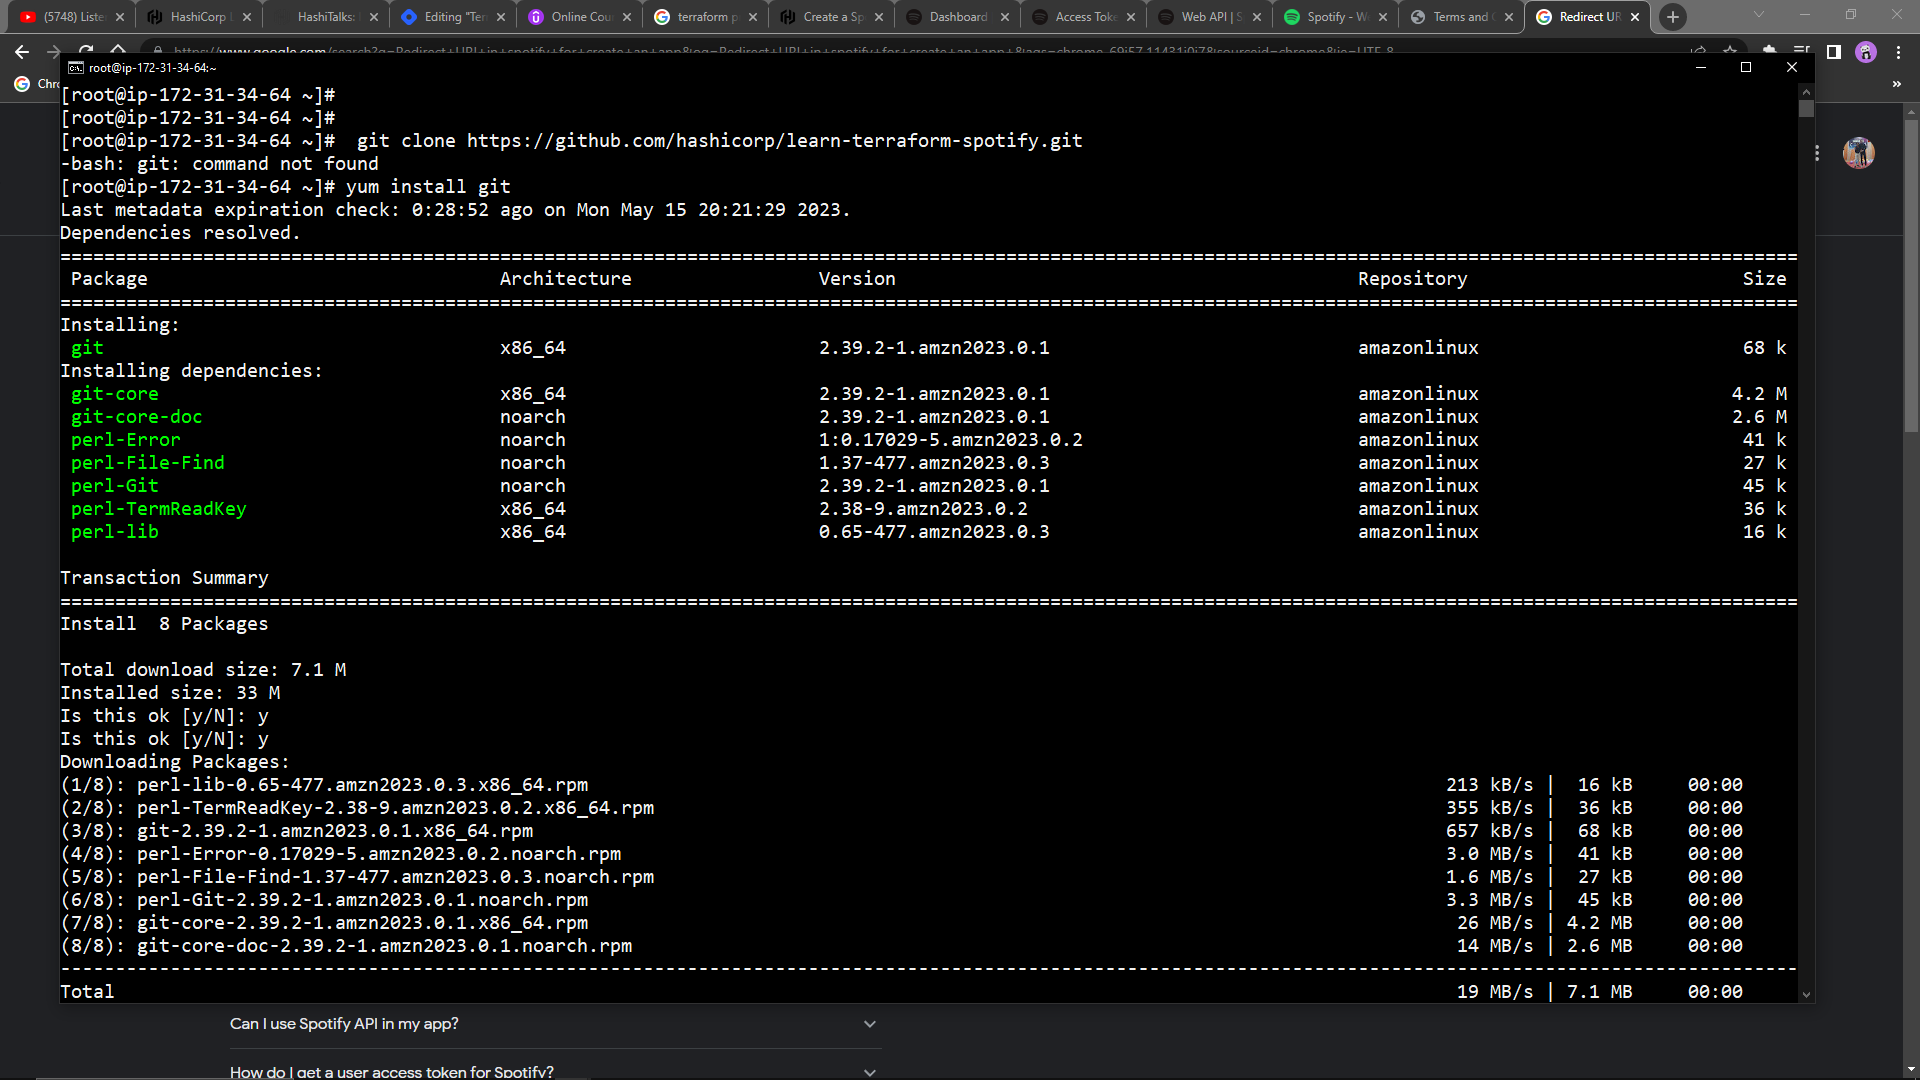
$ yum install git
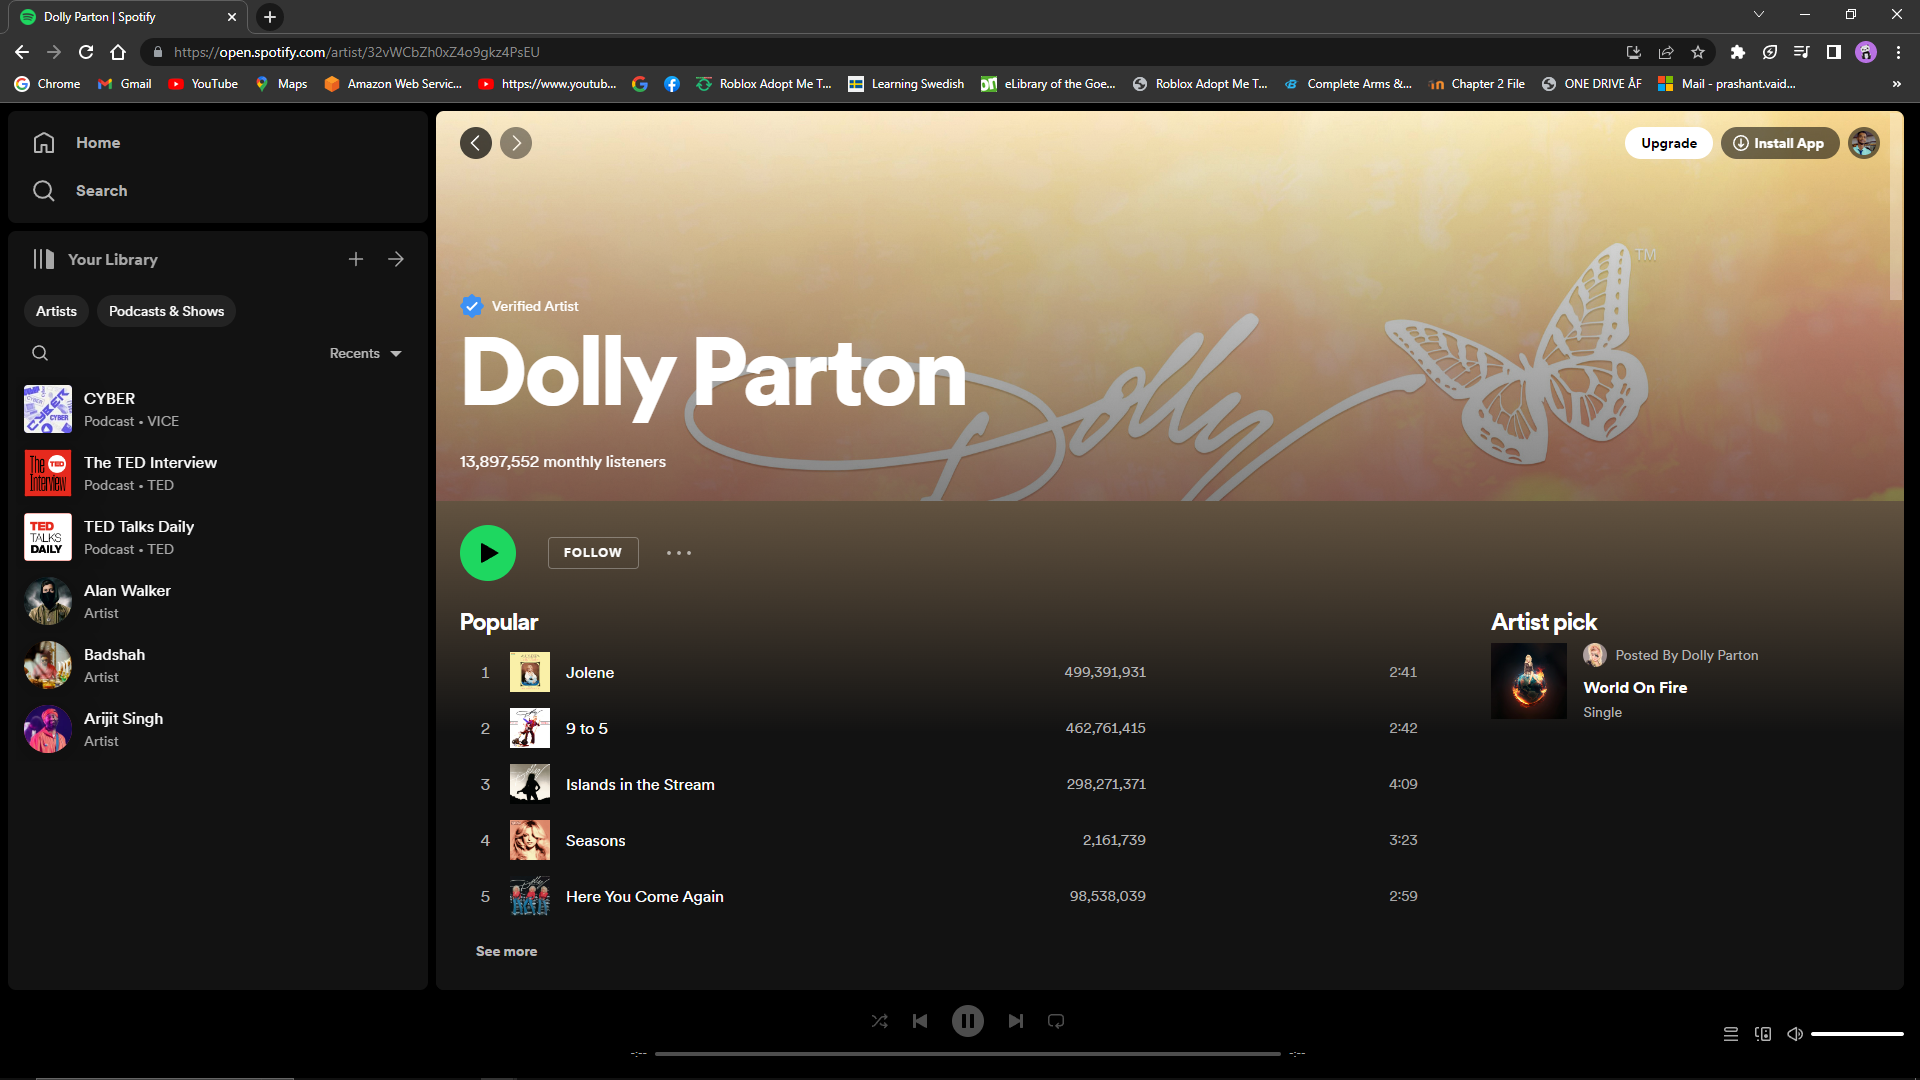
It contains a complete Terraform configuration that searches for songs by Dolly Parton and creates a playlist out of them.
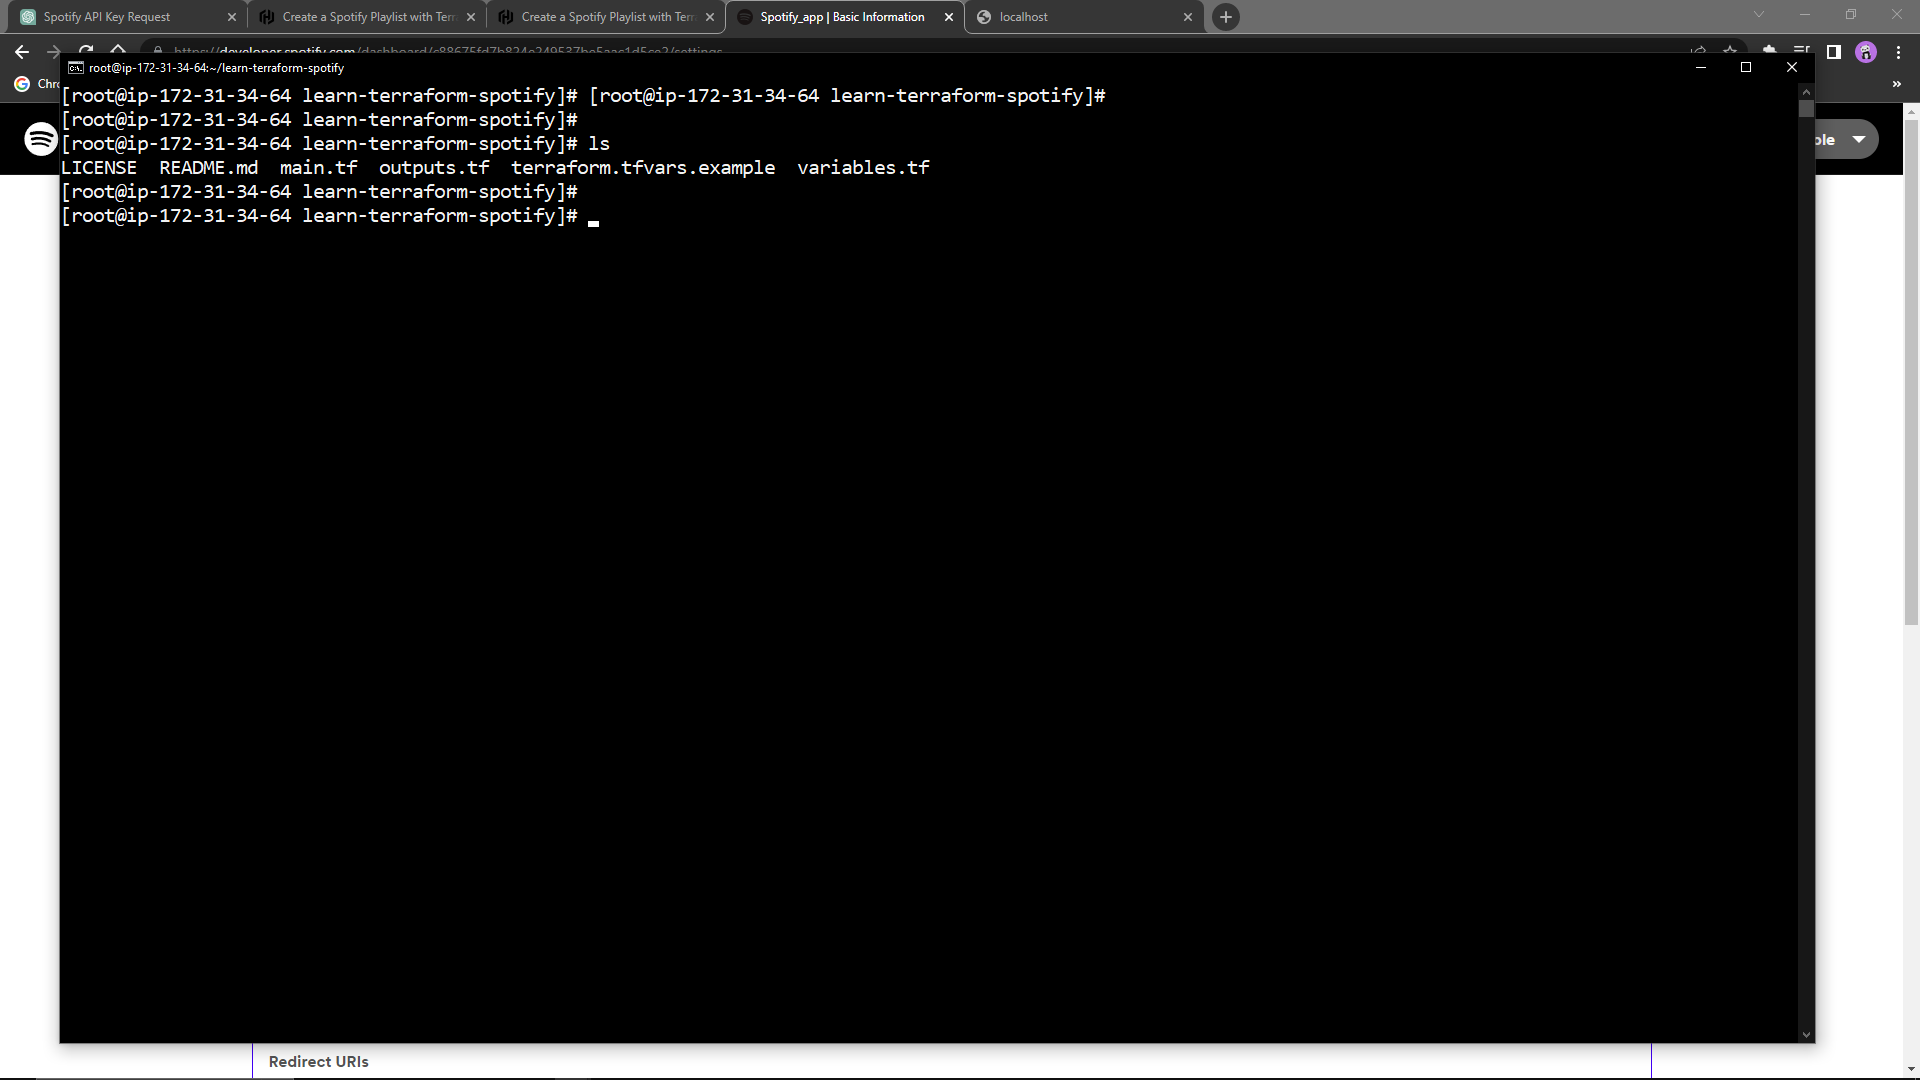
$ git clone https://github.com/hashicorp/learn-terraform-spotify.git

Change into the directory.
$ cd learn-terraform-spotify
Explore the configuration
Open main.tf. This file contains the Terraform configuration that searches Spotify and creates the playlist. The first two configuration blocks in the file:
configure Terraform itself and specify the community provider that Terraform uses to communicate with Spotify.
configure the Spotify provider with the key you set as a variable.
terraform {
  required_providers {
    spotify = {
      version = "~> 0.1.5"
      source  = "conradludgate/spotify"
    }
  }
}

provider "spotify" {
  api_key = var.spotify_api_key
}
The next block defines a Terraform data source to search the Spotify provider for Dolly Parton songs.
data "spotify_search_track" "by_artist" {
  artists = ["Dolly Parton"]
  #  album = "Jolene"
  #  name  = "Early Morning Breeze"
}
The next block uses a Terraform resource to create a playlist from the first three songs that match the search in the data source block.
resource "spotify_playlist" "playlist" {
  name        = "Terraform Summer Playlist"
  description = "This playlist was created by Terraform"
  public      = true

  tracks = [
    data.spotify_search_track.by_artist.tracks[0].id,
    data.spotify_search_track.by_artist.tracks[1].id,
    data.spotify_search_track.by_artist.tracks[2].id,
  ]
}
Open outputs.tf, which defines an output value for the URL of the playlist.
output "playlist_url" {
  value       = "https://open.spotify.com/playlist/${spotify_playlist.playlist.id}"
  description = "Visit this URL in your browser to listen to the playlist"
}
Set the API key
Rename the terraform.tfvars.example file terraform.tfvars so that Terraform can detect the file.
$ mv terraform.tfvars.example terraform.tfvars
The .gitignore file in this repository excludes files with the .tfvars extension from version control to prevent you from accidentally committing your credentials.
Warning
Never commit sensitive values to version control.
Find the terminal window where the Spotify authorization proxy server is running and copy the APIKey from its output.
Open, and replace ... with the key from the proxy, so that Terraform can authenticate with Spotify. Save the file.
spotify_api_key = "..."
This variable is declared for you in variables.tf.
variable "spotify_api_key" {
  type        = string
  description = "Set this as the APIKey that the authorization proxy server outputs"
}
Install the Spotify provider
In your terminal, initialize Terraform, which will install the Spotify provider.
$ terraform init

Create the playlist
Now you are ready to create your playlist. Apply your Terraform configuration. Terraform will show you the changes it plans to make and prompt your approval.
$ terraform apply
Confirm the apply with a yes , and Terraform will create your playlist.
Enter a value: yes
Listen to your playlist
Open the playlist URL returned in the Terraform output and enjoy your playlist!
References
You can simply learn the terraform concept from https://learn.hashicorp.com/
Adding the Playlist of Spotify https://developer.hashicorp.com/terraform/tutorials/community-providers/spotify-playlist
All the references are useful to learn and understand the concept of terraform
That's all for this blog and stay tuned for more Terraform Tutorial and more such tech. Make sure to subscribe to our newsletter.
Thank you for Reading:)
#Happy Reading!!
Any query and suggestion are always welcome - Nehal Ingole


