

Demystifying Kubeflow: Your Easy Guide to Understanding and Creating Pipelines with KFP.

Hey I'm Samiksha Kolhe. a Data Enthusiast and aspiring Data Scientist. One day Fascinated by a fact that "We can built Time machines and predict future using AI". That hit my dream to explore the Vector space and find out what the dark matter is about. World and Technology every day brings new challenges, and new learnings. Technology fascinated me, I'm constantly seeking out new challenges and opportunities to learn and grow. A born-ready girl with deep expertise in ML, Data Science, and Deep Learning, generative AI. Curious & Self-learner with a go-getter attitude that pushes me to build things. My passion lies in solving business problems with the help of Data. Love to solve customer-centric problems. Retail, fintech, e-commerce businesses to solve the customer problems using Data/AI. Currently learning MLops to build robust Data/ML systems for production-ready applications. exploring GenAI. As a strong collaborator and communicator, I believe in the power of teamwork and diversity of thoughts to solve a problem. I'm always willing to lend a helping hand to my colleagues and juniors. Through my Hashnode blog, I share my insights, experiences, and ideas with the world. I love to writing about latest trends in AI and help students/freshers to start in their AI journey. Outside technology I'm a spiritual & Yoga person. Help arrange Yoga and mediation campaigns, Volunteering to contribute for better society. Love Travelling, Reading and Learn from world.
Hello Techies👋! Hope you all are doing amazing stuff. As per the discussion in the Full-stack project article, Today will delve into the world of Kfp pipeline. This article will give you an in-depth understanding of what kfp is, kfp components, and how to develop your first kubeflow pipeline with a ML model training pipeline on wine-quality dataset.
This article is for everyone who wants to learn pipeline building using kfp and the internal workings of kfp pipelines.
Note: Follow this article end-to-end, sharing some useful resources regarding kfp pipeline building for ML projects.
wait wait!!.. At the end, I'm also going to explain how to schedule the Pipeline using Recurring Runs.🤩
Excited!! Let's see Our Agenda first.
What are Kfp Pipelines?
Argo Workflows: Devops mindset behind kfp orchestration.
Internal architecture of kubeflow component.
Sample pipeline building example using kubeflow sdk.
Schedule the pipeline using Recurring Runs.
Let's get Started!!🥳
1. What is Kfp?
Kubeflow Pipelines (KFP) is a platform for building and deploying portable and scalable machine learning (ML) workflows using Docker containers.
KFP enables data scientists and machine learning engineers to:
Author end-to-end ML workflows natively in Python
Create fully custom ML components or leverage an ecosystem of existing components
Easily manage, track, and visualize pipeline definitions, runs, experiments, and ML artifacts
Efficiently use compute resources through parallel task execution and through caching to eliminating redundant executions
Maintain cross-platform pipeline portability through a platform-neutral IR YAML pipeline. The IR YAML is an intermediate representation of a compiled pipeline ie. backend of kfp pipelines creates a Yaml to run over Argo workflow.
Will discuss WTF Argo workflows in the next section.
If we go back into the history of kubeflow, It was built up with the idea of using the capabilities of kubernetes for ML workflow/project lifecycle management. To built machine learning workflow and manage and scale each component of ML lifecycle. Each component or part of ML workflow is scalable, composed and always follow a connect with each other, For model training/Modelling instead of waiting for all algo to run one-by-one or in diff notebooks, to register the best model.. we can parallelly run all algorithms, that's insanely reduce the time.. Gosh!! Only Data People can relate😉.
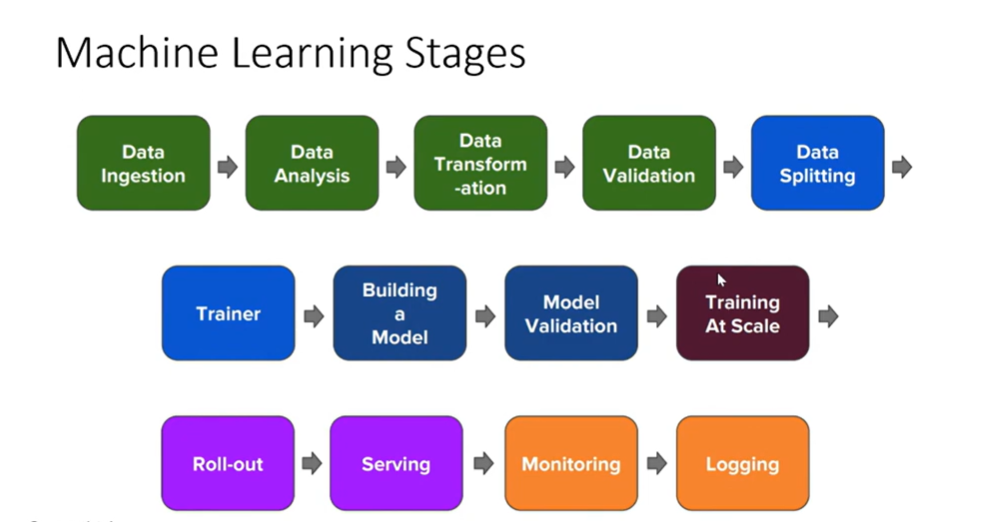
A typical ML workflow would like this!!
Below is the kubeflow architecture. pipelines is one of the feature that kubeflow provides

If you want to know more about Kubeflow and its features check out my previous article Link, where I explained in-depth intuition about kubeflow.
2. Argo Workflows: The DevOps Mindset behind kfp Orchestration.
So, back then there was one project built already to manage and create CI/CD pipelines on kubernetes i.e Argo. Argo is meant for kubernetes, that's the people who expertise in kubernetes can only build and define and run workflow .yaml for kubernetes pipelines.
Let's see first what is Argo!!
ArgoWorkflows is an open-source container-native workflow engine for orchestrating parallel jobs on Kubernetes. Argo Workflows is implemented as a Kubernetes CRD (Custom Resource Definition).
Define workflows where each step in the workflow is a container.
Model multi-step workflows as a sequence of tasks or capture the dependencies between tasks using a directed acyclic graph (DAG).
Argo Workflows is the most popular workflow execution engine for Kubernetes.
Lightweight, scalable, and easier to use.
Designed from the ground up for containers without the overhead and limitations of legacy VM and server-based environments.
Cloud agnostic and can run on any Kubernetes cluster.

Some of the projects that rely on argo are argo events, Couler, Hera, Katib, Kubeflow Pipelines, Netflix Metaflow, Orchest(Visual Pipeline Built), Ploomer, Seldon etc.
Typical Argo YAML creation for workflow with the Hello World Program:
apiVersion: argoproj.io/v1alpha1
kind: Workflow
metadata:
  generateName: hello-world-
spec:
  entrypoint: whalesay
  templates:
  - name: whalesay
    container:
      image: docker/whalesay
      command: [cowsay]
      args: ["hello world"]
      resources:
        limits:
          memory: 32Mi
          cpu: 100m
Let's see in short the fields in this template:
kind: Workflow
—specifies that this template uses the Workflow spec defined by Argo
generateName
—defines the workflow spec name, which will also be the prefix of all pods created by the template.
entrypoint: whalesay
—specifies that the whalesay template should be the entry point of the Argo workflow. This means that when the workflow spec is executed by Kubernetes, this template will be invoked. In a real workflow, there are multiple templates, and the entry point starts the multi-step process.
resources
—limits the resources that the container created by this template will be allowed to use.
So, at the end kubeflow builds a wrapper over argo workflows to run ML pipelines i.e. CI/CD for Machine learning over kubernetes. anyone with no expertise in kubernetes and less knowledge about pods, container and cluster management etc. can able to build ML pipelines without caring about Kubernetes orchestration and resource management.
Note: Argo workflows advantage is it launches instead of launching a single pod and running all container of pipelines inside it.. Launch one-pod one-container i.e. if 7 steps in ml-pipelines 7 independent kubernetes pods will be launched.
Now we got to know how Kubeflow creates the workflow in the backend using argo workflow YAML. Now let's see How each component Runs i.e. How a typical workflow Run gets containerized and runs on kubernetes pods independently.
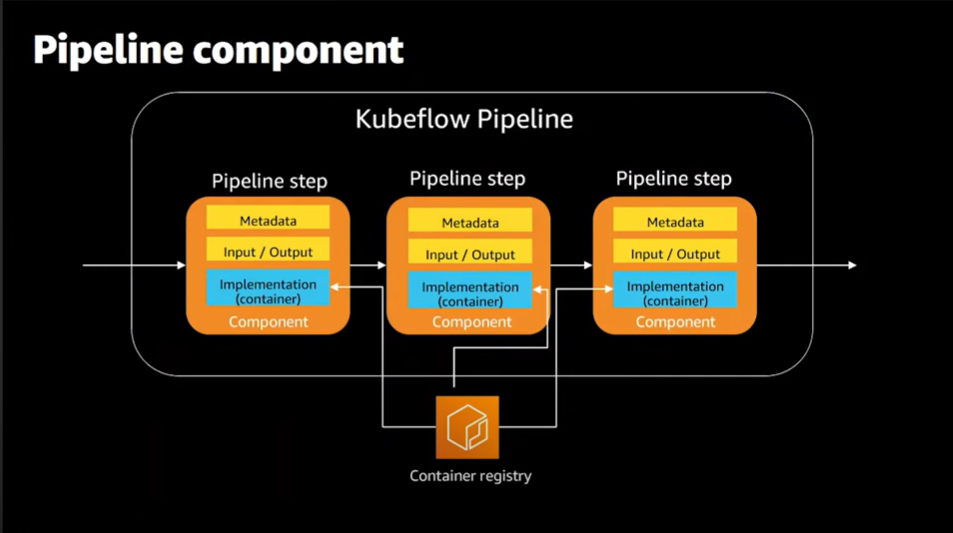
3. Internal Architecture of Kubeflow Components.
Kubeflow components are the essential ingredients to create a recipe of pipelines. A component in argo specifies one kubernetes pod that contains container where our code resides. As per below image, Kubeflow pipelines is created by defining each pipeline step sequentially or in parallel. Each pipeline step is a component which contains metadata information of component, Input and output definition and Docker Container where our code resides.
Every container is a program/Application that one wants to run, As we know Argo launches isolated single pod for every container/Component in the pipeline. Hence everytime when a pipeline runs it should automatically create and run the intended application.
Therefore, the Container registry is a storage/hub where we put our application images/templates. Whenever a pod get launched, the component will get initialised and which requires input/output information mentioned and a container-image for our code.
The image in context of machine learning can contain the dependencies require for executing the code like python libraries/folders/system commands etc. to prepare the pod or setup the environment before our program/code runs.
Now we know the pipeline internal architecture from larger perspective. Let's see how kfp sdk can be used to create a component, define workflow with sample pipeline below!!
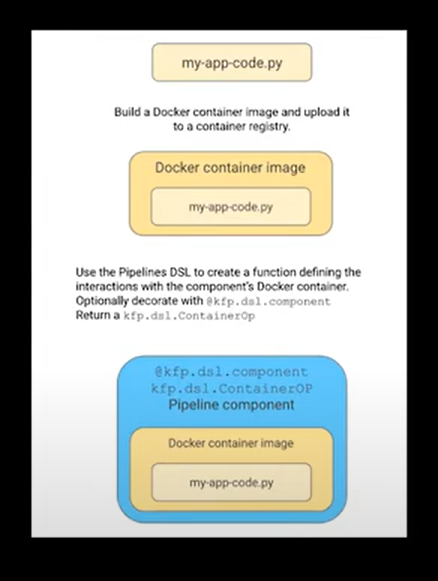
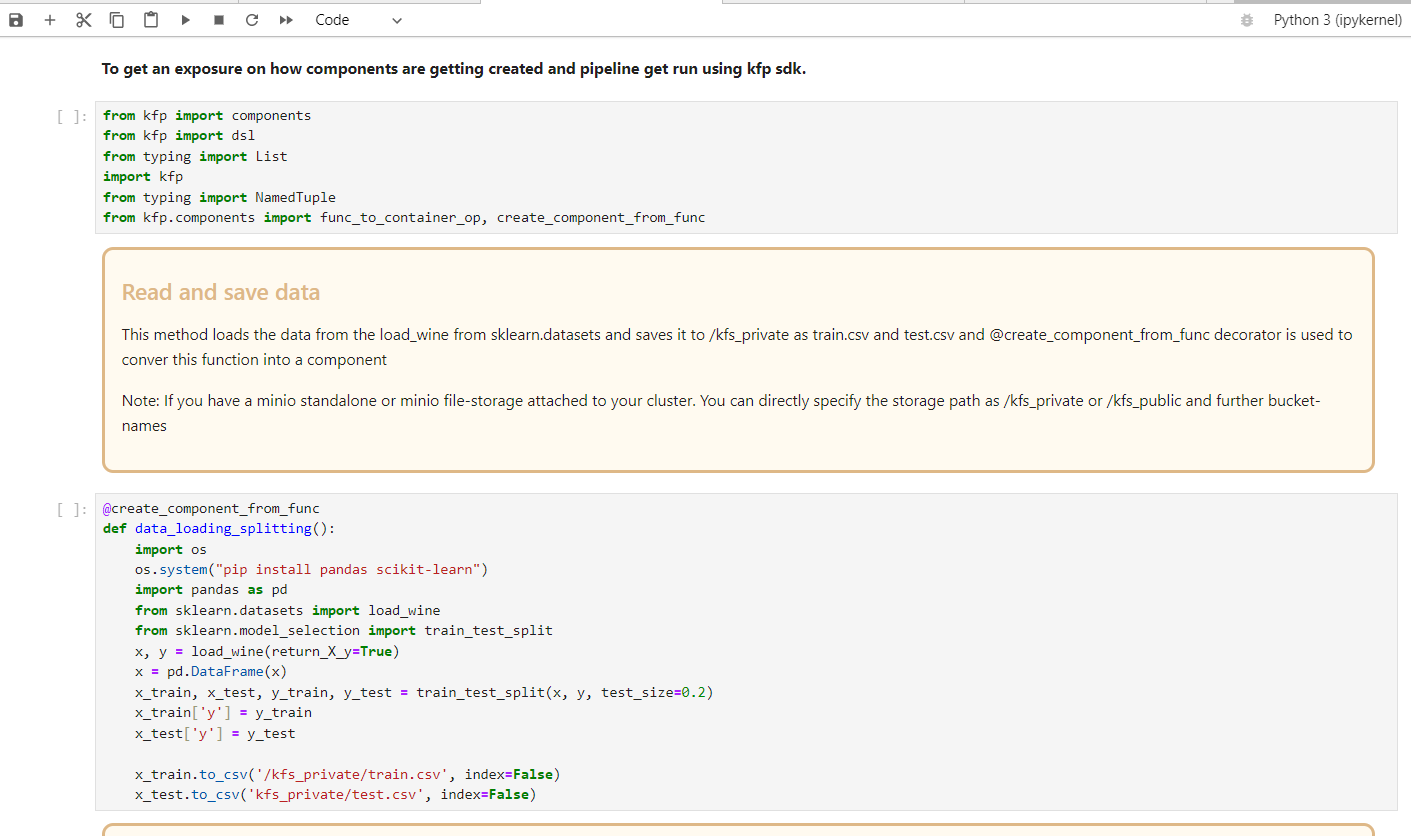
First create a code function e.g def data_loading() or a app.py file where a single step of data_loading function is mentioned. Attatch a docker image to the container using the component decorator.
@component_from_func
def data_loading(input_params) -> output_params
The above two lines will convert your function to kfp component further you can attach the base-image/docker image to it using data_loading_cmp.container.image='container-registry img path'
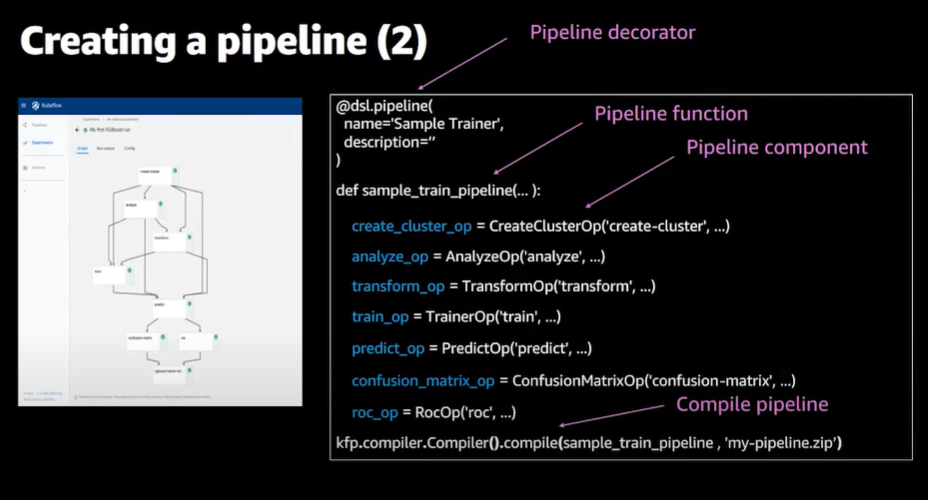
Now after designing all components in the above format, let's combine all together and create a workflow using @dsl.pipeline decorator.
@dsl.pipelinedecorator looks like a normal Python function, it is an expression of pipeline topology and control flow semantics, constructed using the KFP domain-specific language (DSL).
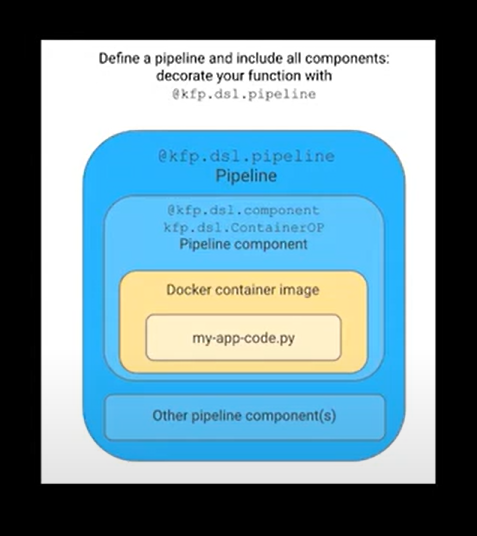
Finally In order to run the pipeline/workflow we first need to convert it into a YAML backed by Argo. So to convert python exceution to Yaml we need to compile the pipeline using Compile method of kfp.
Further, you execute that YAML on our kubernetes environment using argo workflows.

- Below is more detailed overview on how to create and combine components together to create a flow:)
Now you know the theory.. Let's do some practical🥳. If you're new to kubeflow checkout my previous articles regarding kubeflow setup, launch kubeflow notebook etc.
For explanation further, you can launch your notebook and start creating pipeline cod on kubeflow platform
4. Sample pipeline building example using kubeflow sdk
Note: The code is available on GitHub Link. You can skip the section and directly start executing the pipeline and experimentation on your own. else follow me😁.
No Fancy!! Stuff for a sample pipeline guide is created further, Just to explain in-depth about pipelines and how kfp sdk==1.8.1. can be utilized to create efficient ML pipelines for your production project.
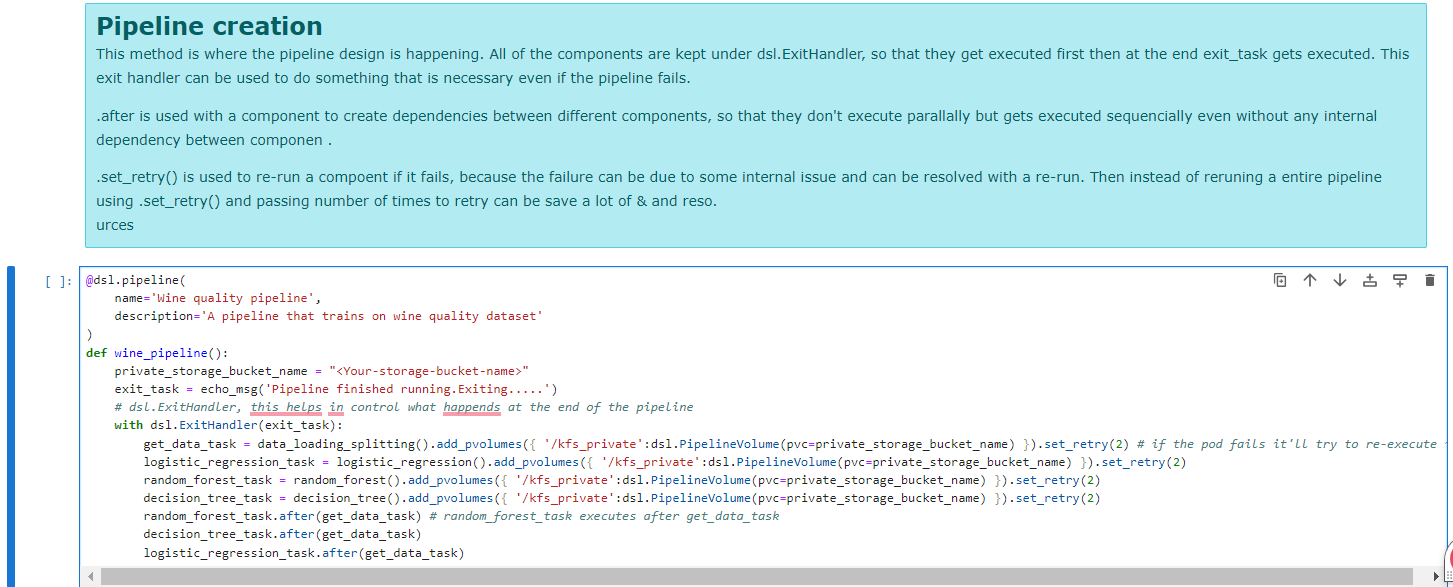
- Components: Let's first start creating components using @create_comp_from_func decorator.
This decorator converts normal function into a kubeflow component, which contains metadata, Input/output defined if components are sharing the data in between others, Image_path which is an env setup for a code or application to run as a container.
Created 5 components: data loading and splitting -> Modelling -> Exit status msg.
The above component becomes a container with default image attatched py3 base-image. but we can setup our own image to the component.. how to do it discussed further. The OS-level or run-time dependencies can also be added to an image, instead in code as above.

Define Pipeline workflow functions
Run the YAML or worfkflow or components on the kubeflow platform.

Now after compiling and running the pipeline from notebooks. you can see under-pipelines section, pipeline_fun_<some_id>. Below is the pipeline created and it has successfully run. if failed you can check the logs, pod yaml, i/o etc.
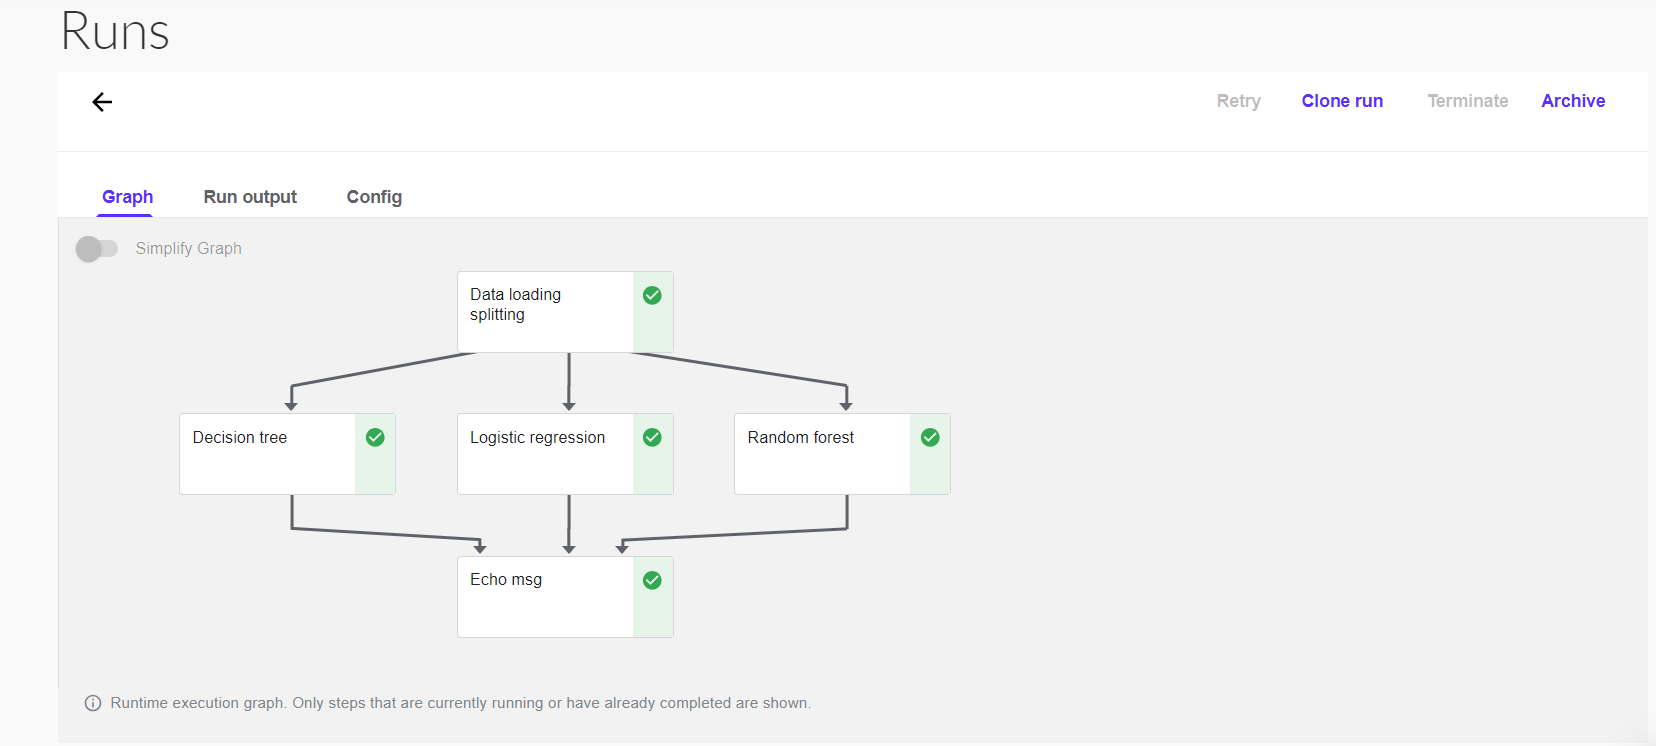
Yeahhhh.. You created your first kfp pipeline.
Ta Da!!! Bonus Time
5. Schedule the pipeline using Recurring Runs.
The main aim of pipelines is to run the workflow/pipeline daily as per our need. Hence where Recurring Runs comes in to the picture. we can schedule our pipelines.
Let's see how!!
So, the pipeline that we launched earlier, setup experiment and it's yaml. all are required and get imported during recurring runs. Checkout that below
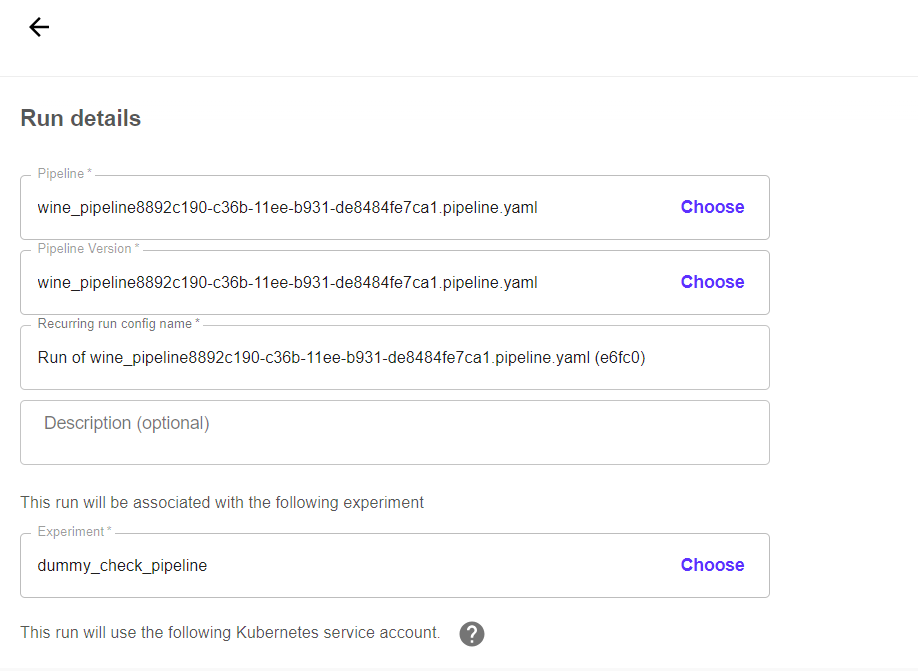
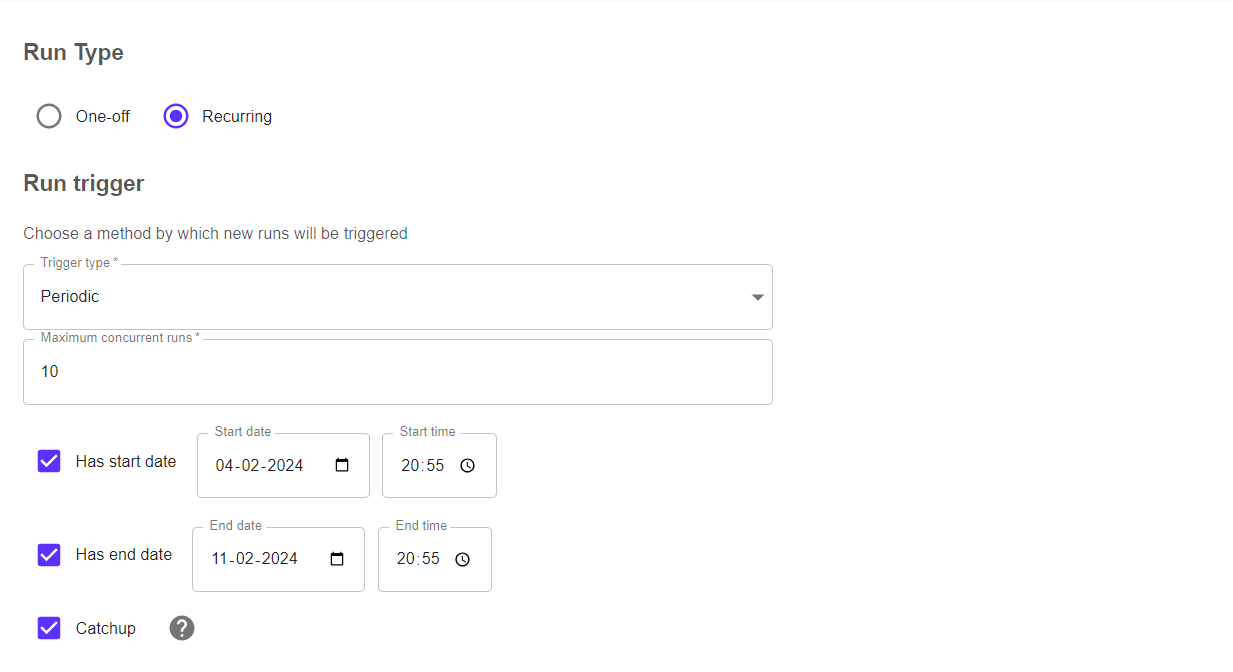
Choose Run Type: one-off means after certain time i.e. one-day/week/month pass.
If Recurring, whewe have options to setup and define custom period , start/end date, concurrent runs.
Run parameters are the params which we define on run-time i.e. some pipeline params/hyperparameters whose values needs to be changed on time.
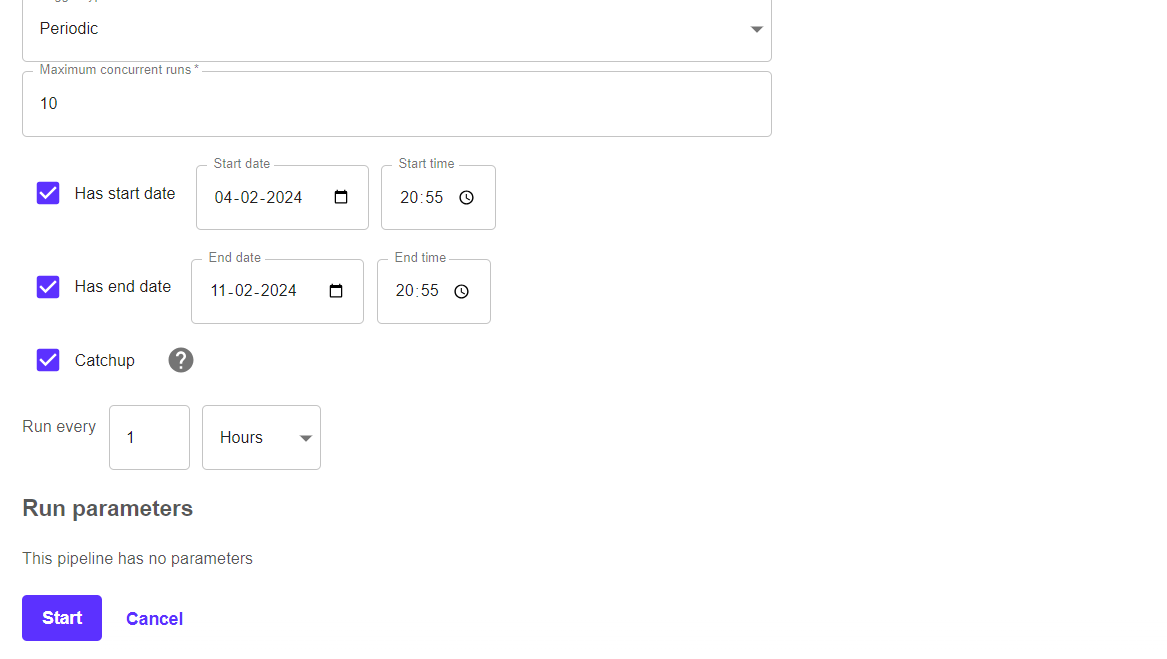
Now after click on start.. you pipelines will automatically runs and fetches new data, cleans-transforms-encode-split-validate and trains the model on daily basis as per our customization.
Hurrray!! You now become expert at kfp.. You can try experimenting with various kfp decorators/components and it's design by following official_doc.
In-next article I'm going to explain how to do model experimentation and model logging, model staging, and Best model registering, using mlflow. So follow me to not miss my articles on teckbakers, connect with me on linkedin, github, kaggle.
Let's Learn and grow together:) Stay Healthy stay Happy✨. Happy Learning!!


